Input Configuration
-
For this tutorial, we will be using the new Unity Input system.
-
Those w/ prior Unity experience may still know how inputs were taken from the user before the addition of the new system (done mostly within code)
-
However, with the new system, we can easily configure different actions for our player asset with custom made action maps and key bindings (you can even configure controllers!)
Quick disclaimer:
- Unity, as part of the new input system, provides an auto-generated input actions asset called InputSystem_Actions.inputactions.
- This comes with a lot of presets already assigned for character movement and UI navigation.
- If you prefer to use it, then skip to step 10. Otherwise, continue onward.
Let's get started!
- Navigate out of the updated_assets folder (if you're following along from the previous page) into the Assets folder.
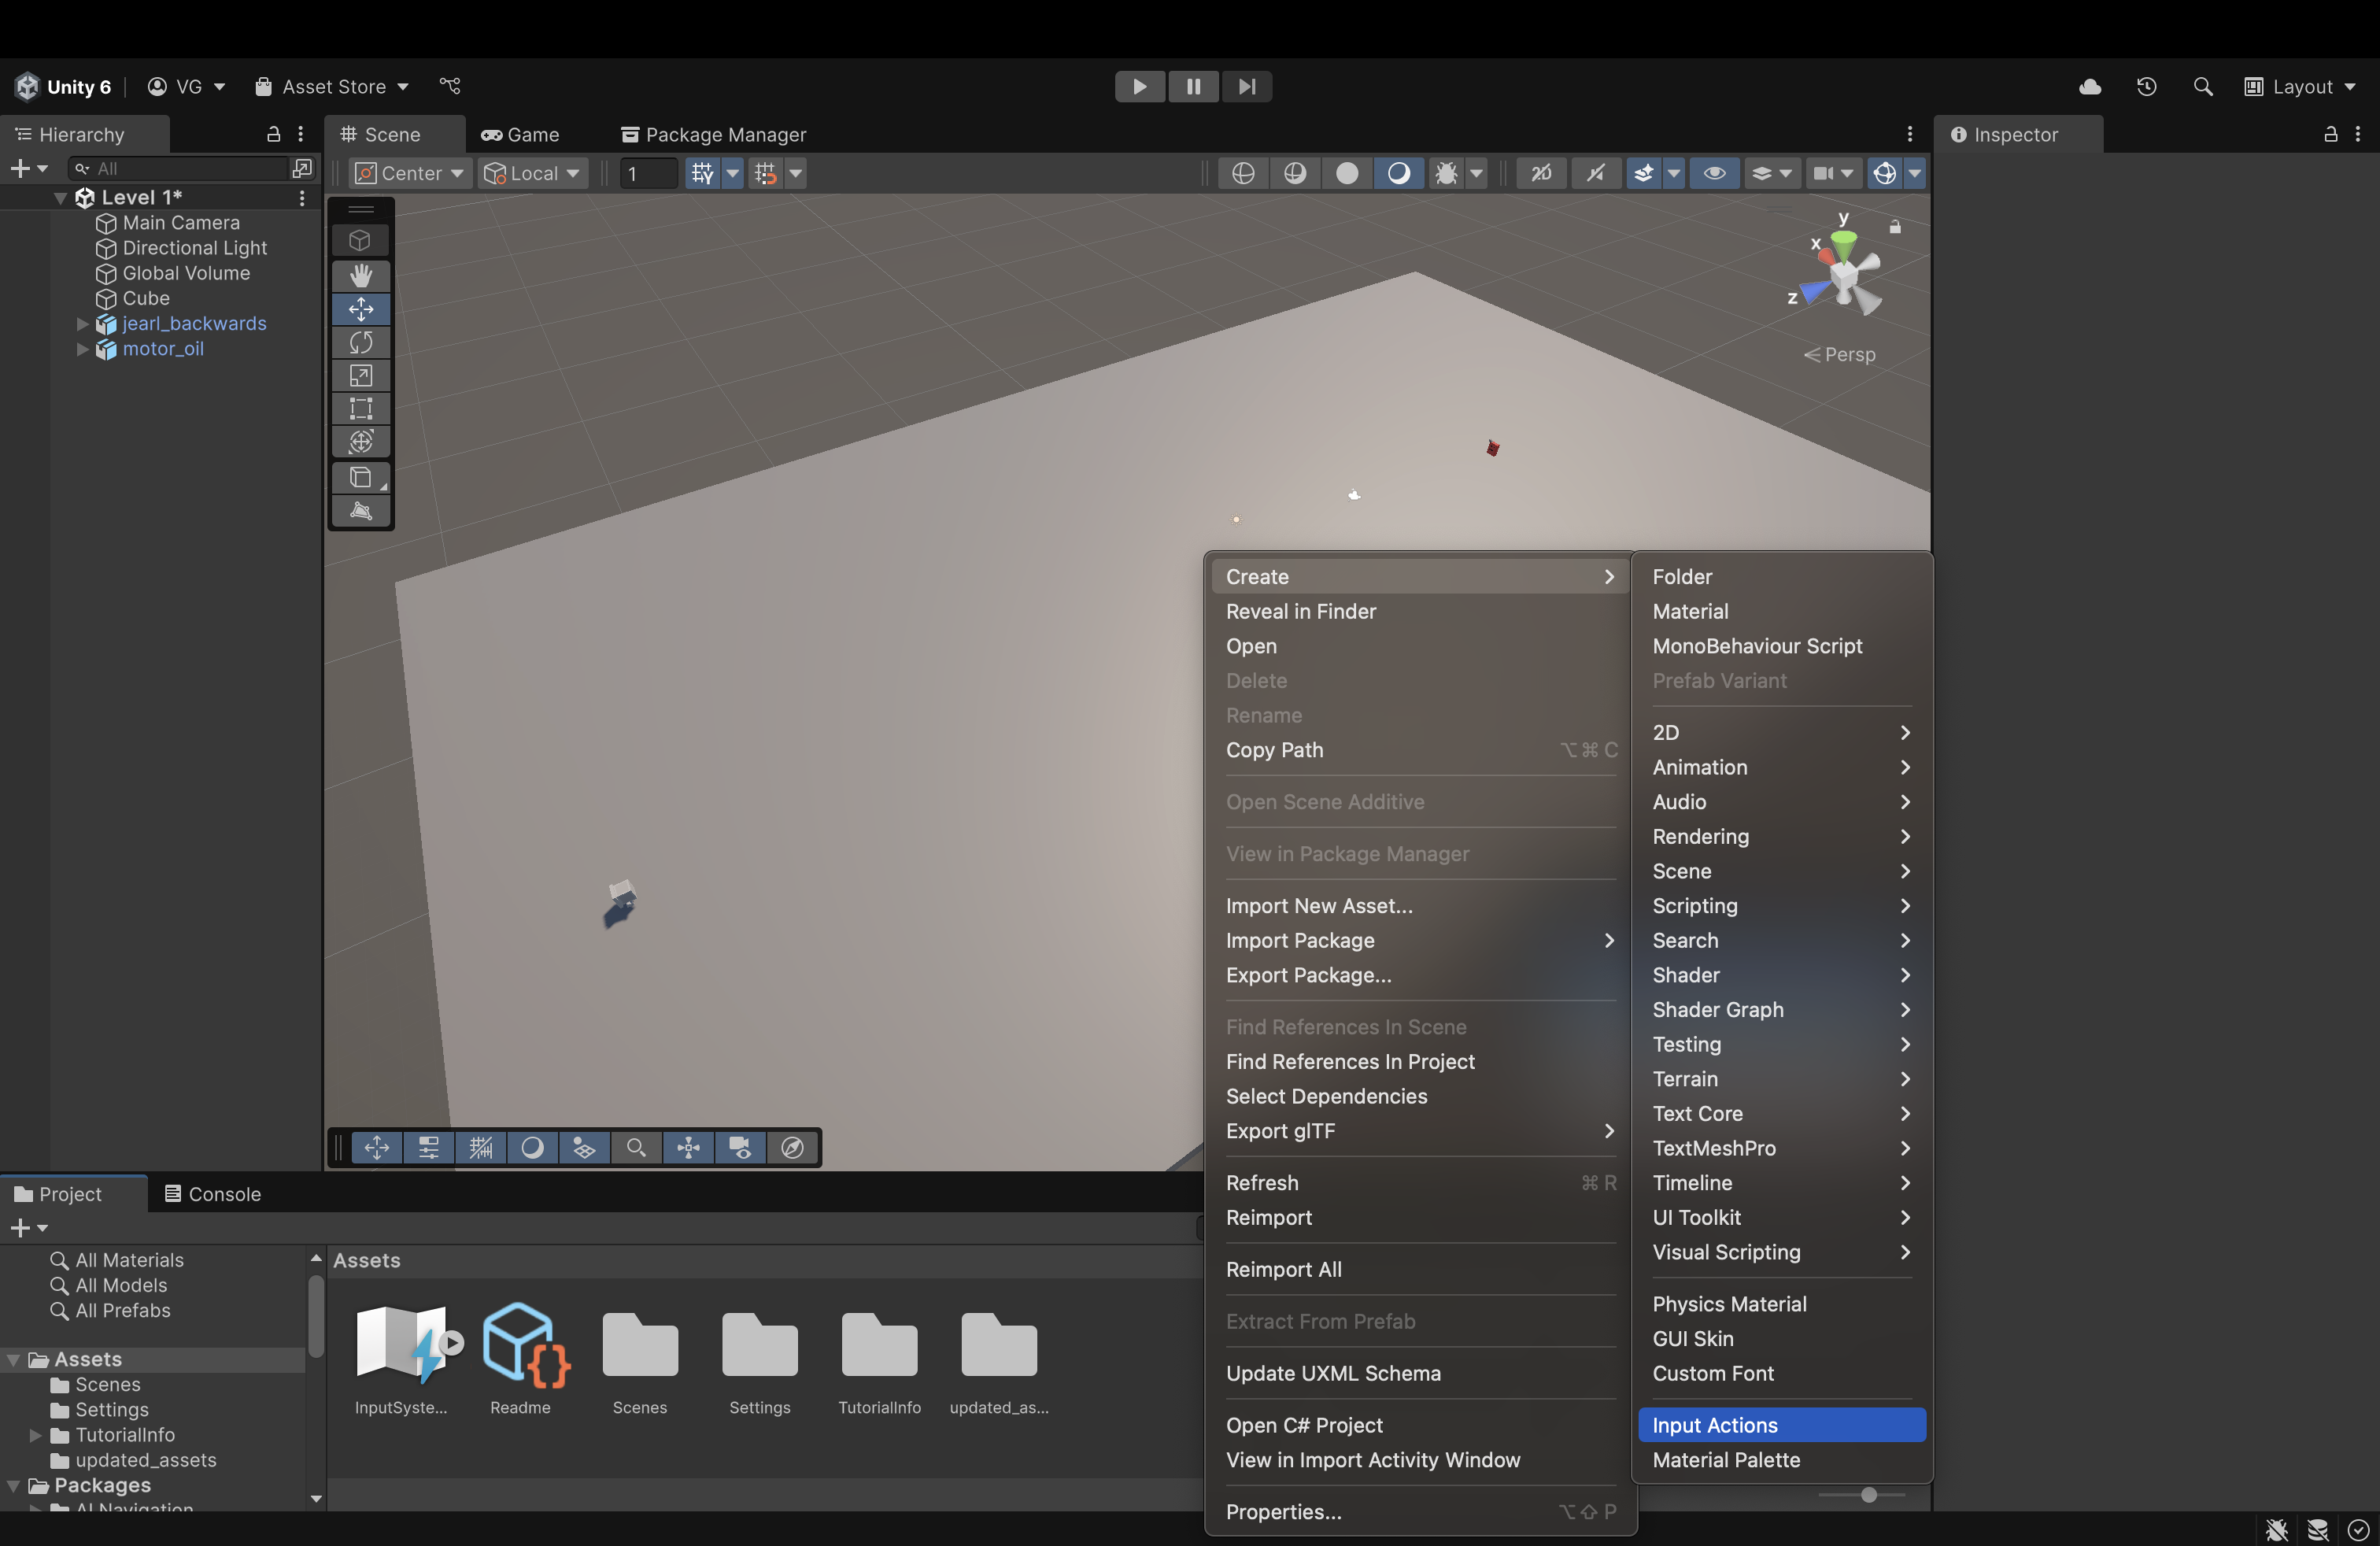
- In the Assets folder in the File View below, right-click, hover over Create and find the Input Actions option. Click it to create a new Input Actions Asset.
- Unity will prompt you to enter a new name for it.
- I named mine "Player_Control" but you can name it whatever you want. Henceforth, I will refer to it using this name
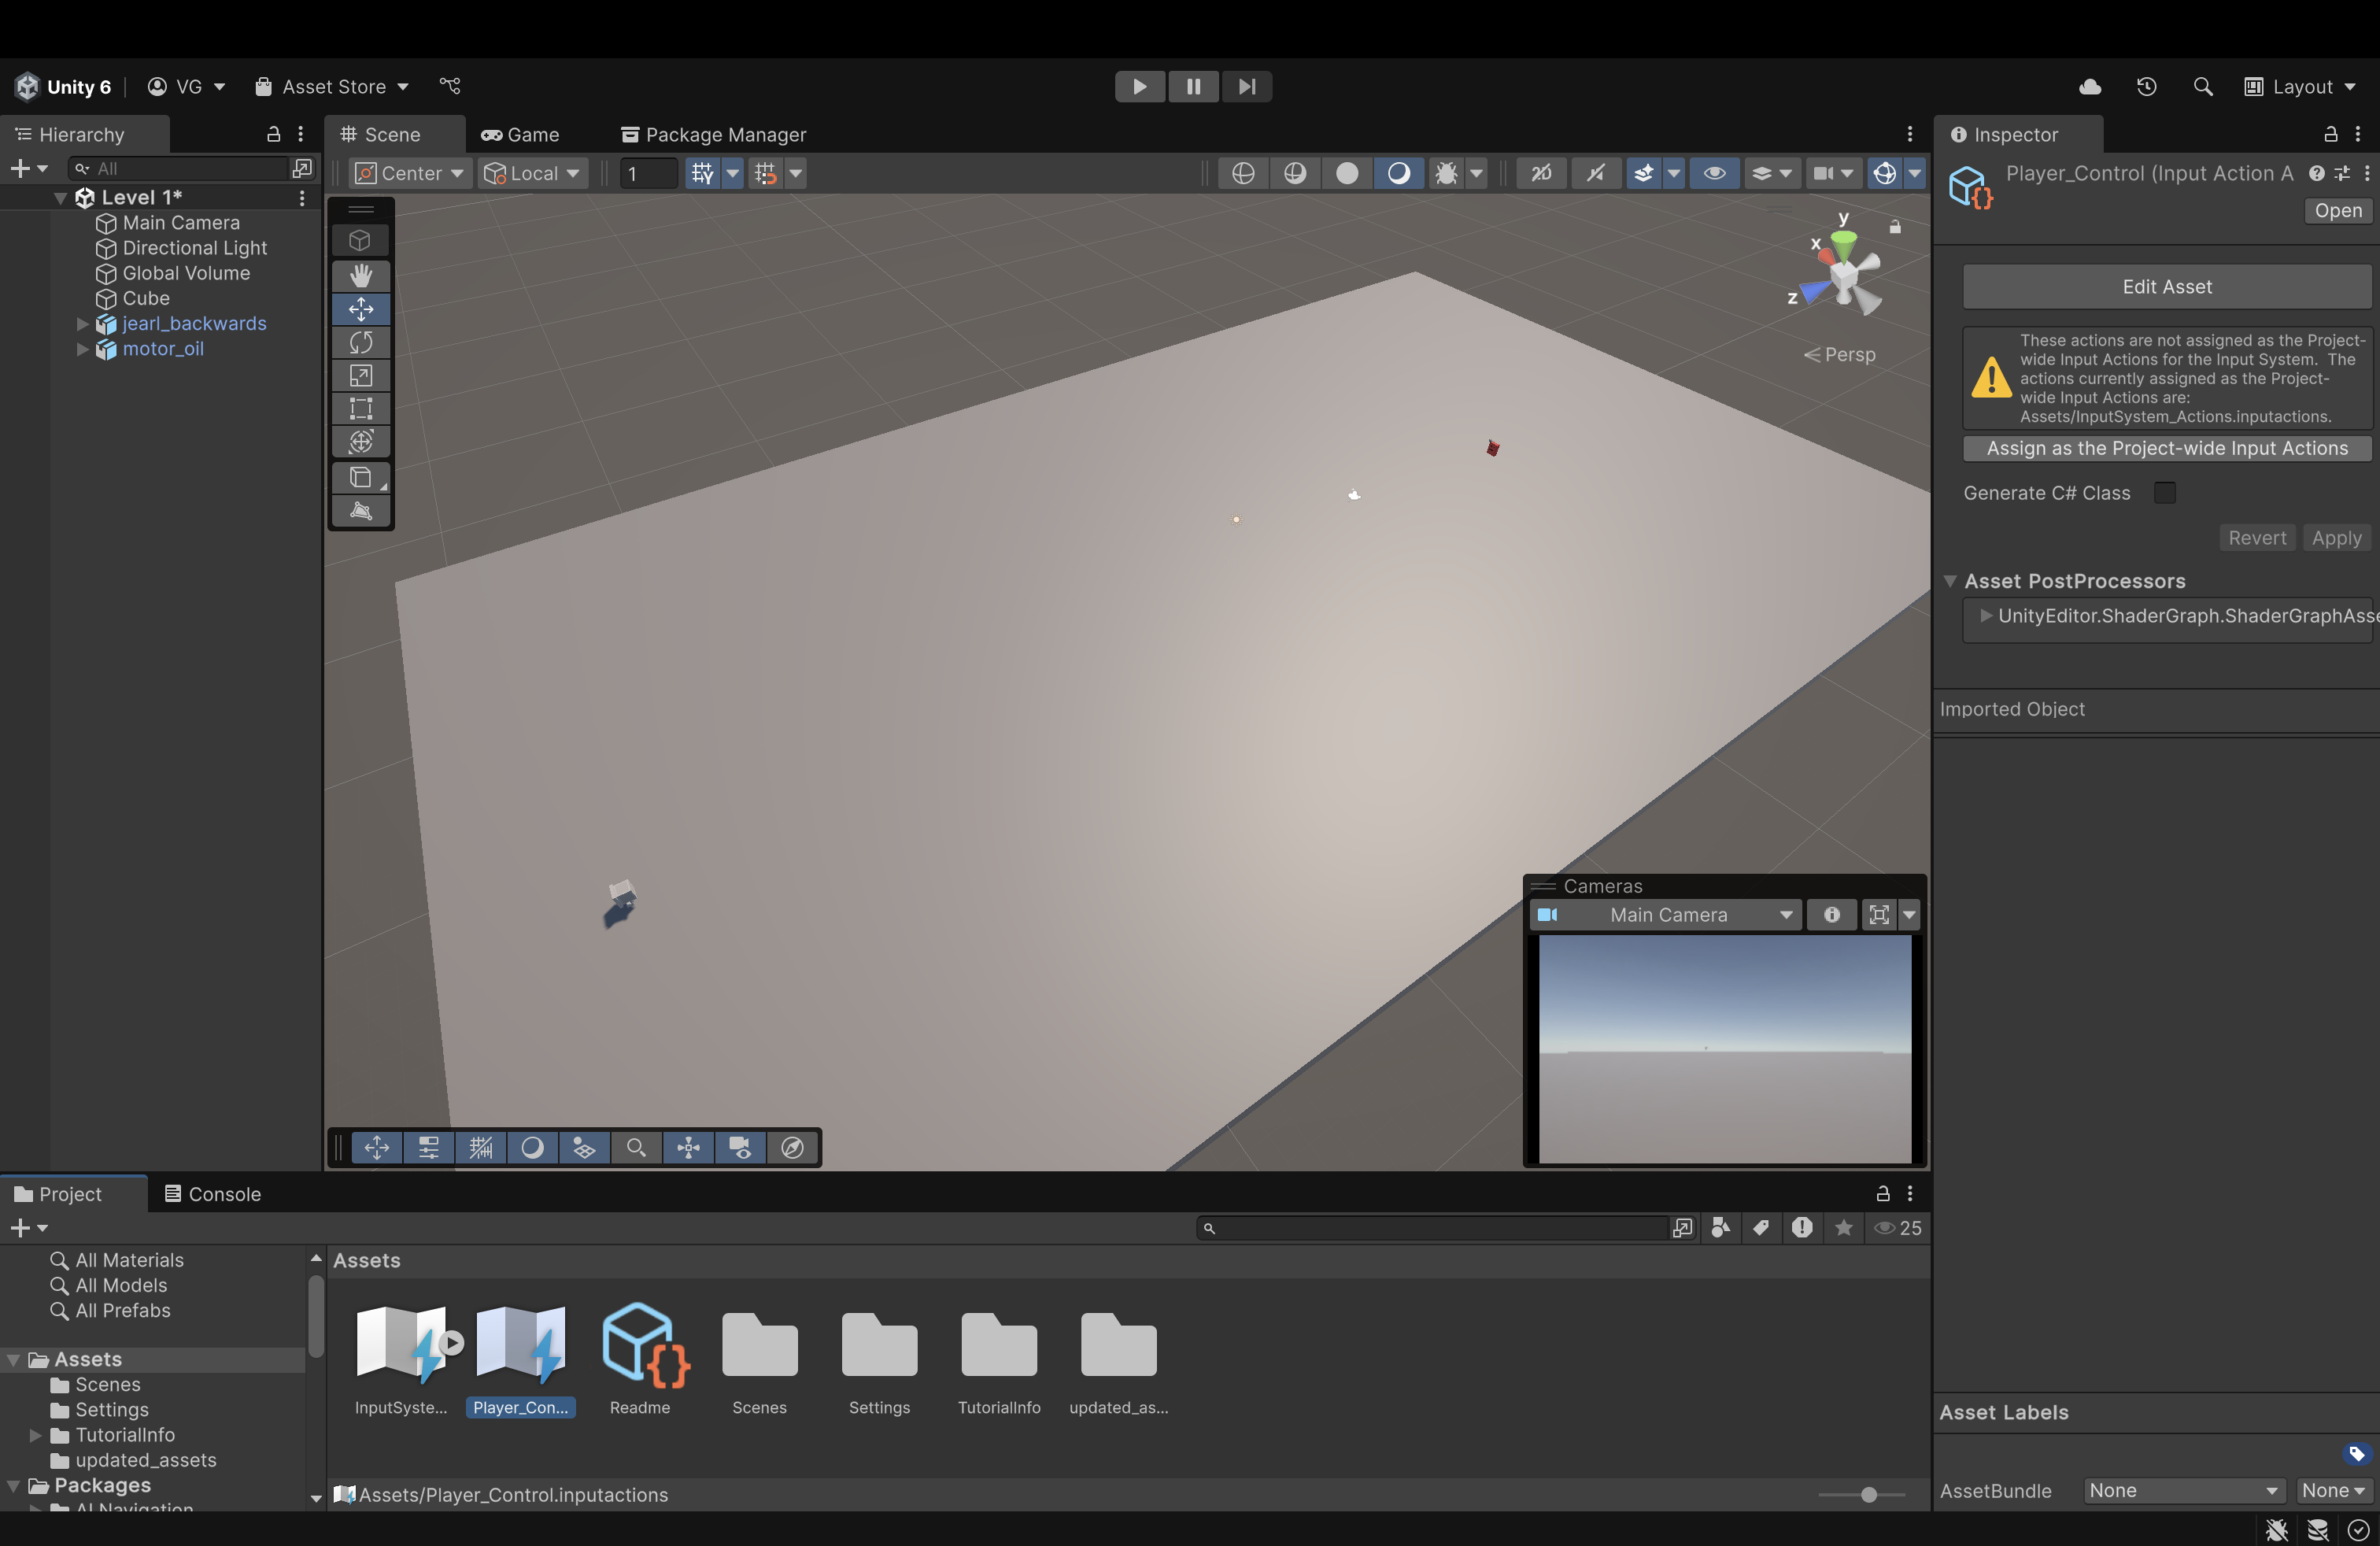
- On the right, in the Component Panel, click Assign as the Project-wide Input Actions. This ensures that our inputs stay consistent and that we don't run into any unexpected errors.
Now, double-click Player_Control to open it in a separate window and dock it next to the Scene and Game view.
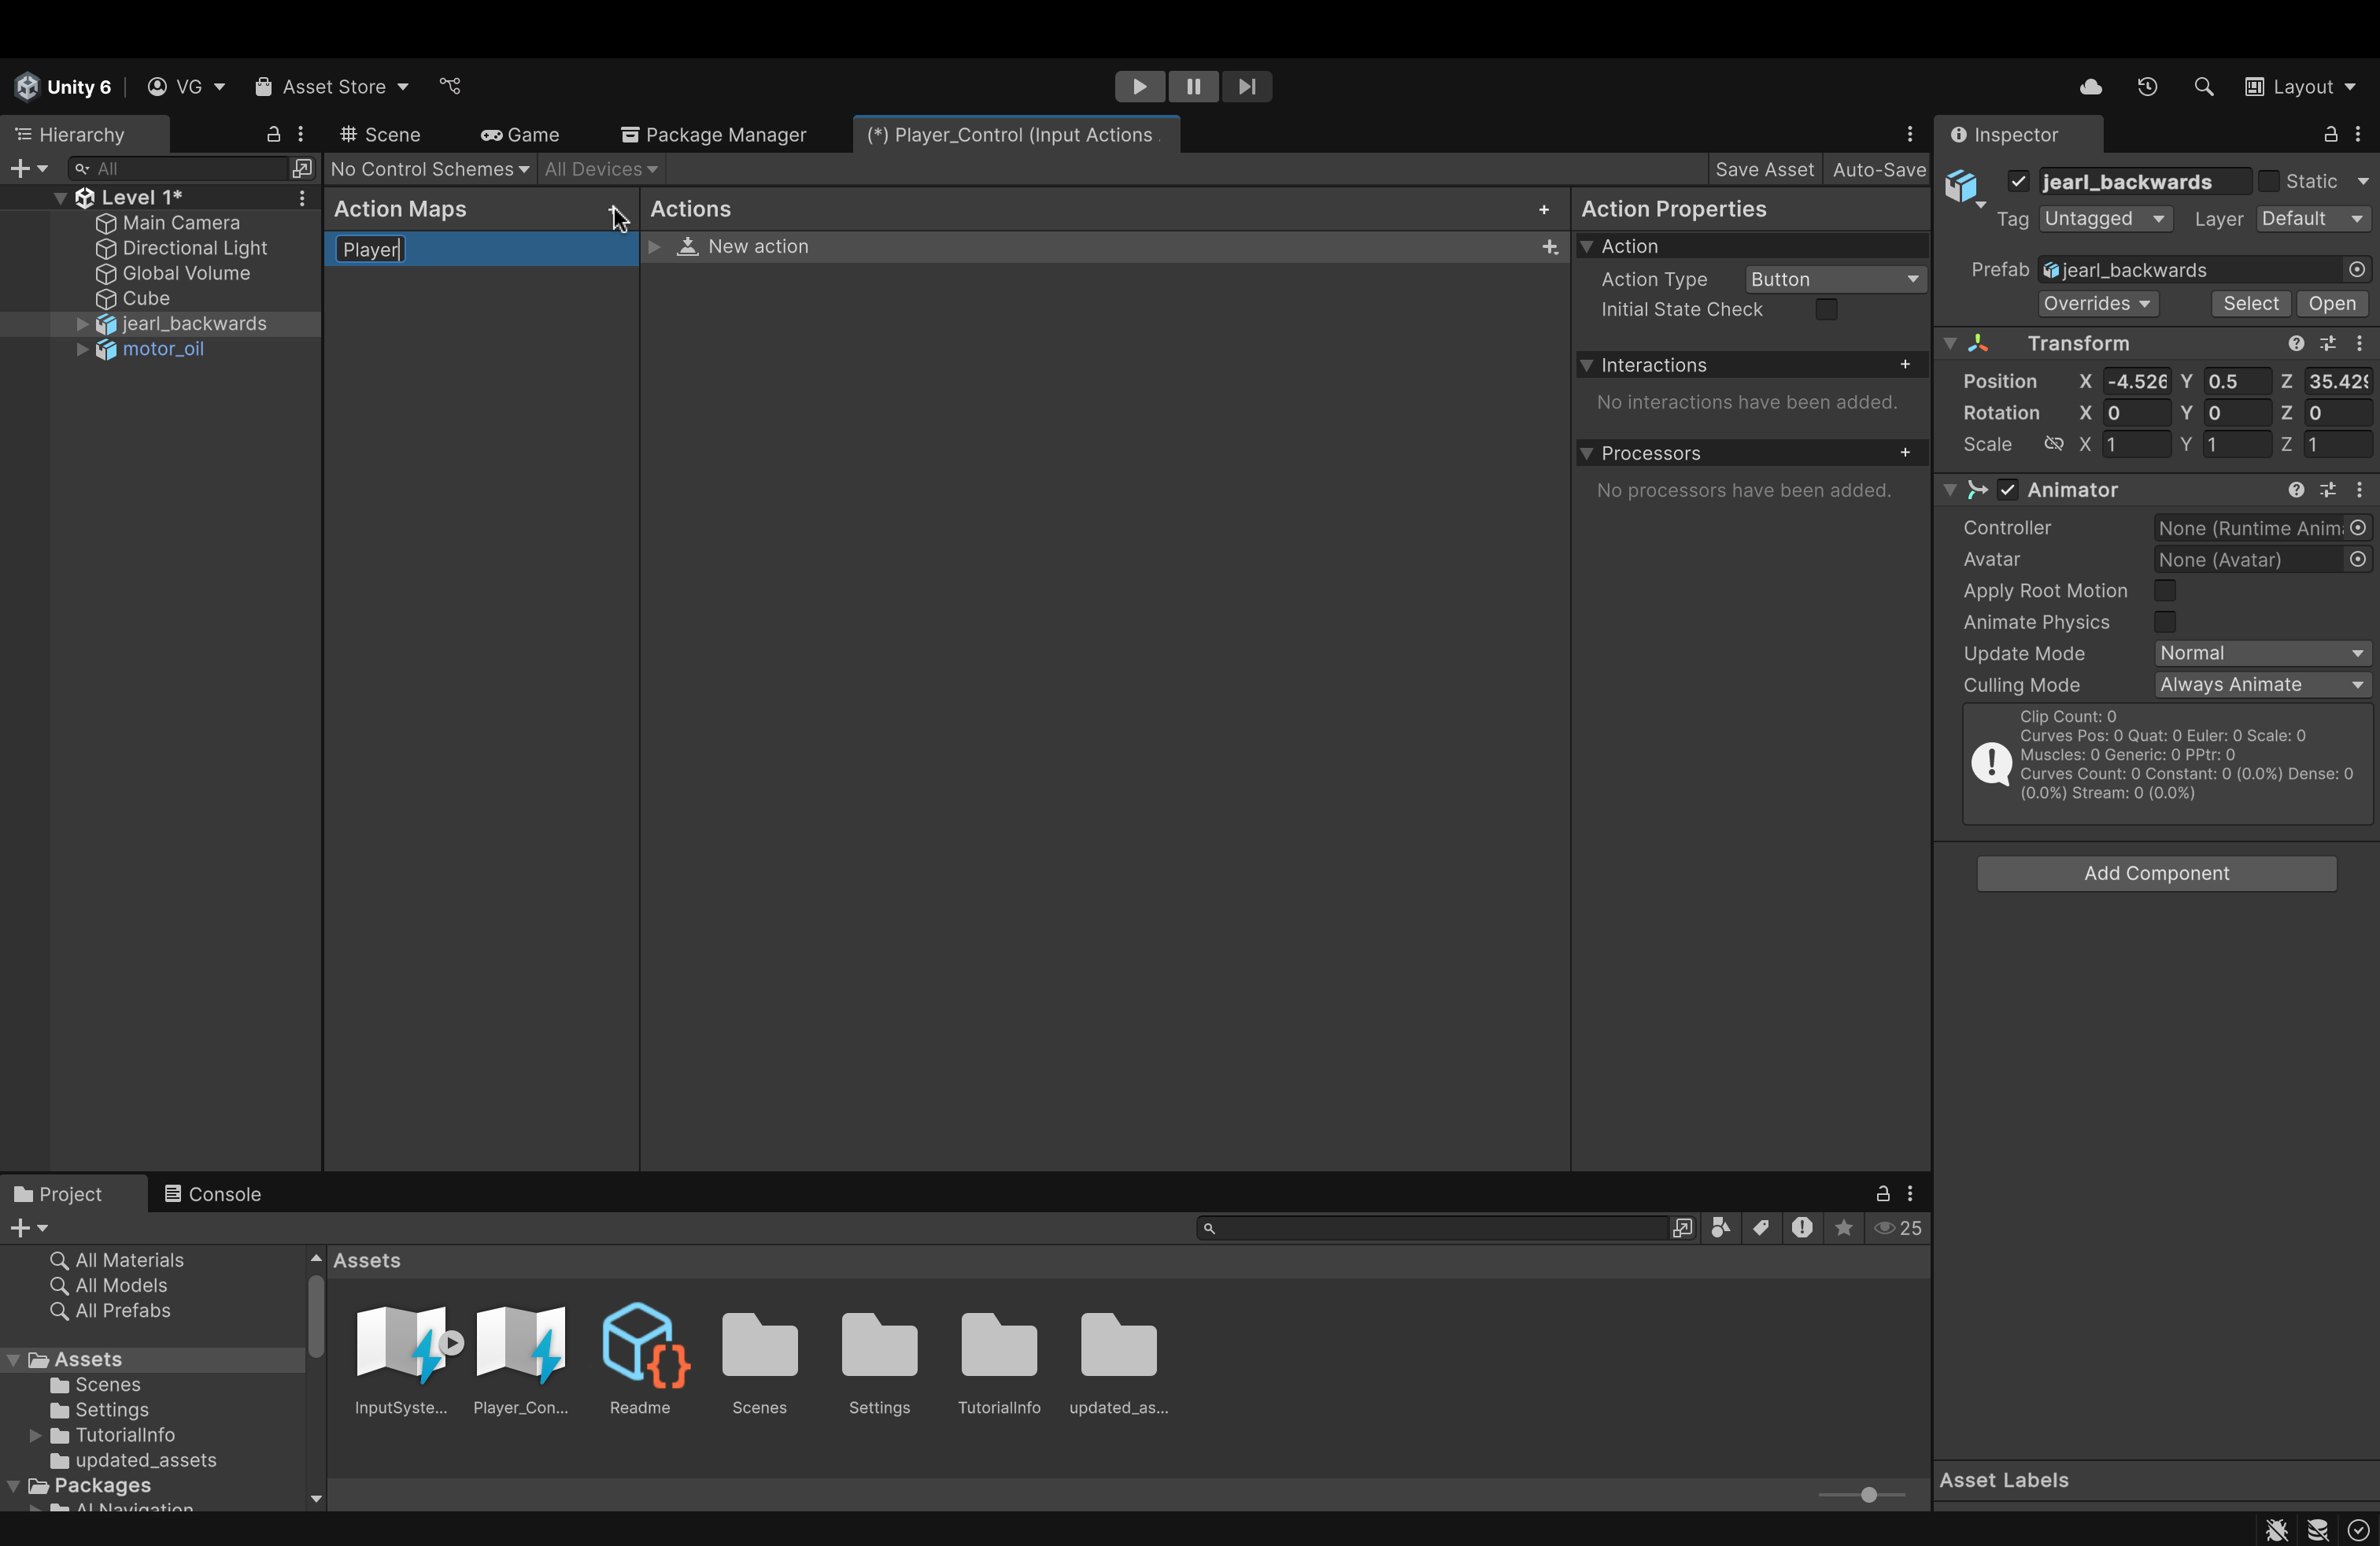
- On the left, in the Action Maps panel, create a new action map called Player by clicking the plus icon in the top right corner of the panel.
-
Name it Player
-
An action map is essentially a container that holds bindings (either for a keyboard or for a controller). Once established, this action map (and its associated bindings) can be assigned to whatever asset we want (like jearl_backwards).
-
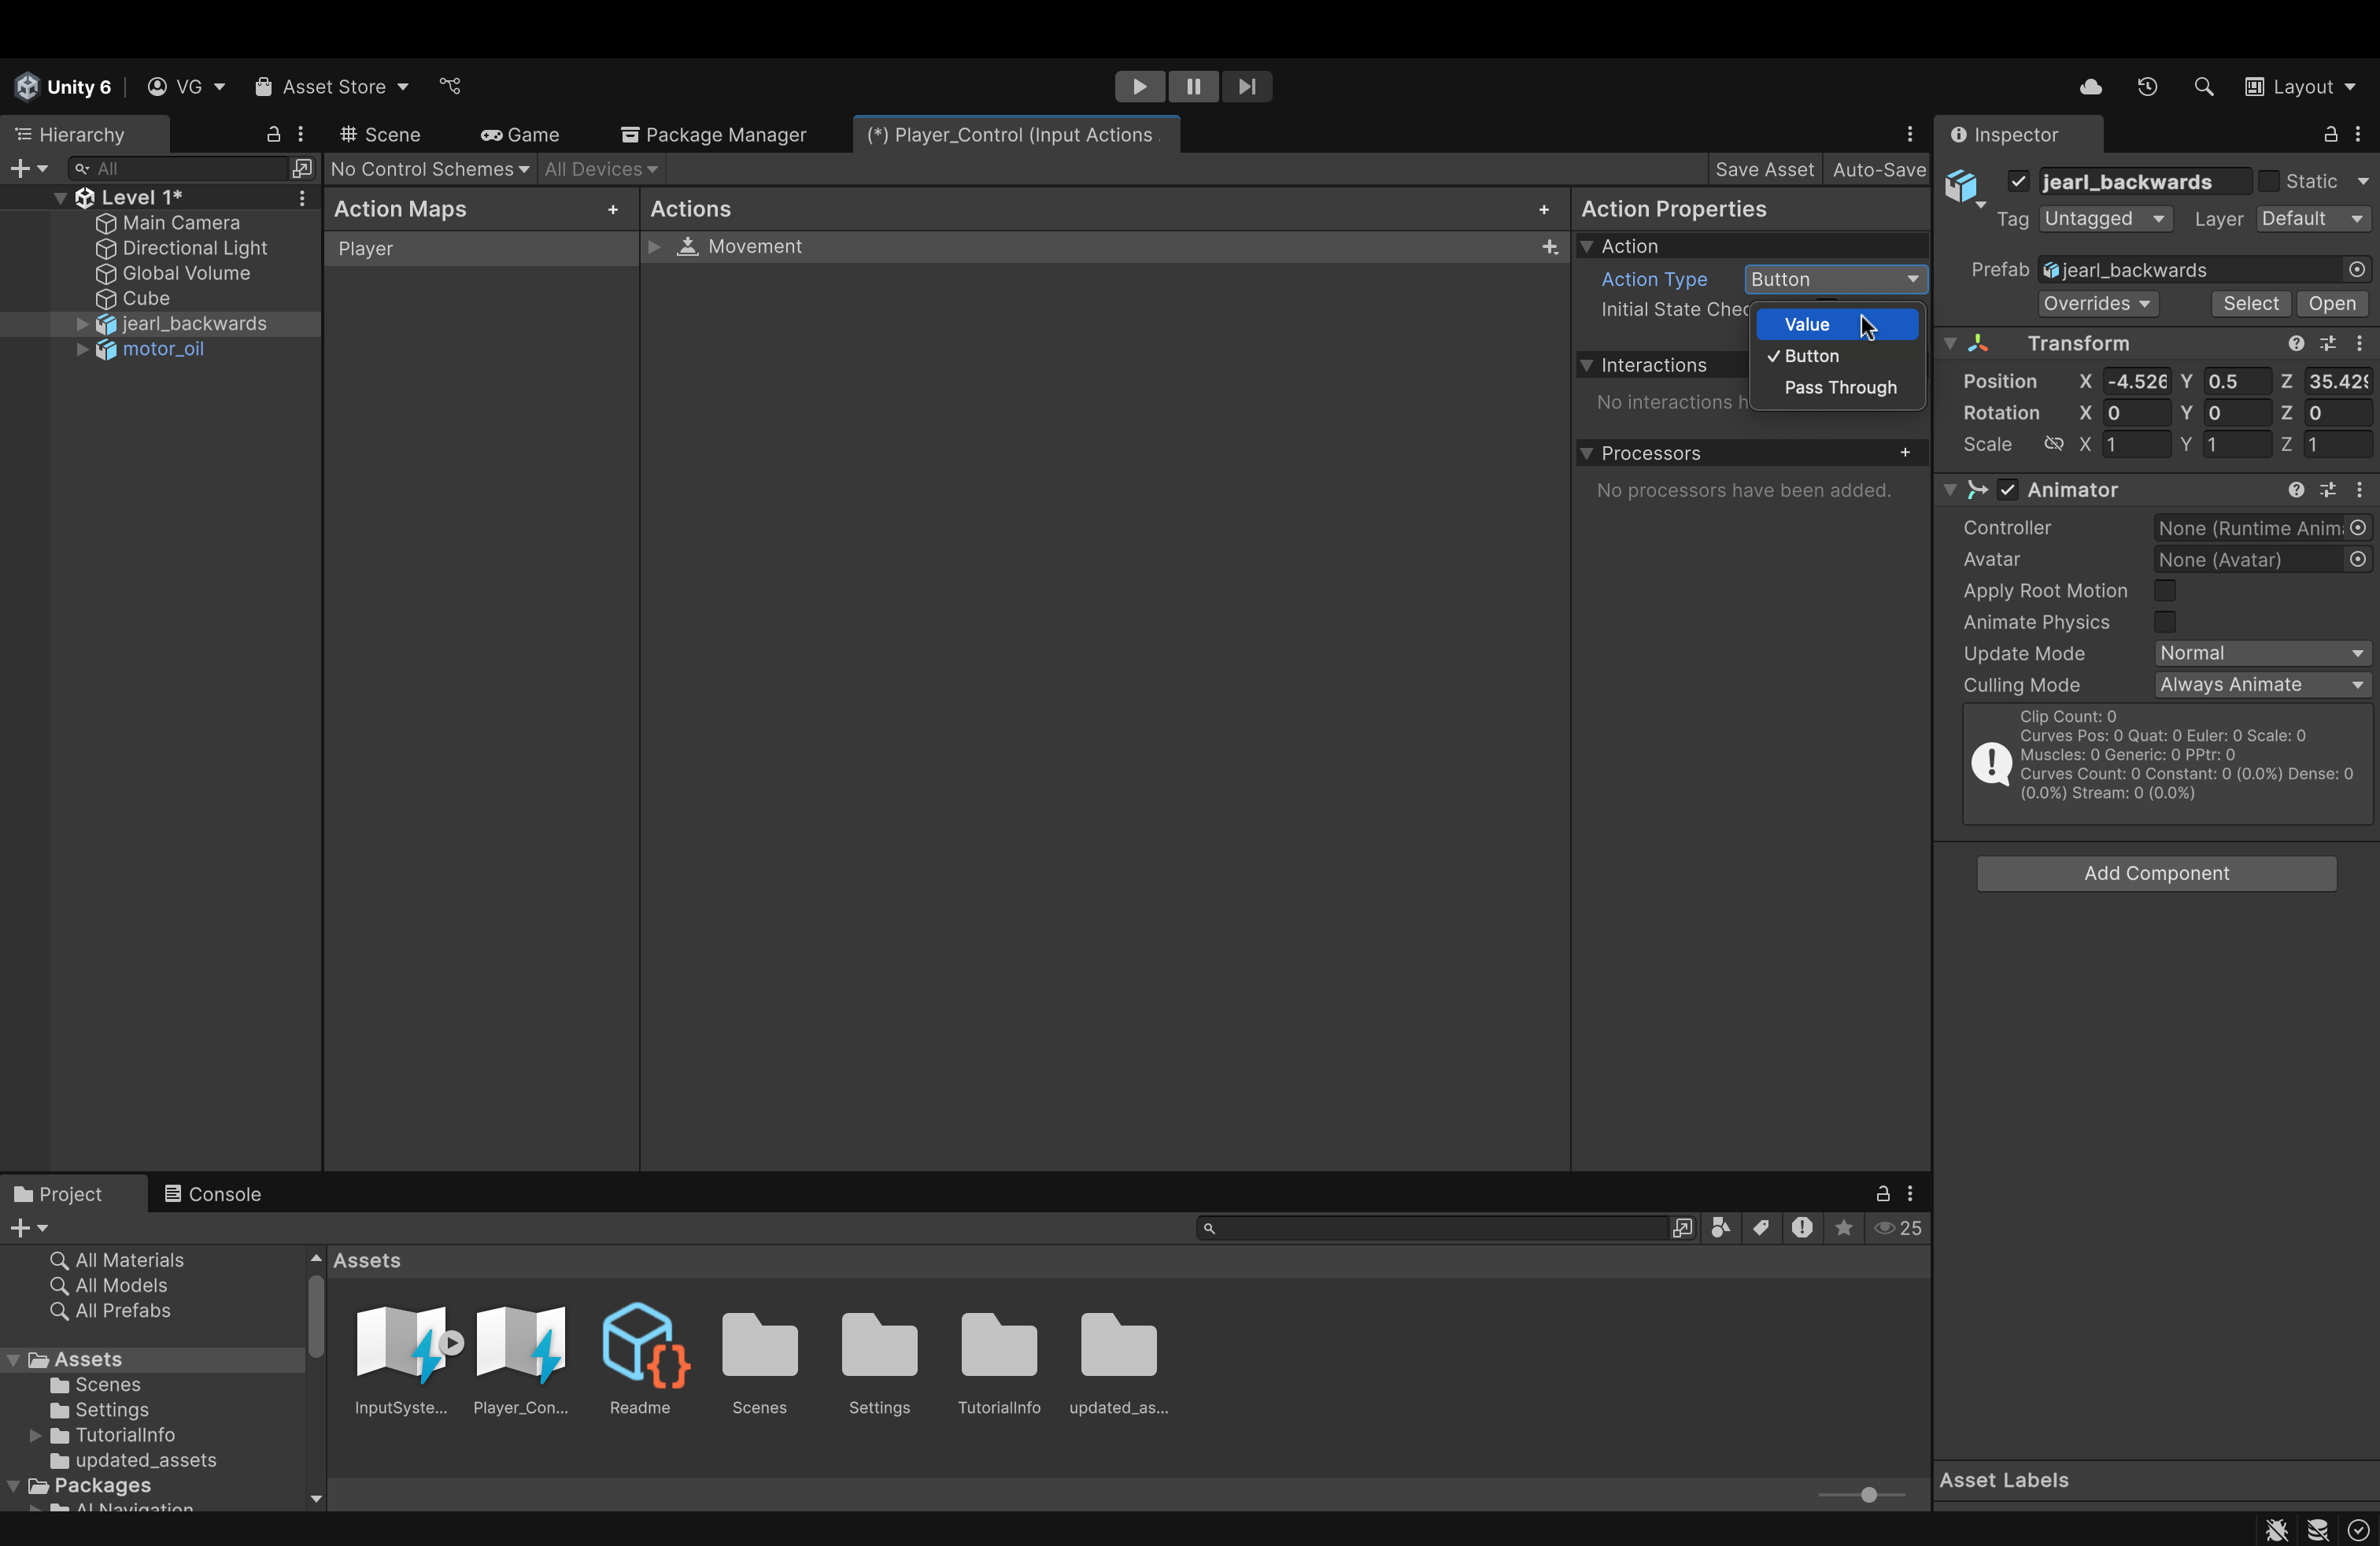
- On the rightmost panel (called Action Properties), change the action type to Value.
- The reason is because, conventionally, movement in games is always done by pressing and holding a button (i.e. it generates a continuous value like "WWWWWWWWW..." for forward movement) unlike jumping, for example, where we press once and don't hold.
- The game engine (and our script) will read that continuous string of W's, interpret it to mean forward movement and, consequently, move our player forward so long as it keeps getting those continuous W's.
- It's not exactly like this but hopefully you get the idea 😁
- It's not exactly like this but hopefully you get the idea 😁

-
In the additional dropdown menu that is spawned underneath Action Type (called Control Type), change its value to Vector 2.
- This is because our movement is only in 2 directions (the x-axis and the z-axis). This is unlike Creative Mode in Minecraft, for example, where we can freely move in any direction.
- We will move in the y-axis (via jumping) but not with continuous movement.
- We will move in the y-axis (via jumping) but not with continuous movement.
- This is because our movement is only in 2 directions (the x-axis and the z-axis). This is unlike Creative Mode in Minecraft, for example, where we can freely move in any direction.

- In the center panel (called Actions), where it says New Action, rename it to Movement.
- Then, click the small plus icon next to Movement (all the way on the right)
- In the menu that pops up, click Add Up\Down\Left\Right Composite.
- If an additional item called No Binding is created, delete it.
- This will automatically create placeholders for 4 movement bindings (for, say, W-A-S-D) and bind/aggregate them into a single 2D vector.
- I haven't tried this yet but you could try manually creating each key binding (without creating the composite). However, you will have to aggregate them yourself in a C# script.
- Using the composite, therefore, will result in less headaches and a cleaner setup.
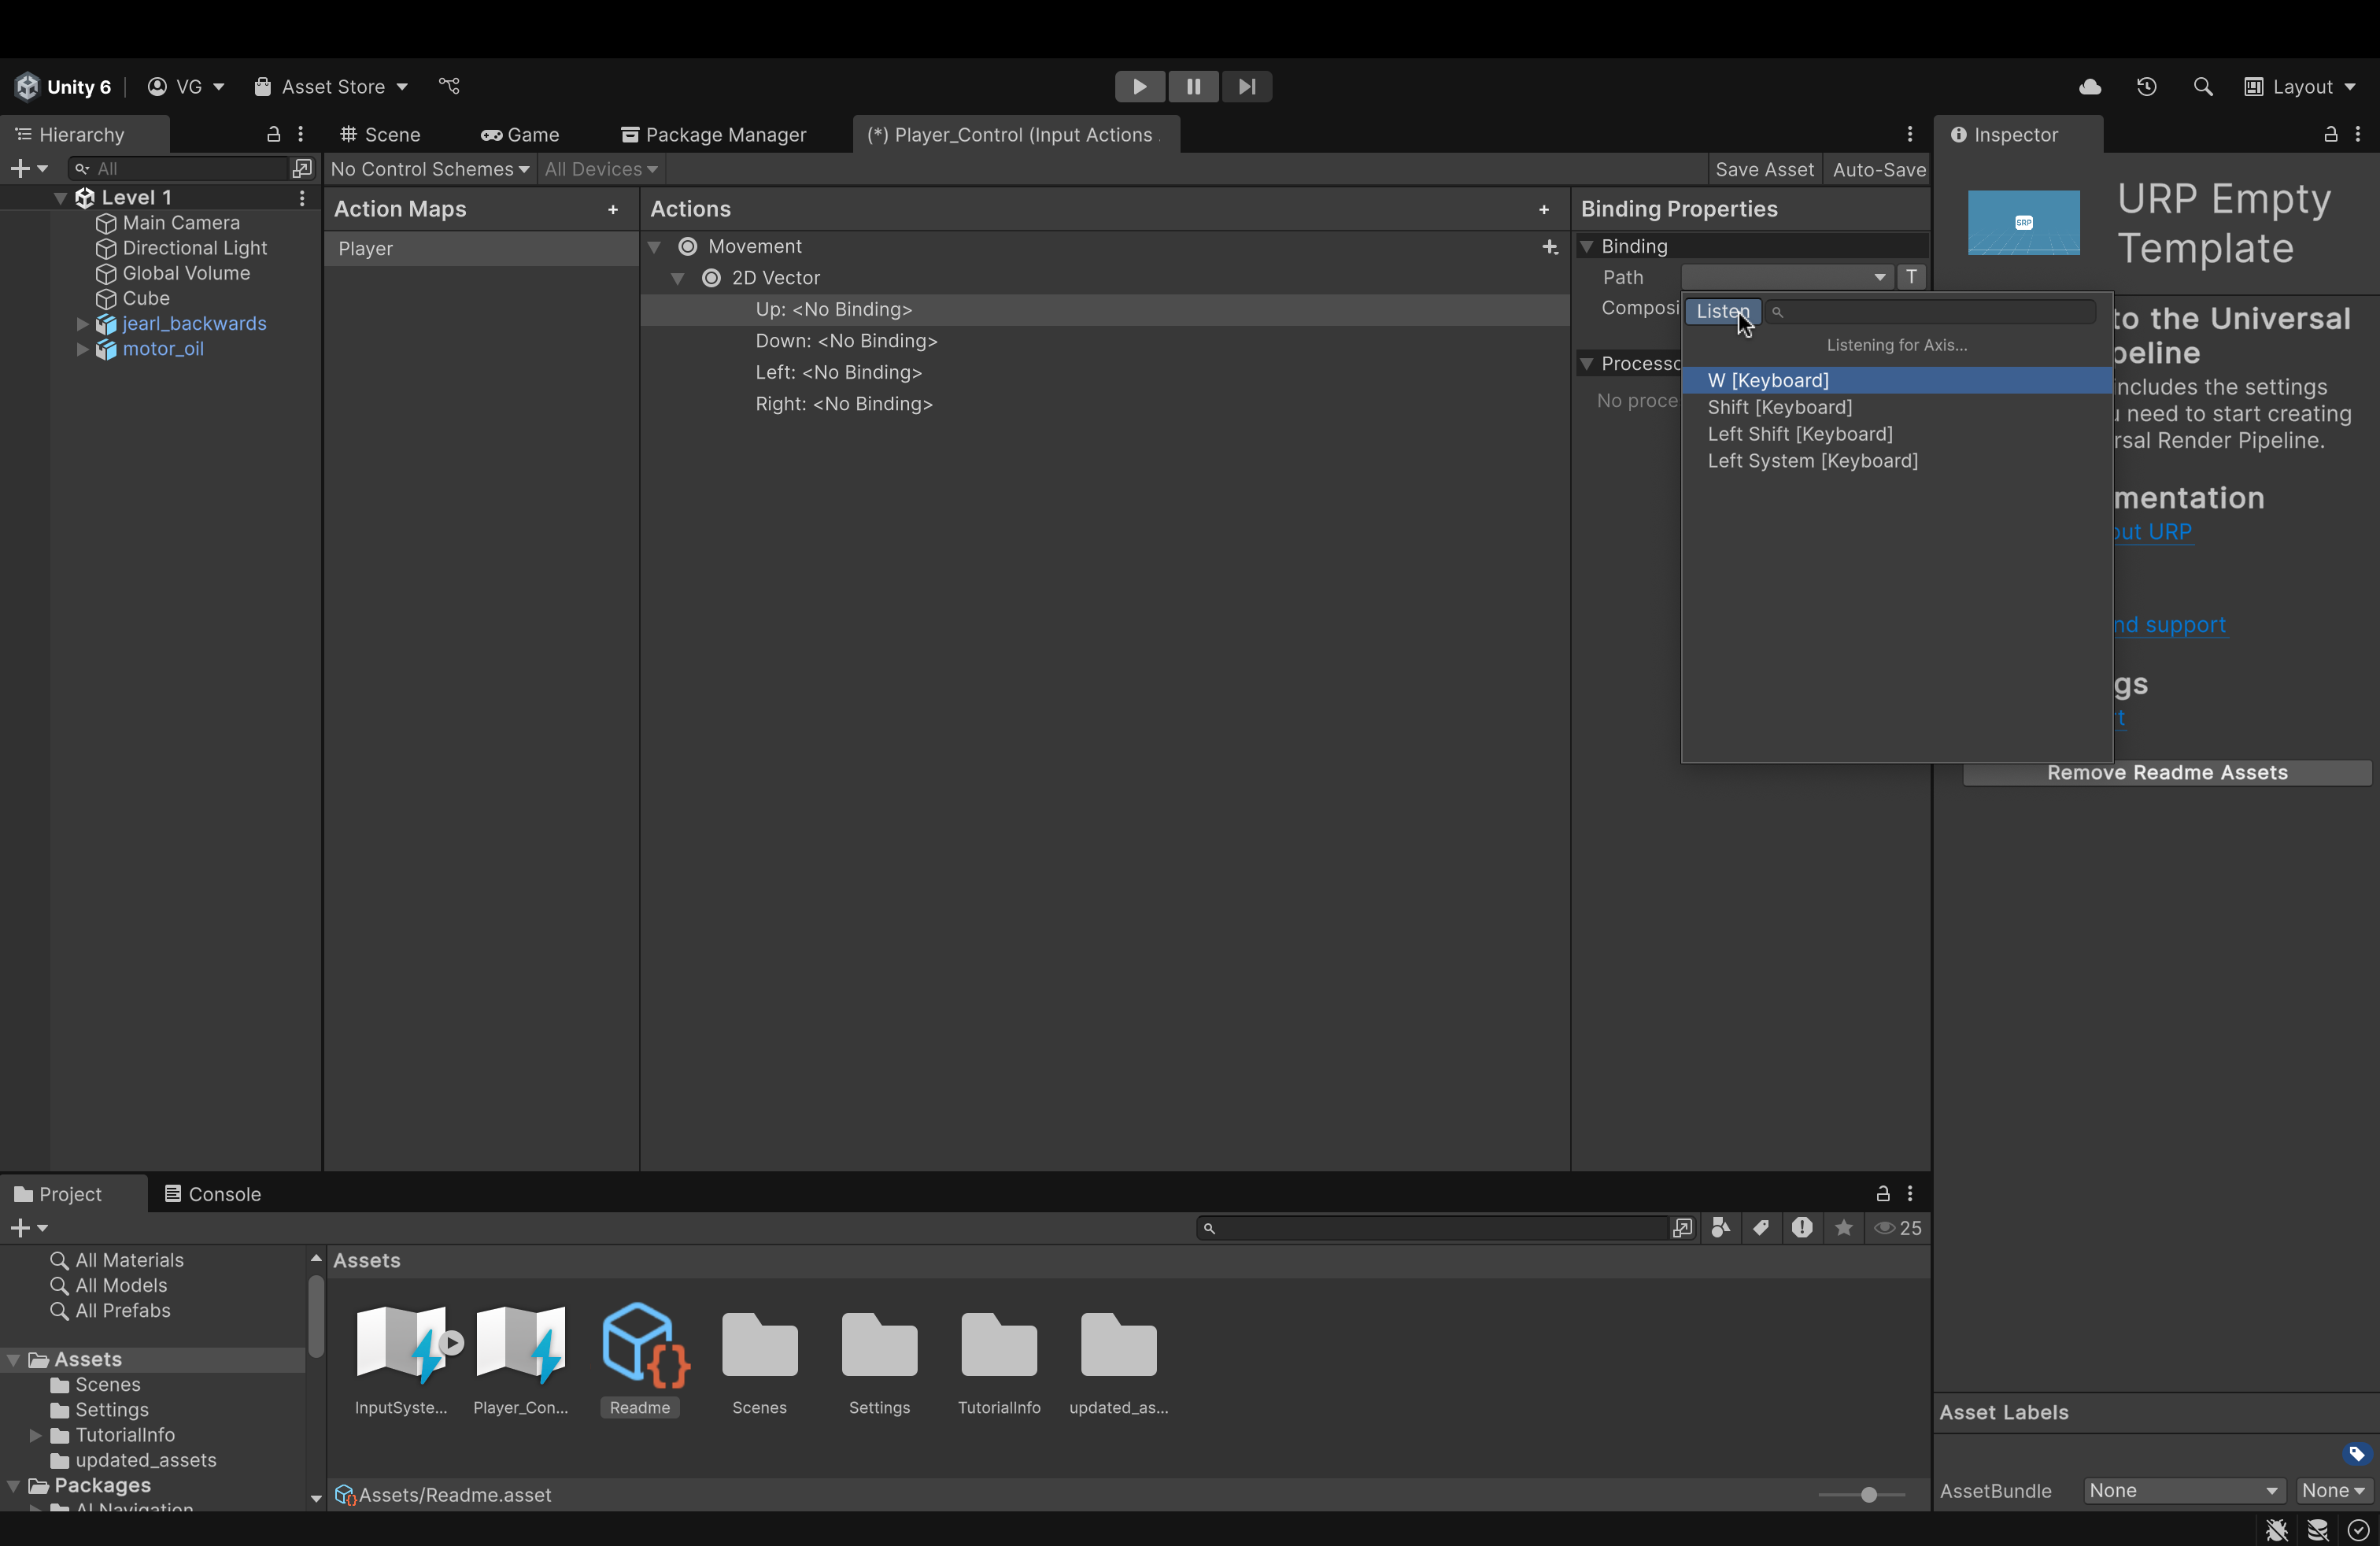
- Expand the dropdown menu of the newly created 2D Vector to show the 4 empty bindings.
- Now, for each binding:
- Click on it in the center panel
- On the right, open the Path dropdown.
- Here, either search for the key to attach to this binding or click the Listen button and press the key you'd wish to attach and it will pop up in the dropdown below.
- Click your desired key to attach it to the Up binding.
- Repeat for all 4 bindings.
- Now, for each binding:
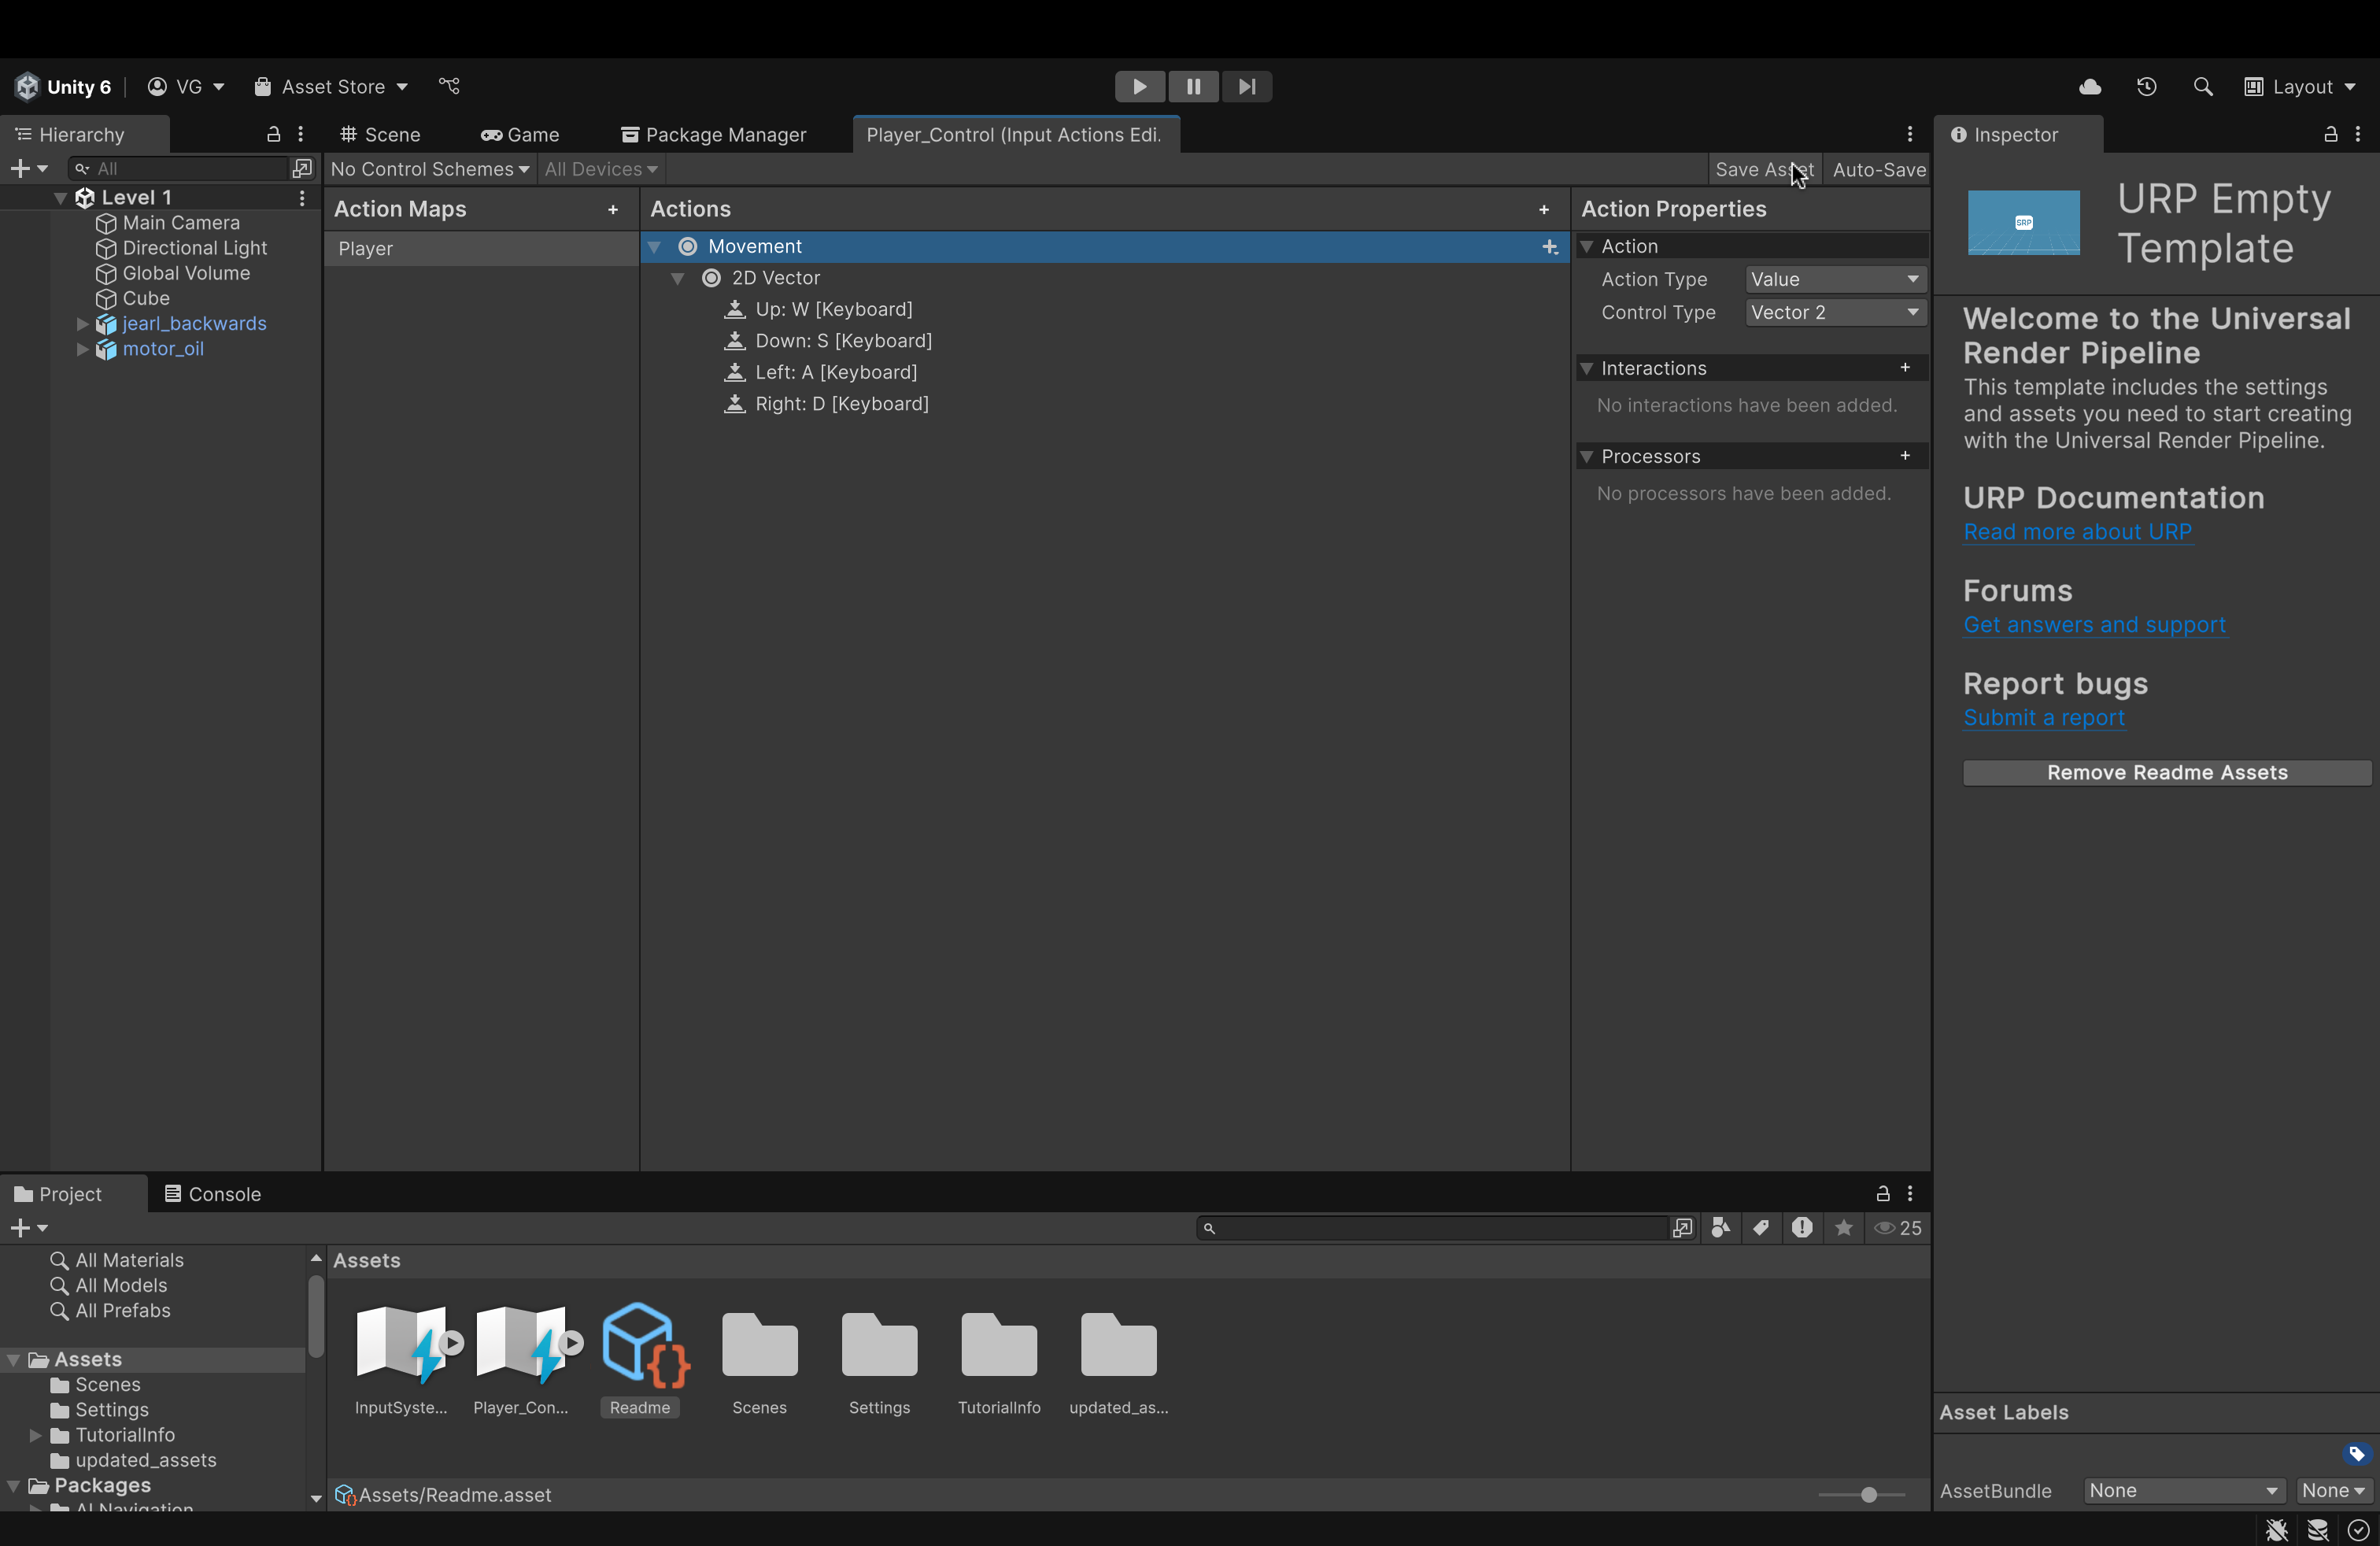
- Up top, in the right corner, click Save Asset to save changes.
- Click on the Scene tab to navigate back to the Scene View.
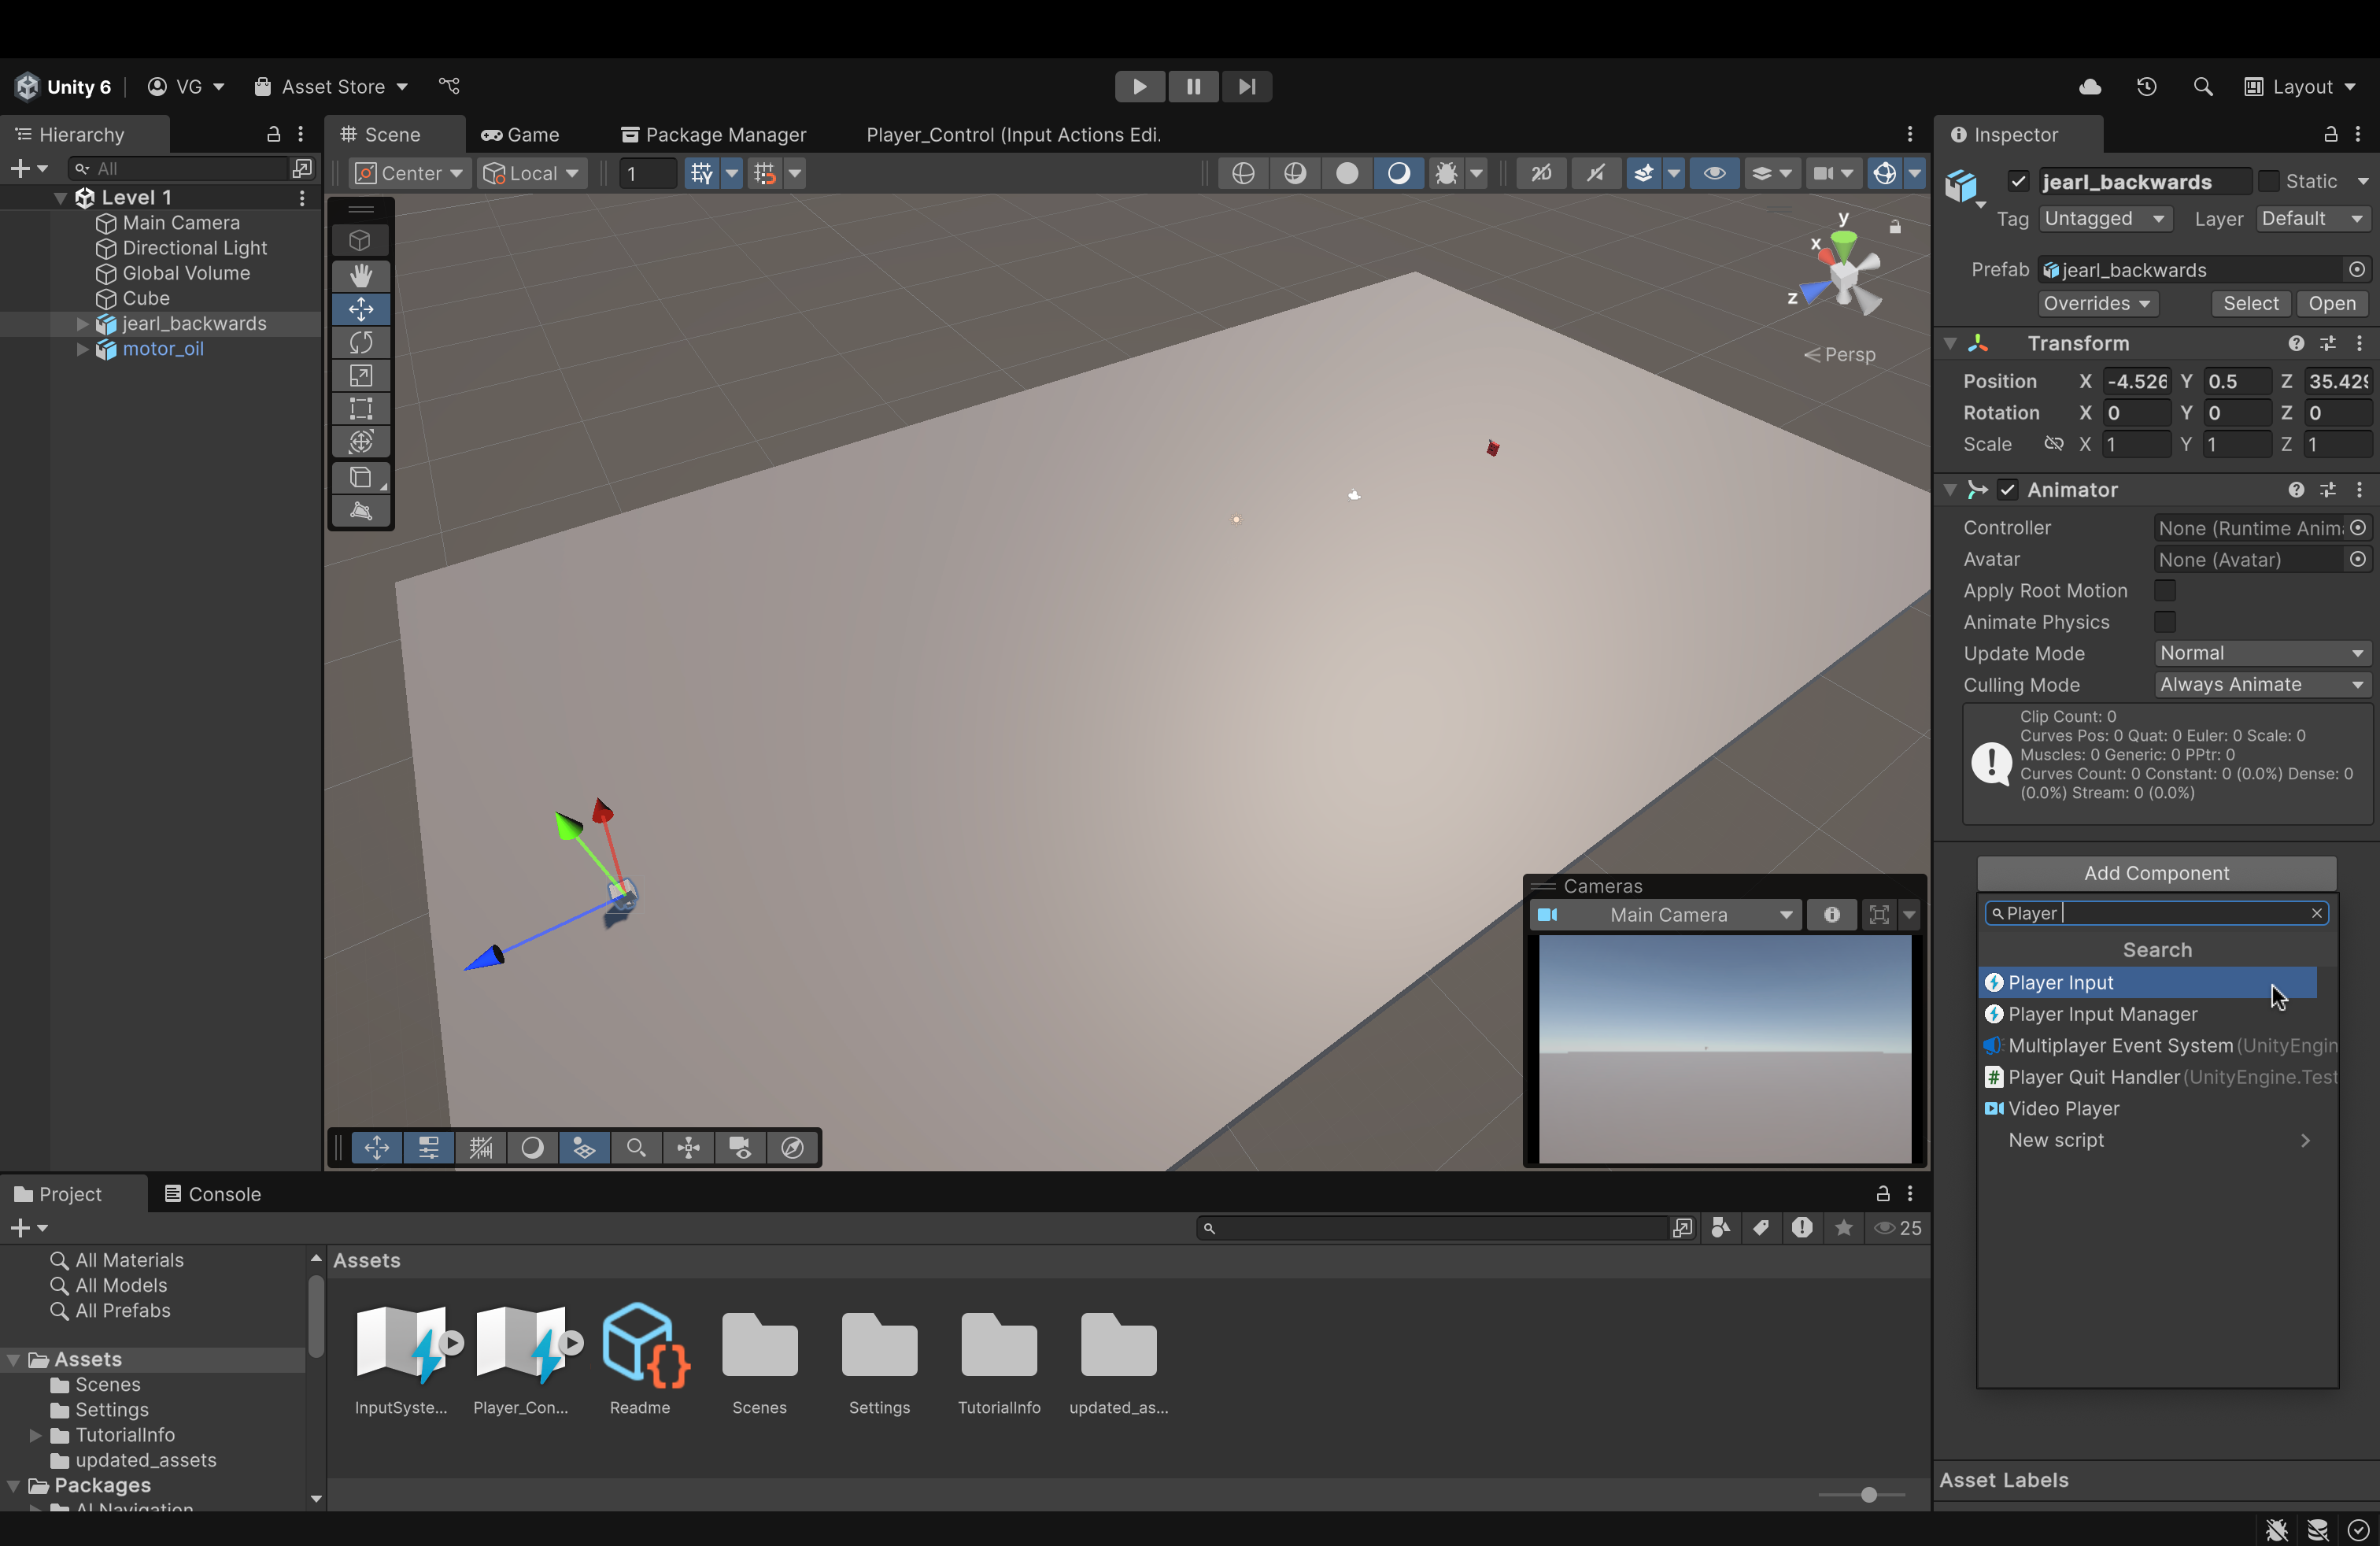
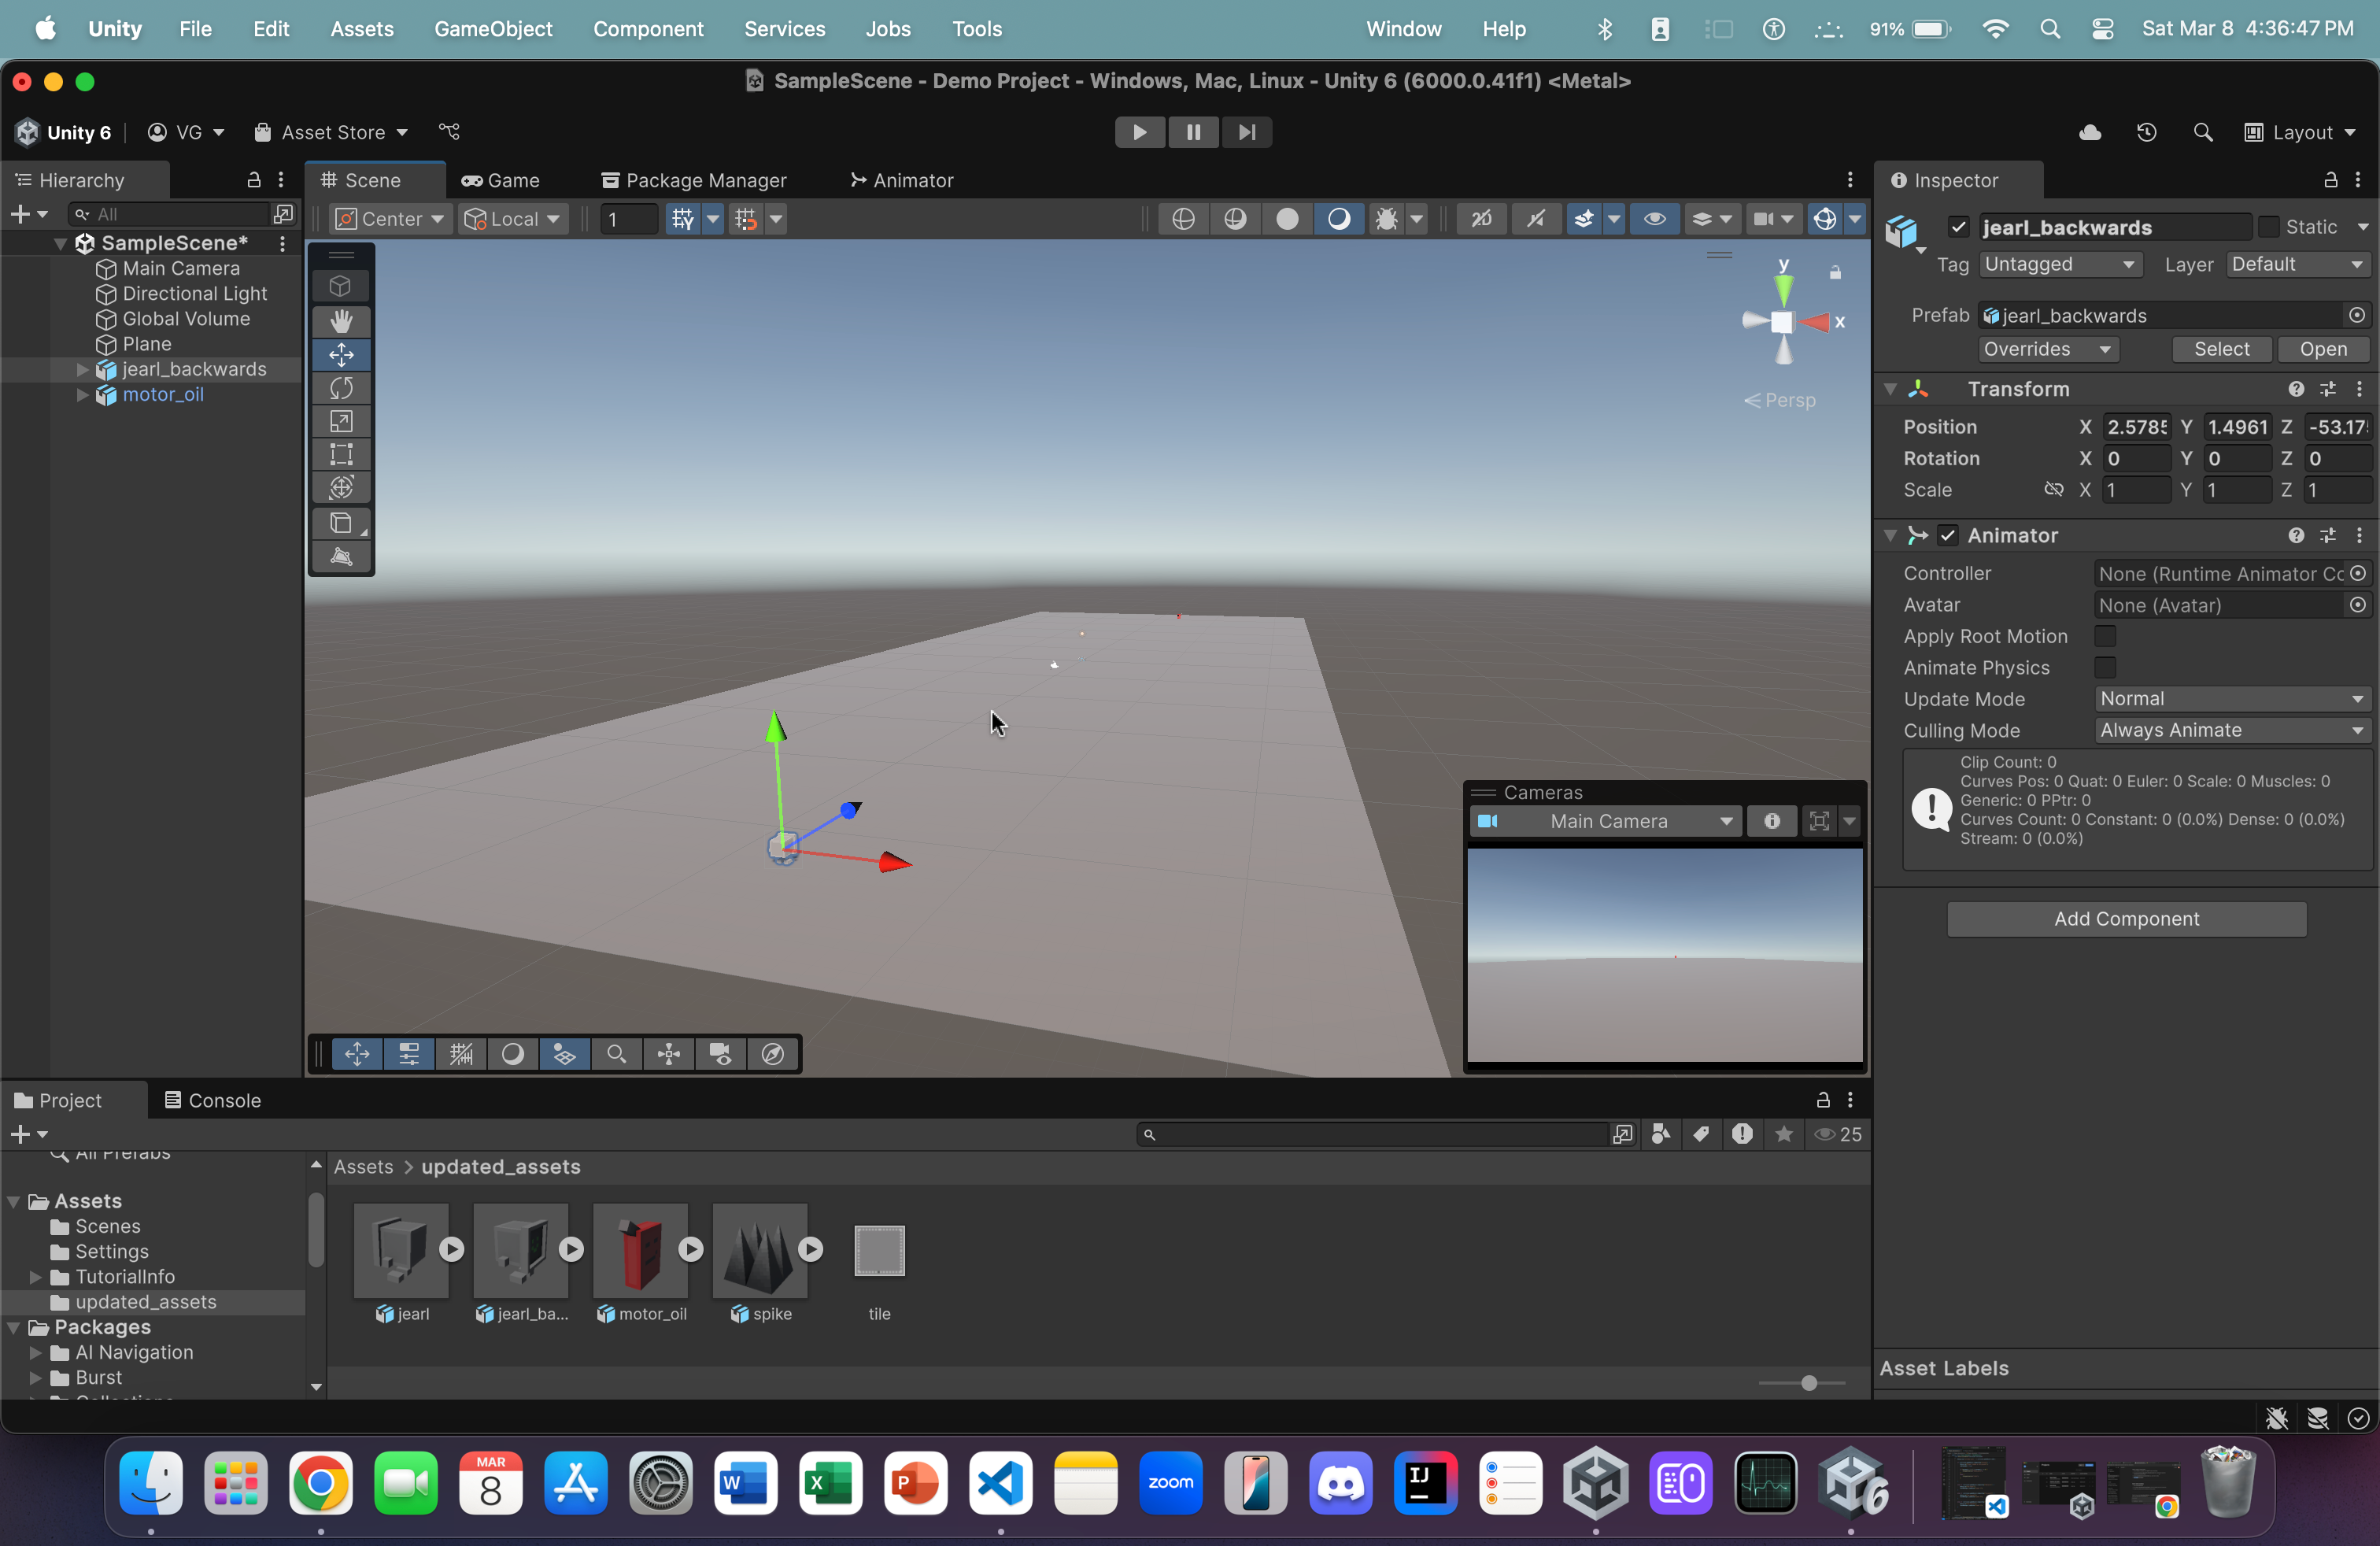
- Click on jearl_backwards in the Scene View itself (or in the Scene Pane on the left)
- In its component panel (on the right), we will add a Player Input component to attach our newly made action map and key bindings to our player asset.
- In the component panel, clikc Add Component (usually at the bottom)
- In the search bar, start typing Player Input and you'll see it below.
- Click it to add it to the jearl_backwards asset.
- Notice that Unity will automatically assign our custom-made Input Actions asset here to the Actions attribute.
- If it didn't, drag and drop the newly created Action Map into the Actions attribute.
- In the Player Input component, The Default Map attribute (below the Actions attribute) will be Player *(referring to the binding map we made earlier).
Now, it's time to put all this together in a C# script.
But, first, we need to set up our code editors.
- For Mac, we are gonna have to use Visual Studio Code.
- For Windows, you guys are free to choose between VS Code and Visual Studio (the purple one).
For this tutorial, as a Mac user, I will use VS Code. But, feel free to use whatever is the most convenient.

- Click on jearl_backwards
- In its component panel, at the bottom, click Add Component
- In the search bar, start typing New Script
- You should see the option shown in the image above.
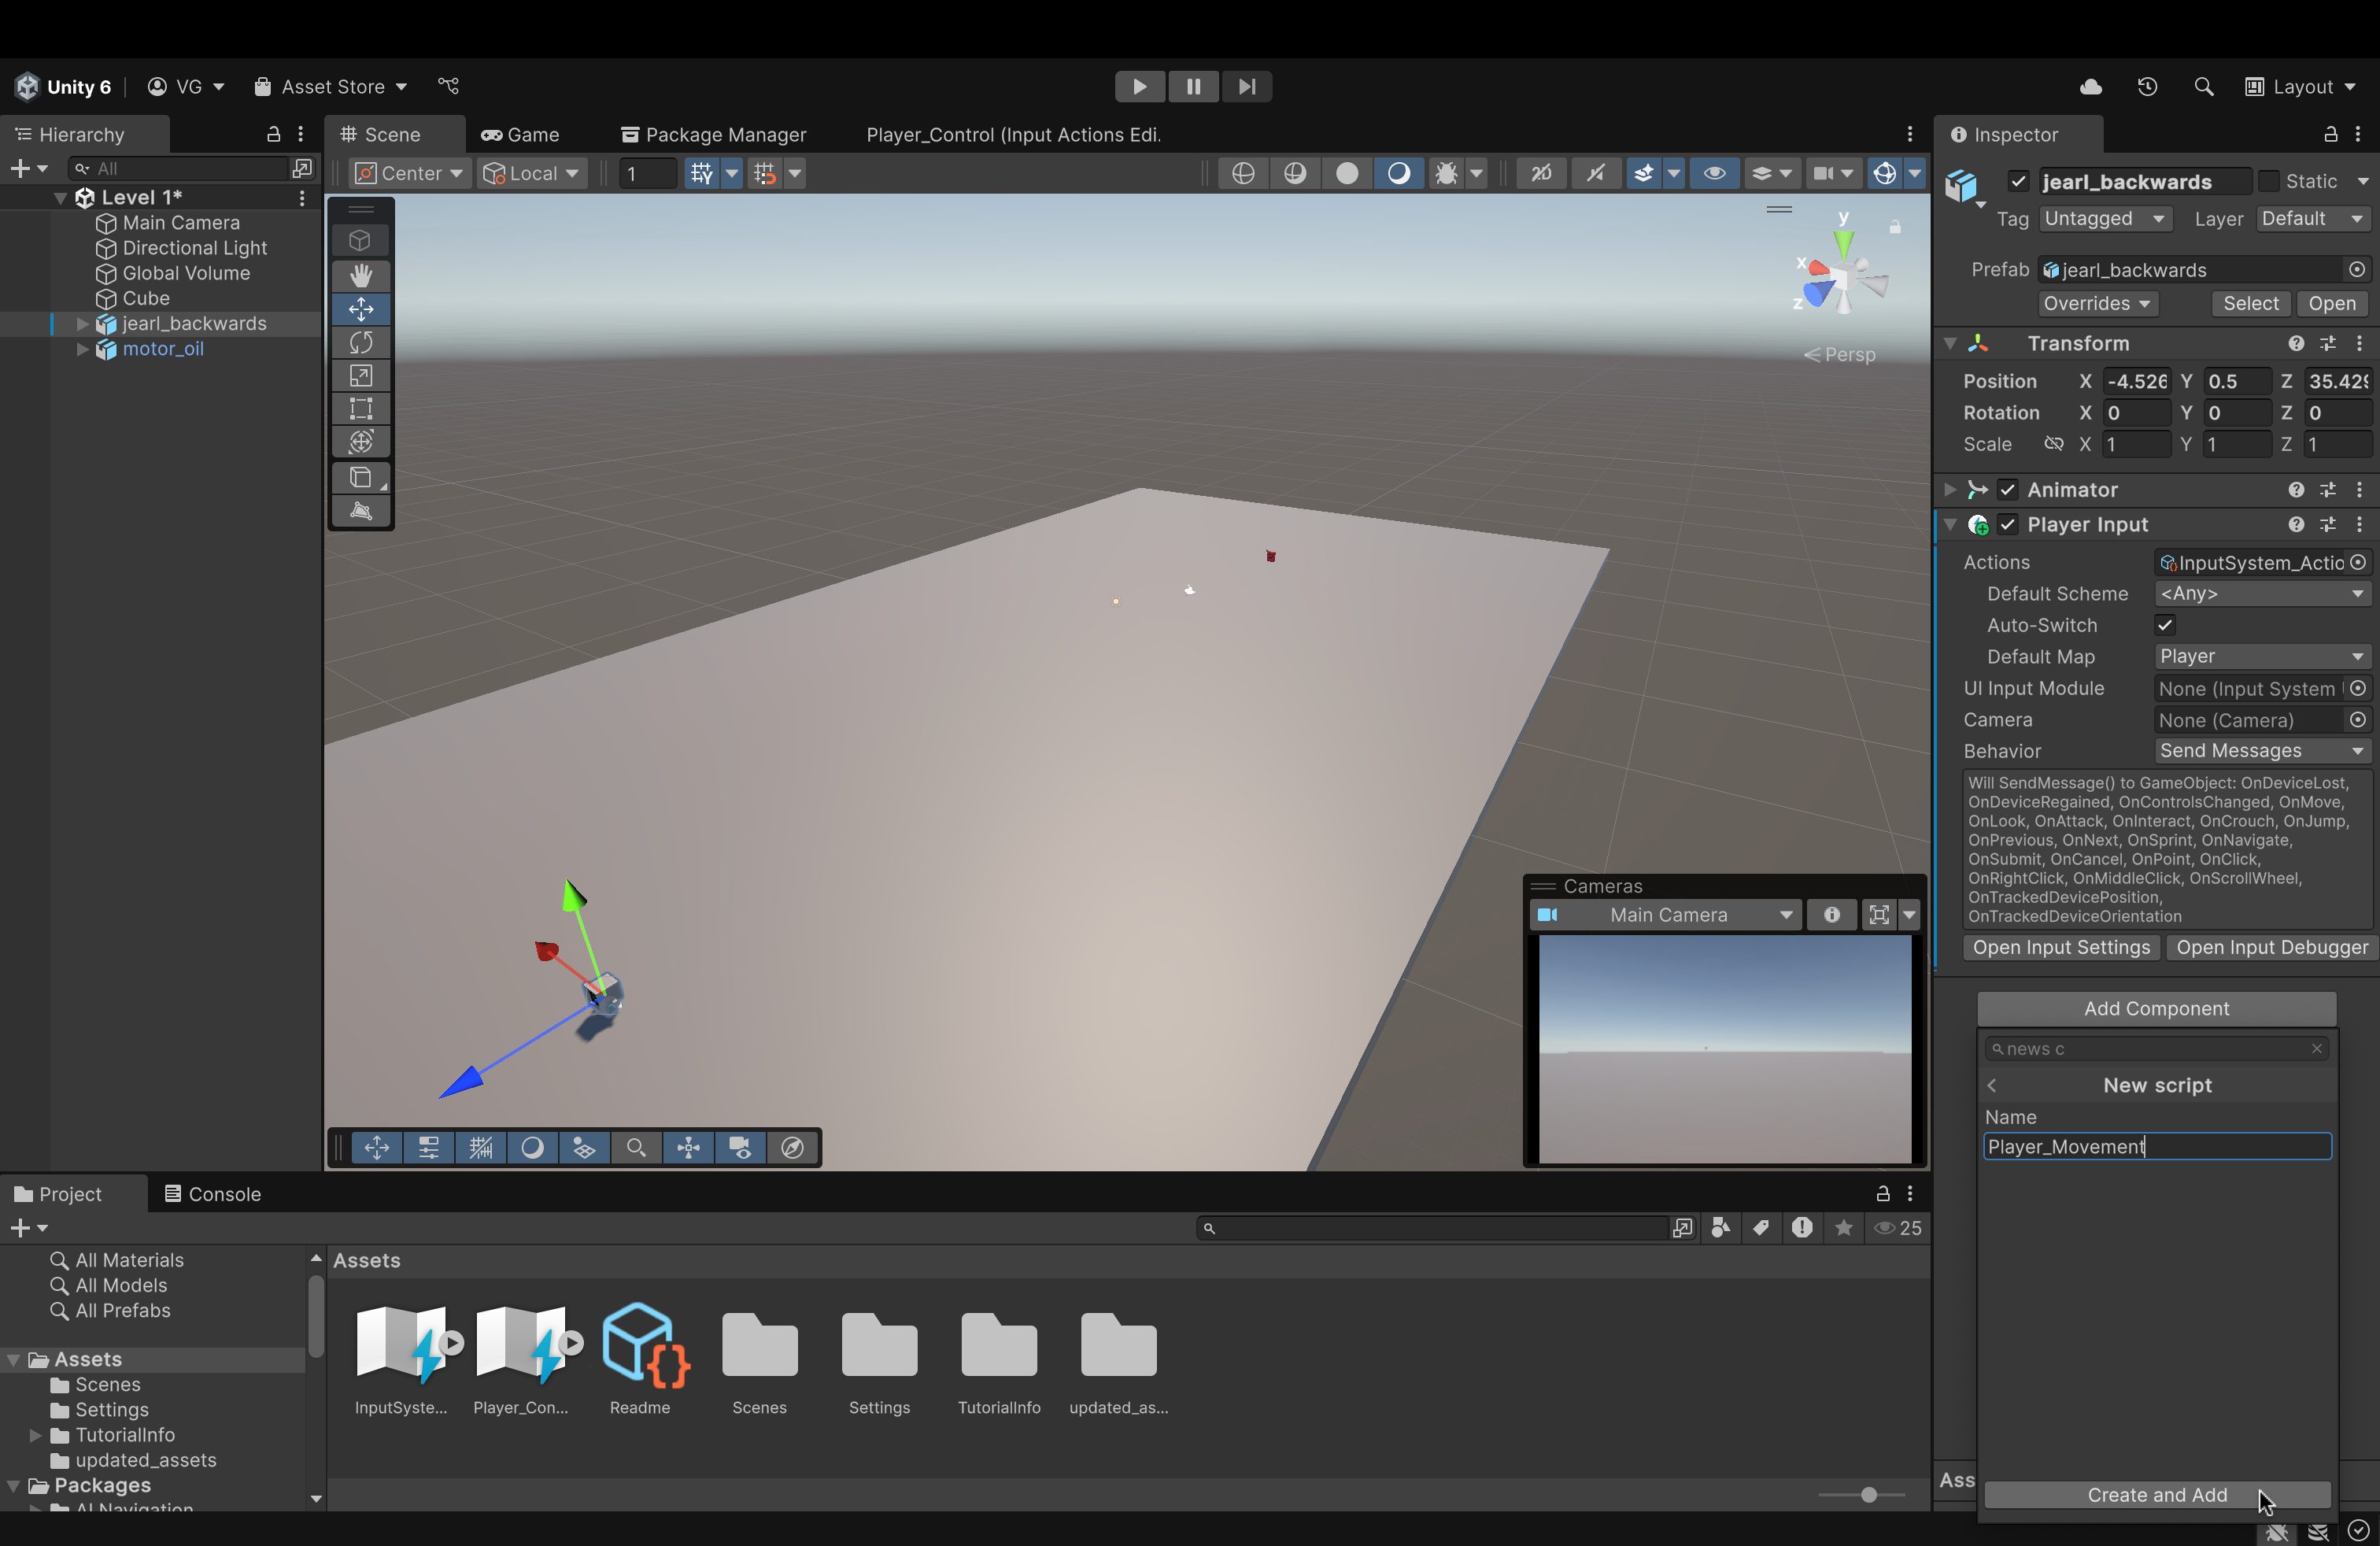
- Name the script something like Player_Movement. Then, click Create and Add. This will create the script and add it as a component to this object (jearl_backwards)
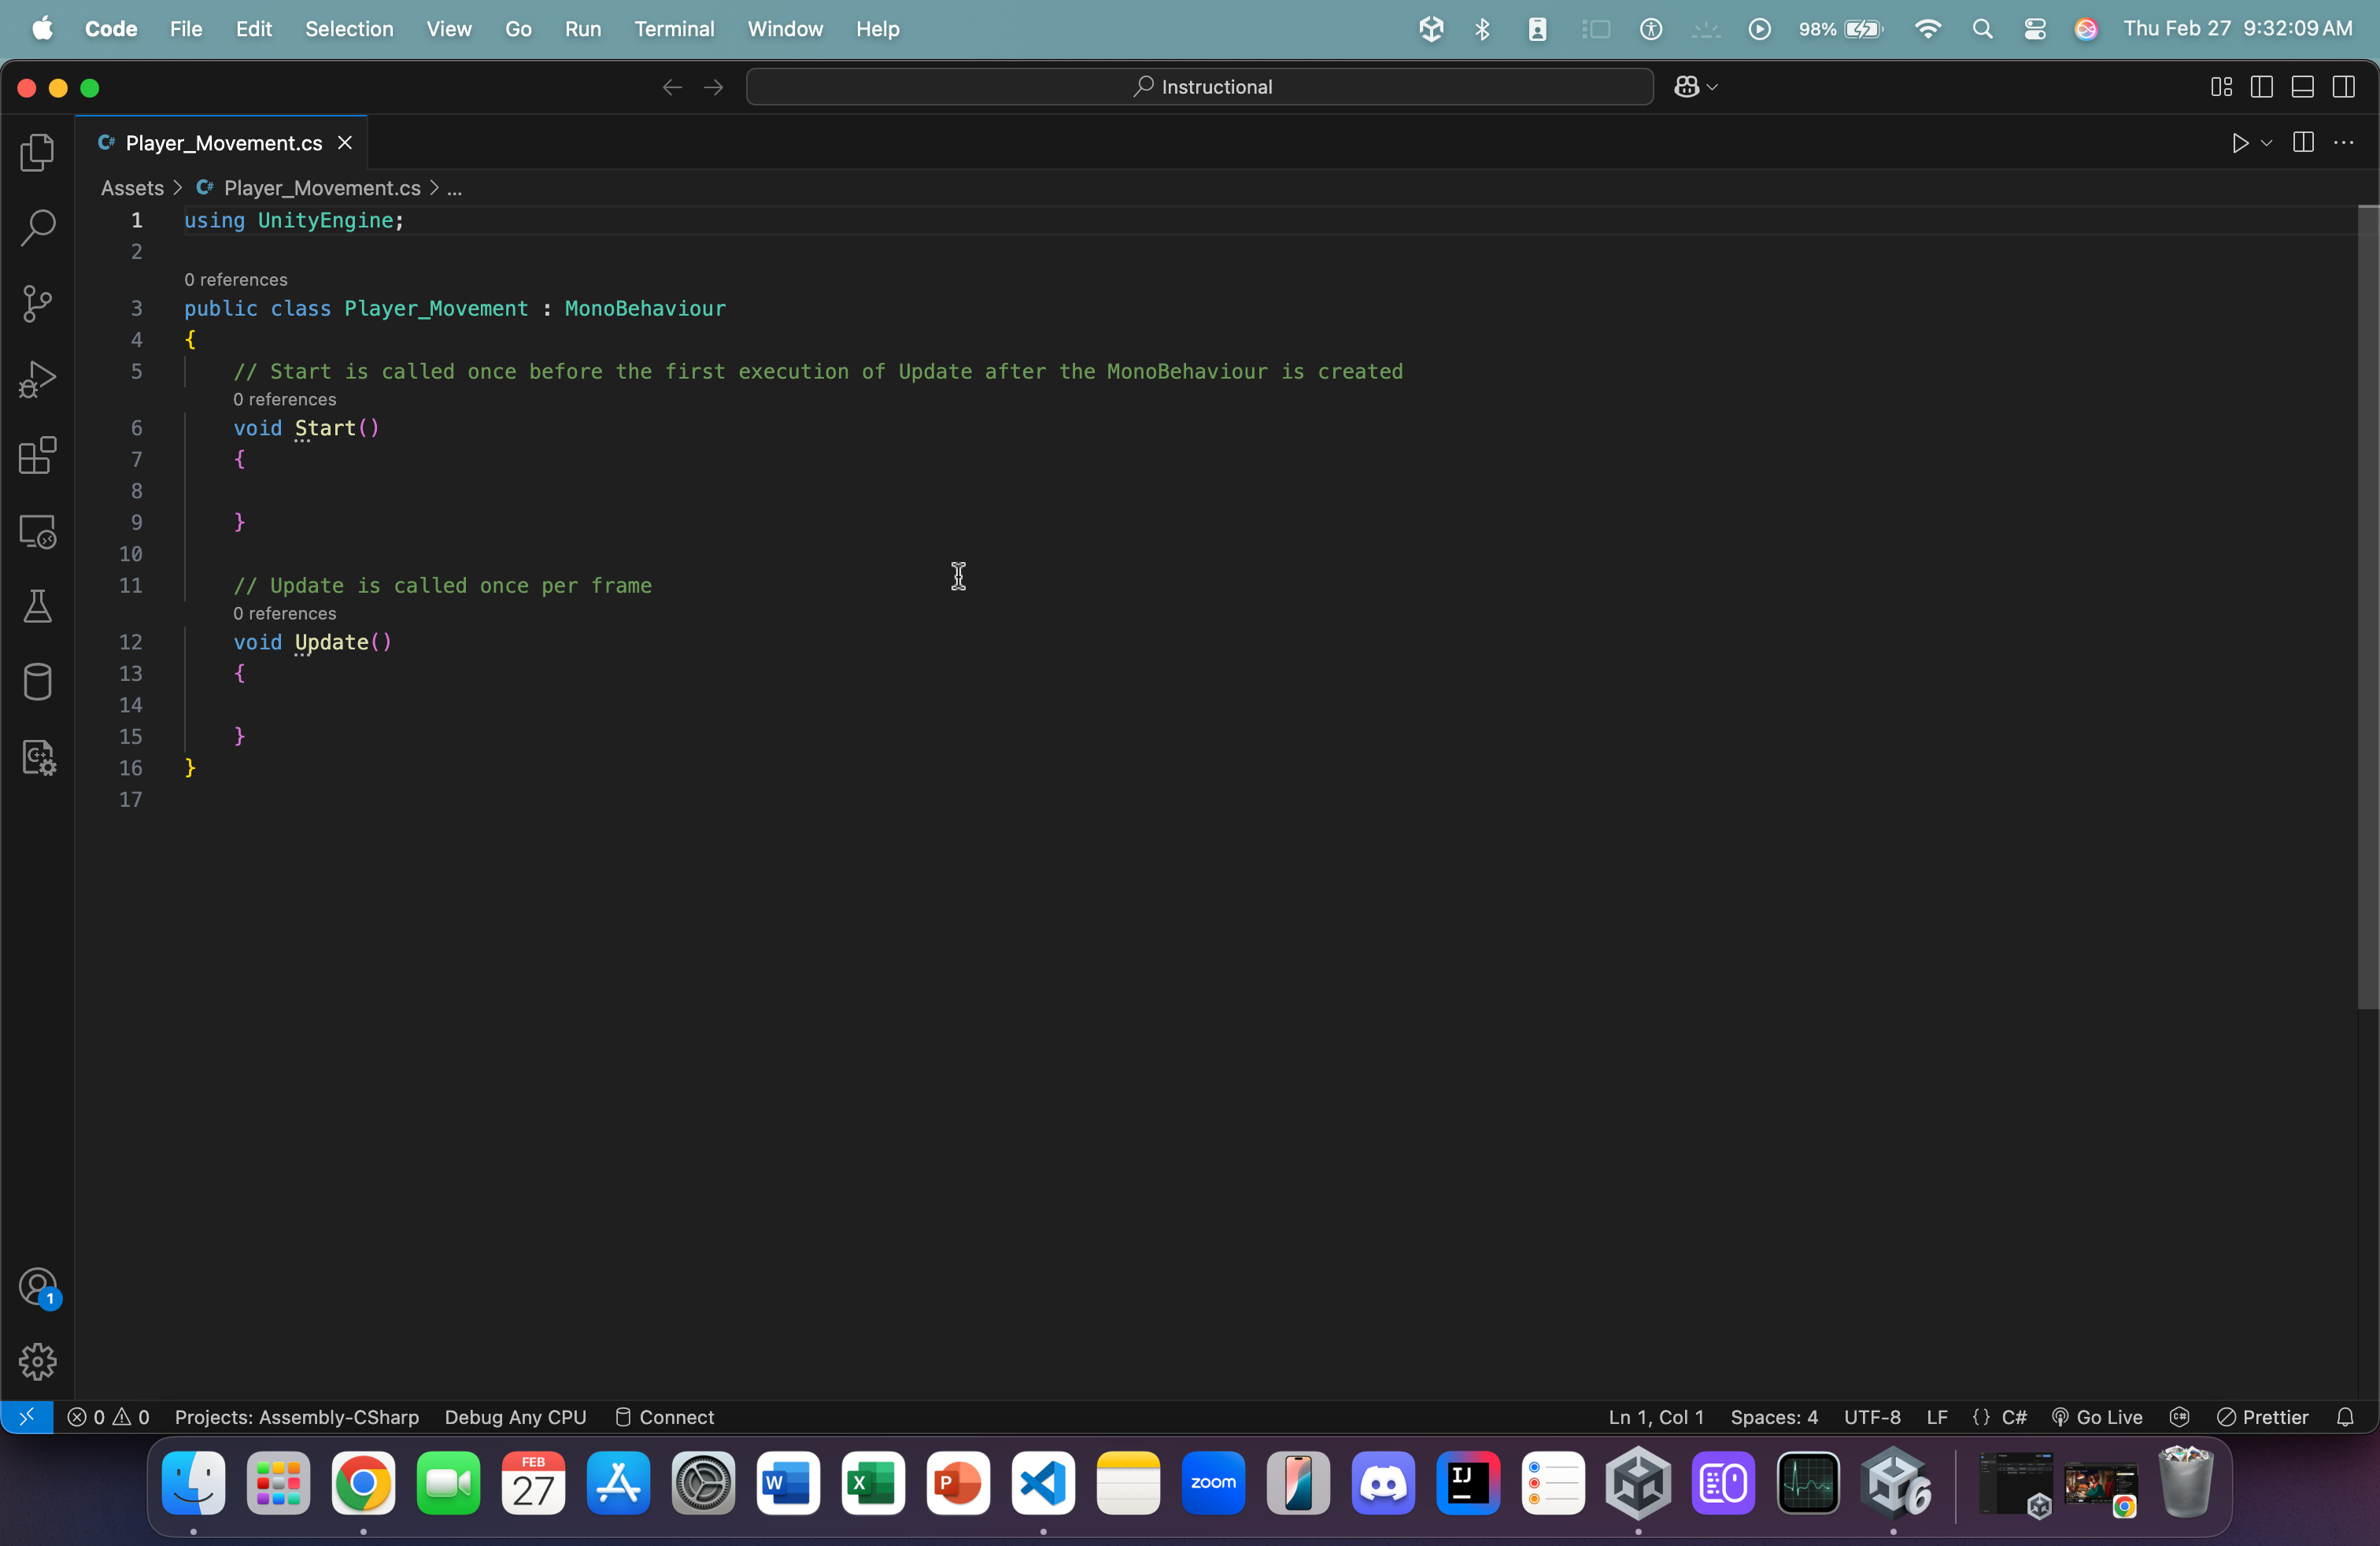
Now, when you double-click the script (inside the script component or in the Assets folder), assuming you set up your respective IDE correctly, it should automatically open the script in said IDE. For me, in VSCode, it looks something like this:
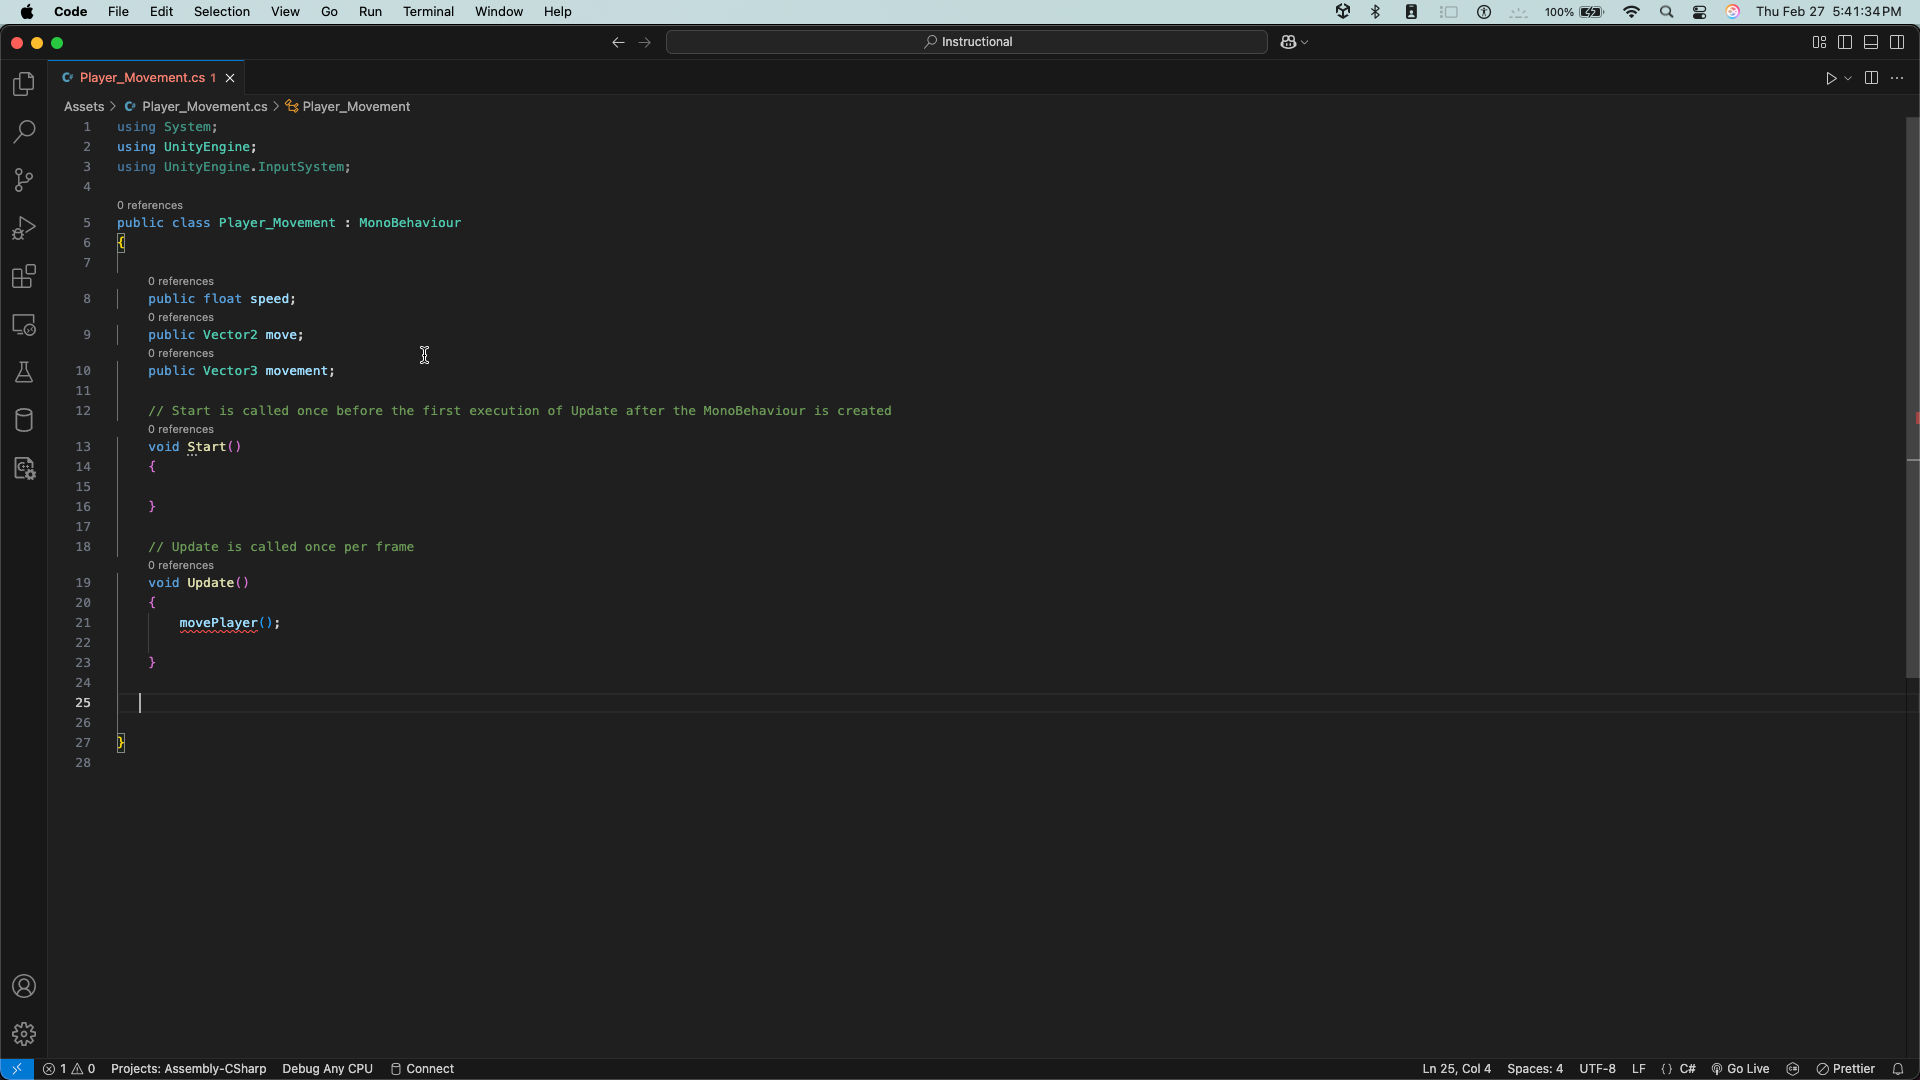
- In the Update function, type MovePlayer() (we'll define this function later).
- This function, as per the description of the Update() function, will run once per frame of gameplay.
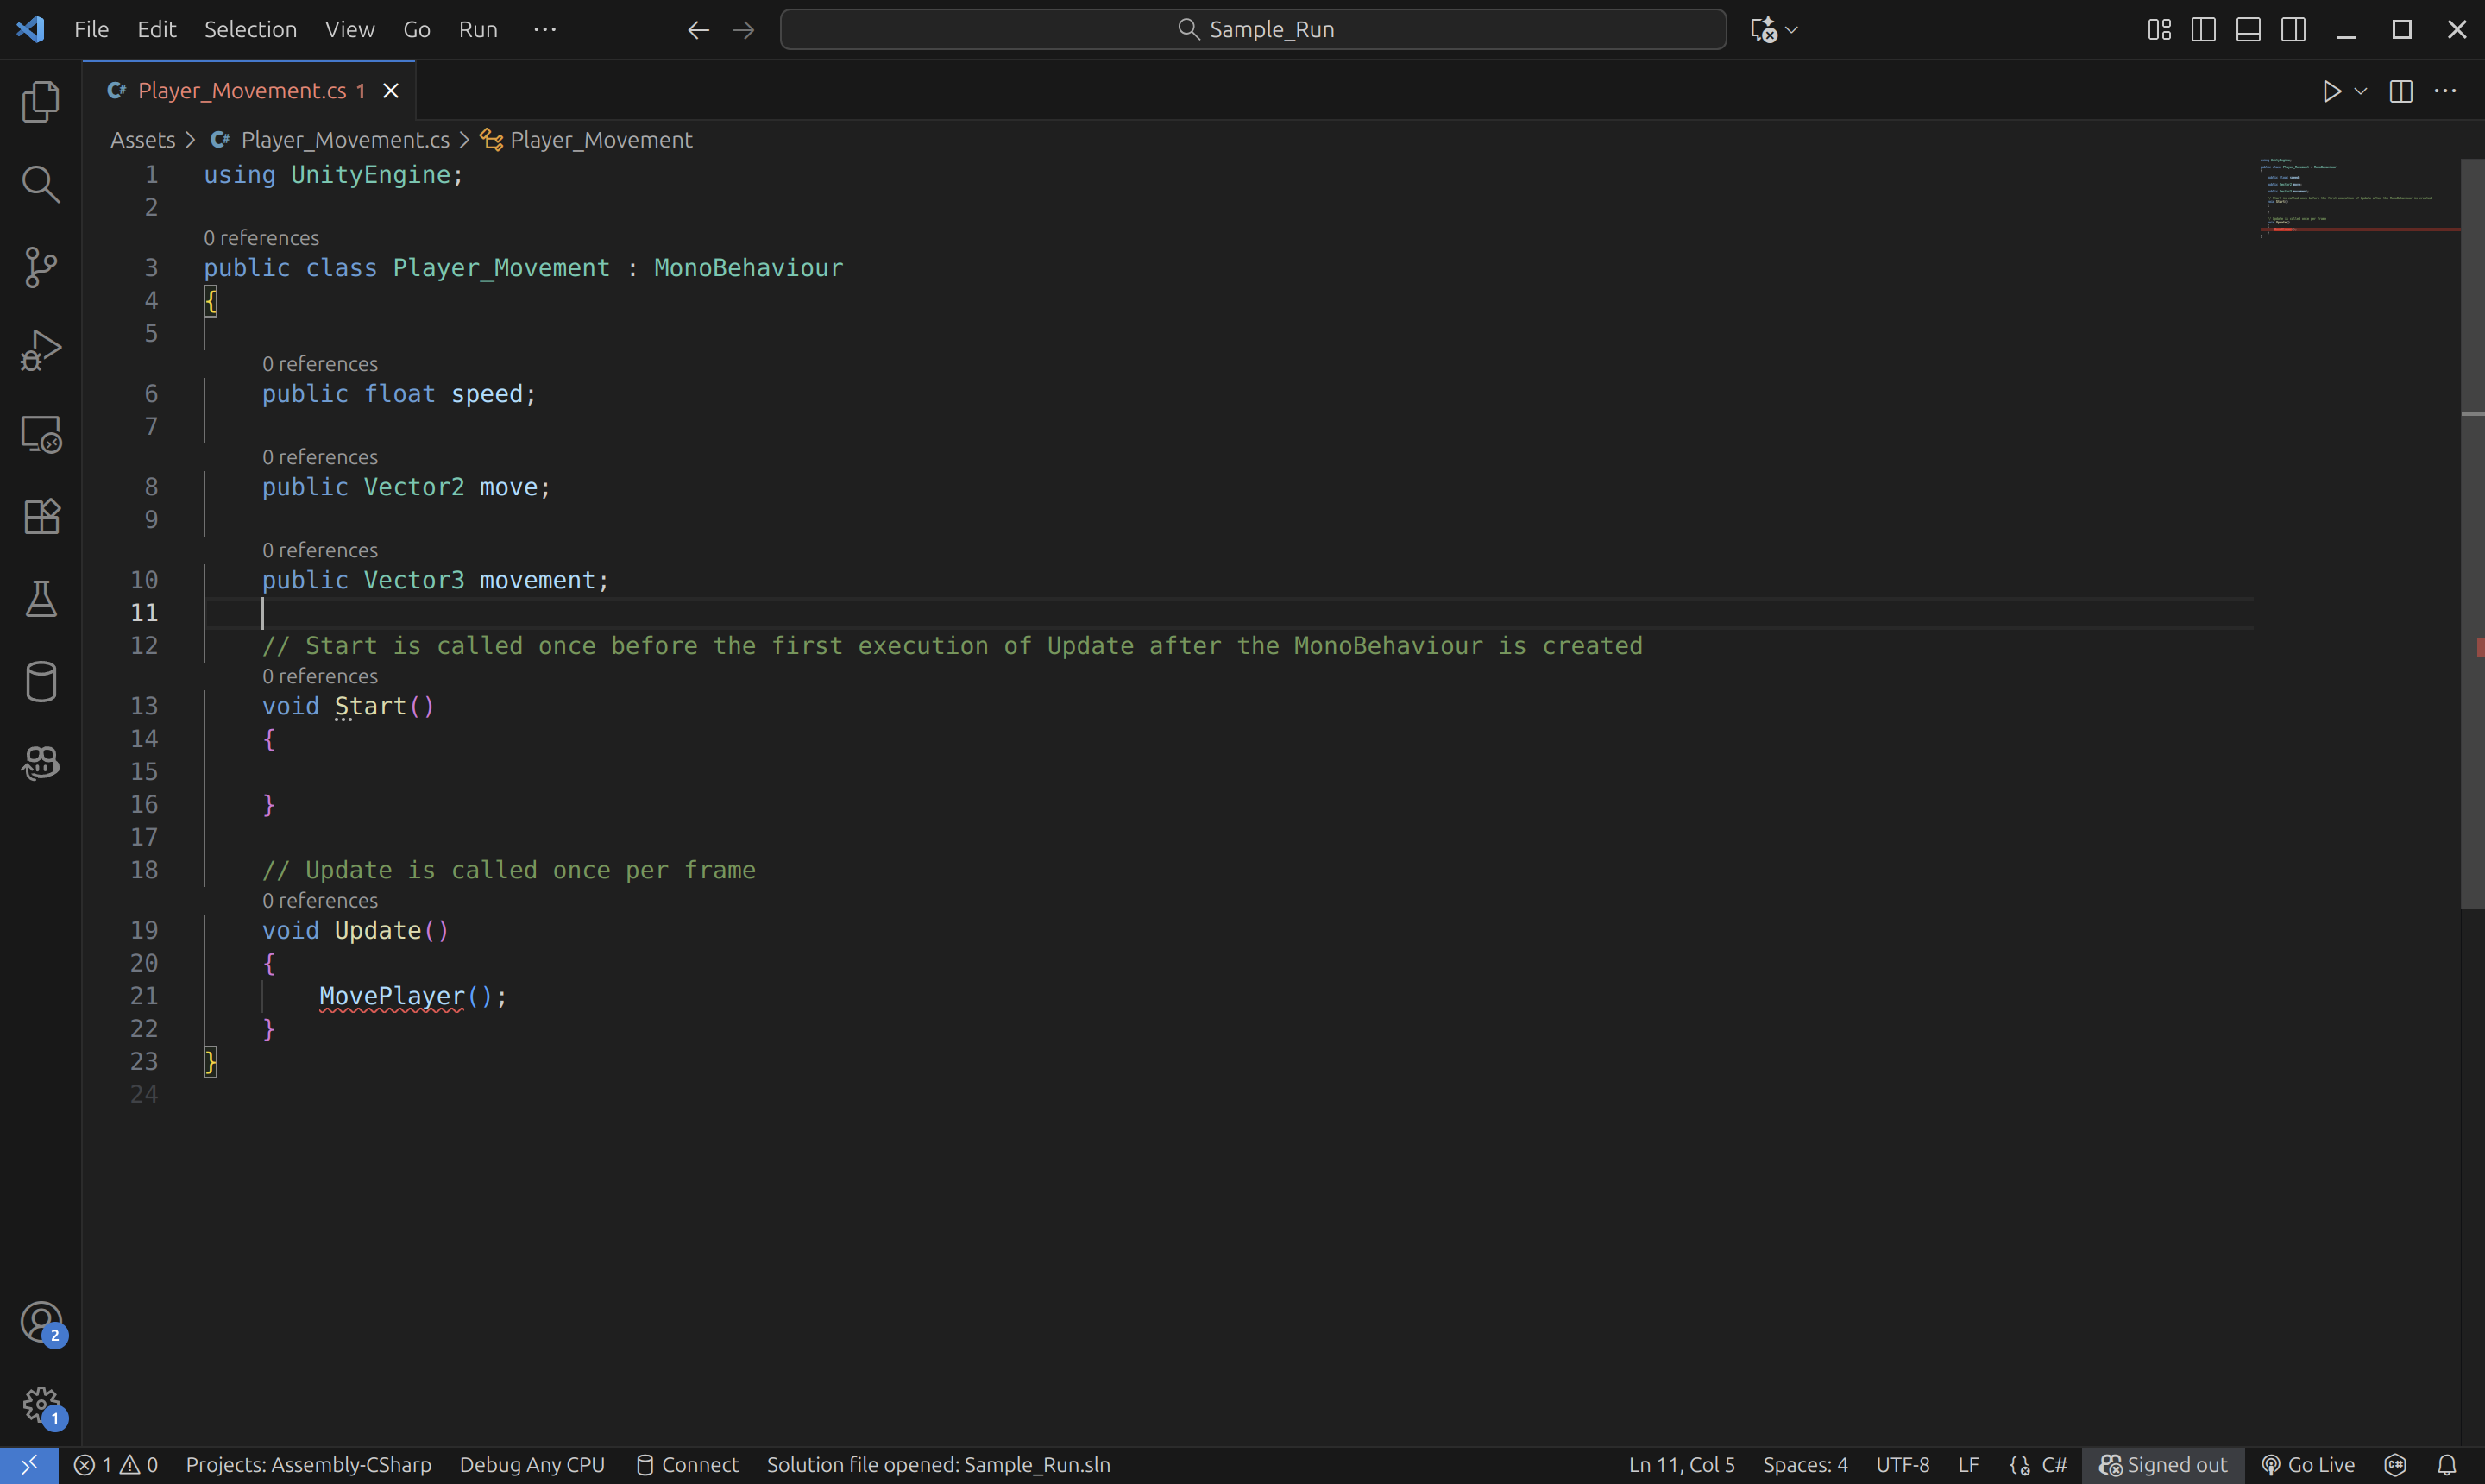
- Add three variables before Start() but inside our main method:
- public float speed
- This will dictate the speed of our player object's movement
- Since this variable is public, we will be able to change the value of this variable on the fly once we're back in the Editor.
- public Vector2 move
- If you remember from earlier, our movement (inside our action map) is strictly in 2 directions (that's what we want). We limited our key bindings to Vector2.
- Thus, when we read our player's movements, they will be in a 2D vector and will be placed inside an object of type Vector2
- public Vector3 movement
- Since our game world is a 3D space, we need to translate our 2-dimensional movement into a 3D vector w/ the y-axis (straight up) set to 0. Which is why we need this variable.
- Bonus question: why would we set the y-axis to 0 in our 3D vector?
- Since our game world is a 3D space, we need to translate our 2-dimensional movement into a 3D vector w/ the y-axis (straight up) set to 0. Which is why we need this variable.
- public float speed

-
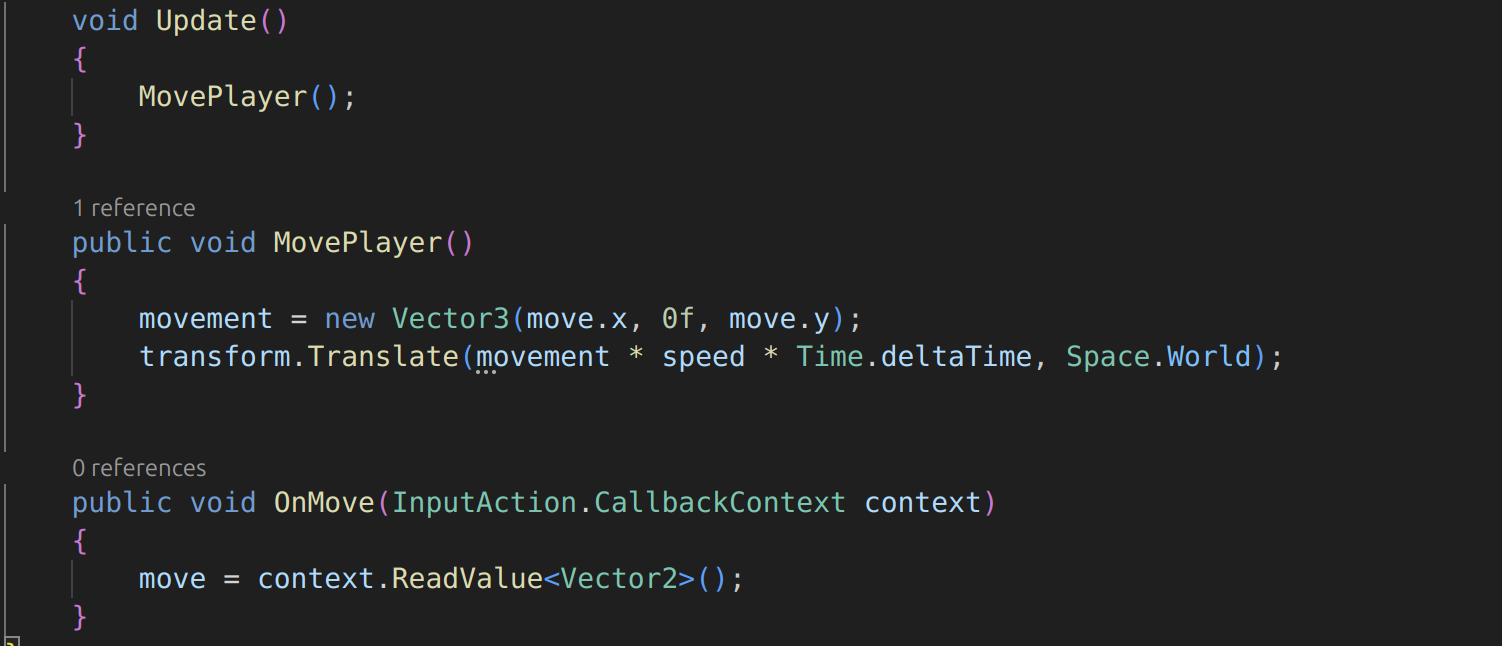
Add the following function after Update():
-
public void OnMove(InputAction.CallbackContext context) { move = context.ReadValue< Vector 2 >(); }
-
You may also need to import the following library up top with this line:
- using UnityEngine.InputSystem
- using UnityEngine.InputSystem
-
Imagine your player asset is a toy remote car:
- Your keyboard/controller is the remote.
- Unity's Input System is the "messenger".
- The function OnMove is the car receiving the message.
- The CallbackContext is the message itself (the message that you send to the function upon a button press).
- The message says what you (the person controlling the car) want the car to do.
- Move? Move where? How fast? Is this gonna happen once or continuously?
- The message says what you (the person controlling the car) want the car to do.
- In this case, the message is a 2D vector indicating which direction we want to move in.
-
-
Define MovePlayer() using the image above.
- We placed the movement = new Vector3(move.x, 0f, move.y) line
- What does it mean?:
- Consider the following example:
- In a 2D space like the one below:
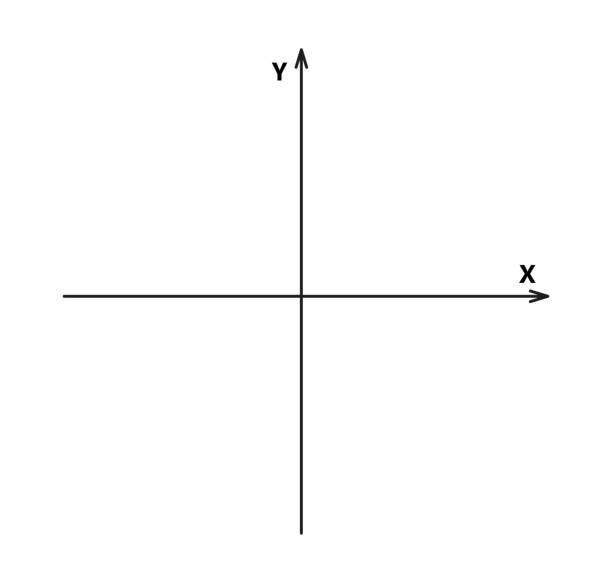
- (0,1) would mean "move in the positive y axis" (i.e. upward)
- But now, when we translate this 2 dimensional movement into a 3 dimensional world, we have to be careful.
- The y-axis is now upwards (directly upwards). The newly added z-axis is the new "forward" axis. And the x-axis is still for left and right movement.
- So, when we map (0,1) from 2D to 3D, we would have to assign it like this (assume our 2D vector is called "move", like above, and our 3D vector is still "movement"):
- movement = new Vector3(move.x, 0f, move.y);
- Why?
- As stated earlier, we don't move upwards with WASD. We only move along the x and z axes.
- Since our 2D vector is (0,1), our 3D translation of this 2D vector would be (0, 0f, 1). Which means that we are now moving (in the 3D space) 1 unit in the positive z-axis (AKA forward)
- Since this action is repeated every frame, in 60 fps gameplay, this will result in our character having smooth forward movement.
- In a 2D space like the one below:
- Consider the following example:
- What does it mean?:
- We also placed a new line: transform.Translate(movement * speed * Time.deltaTime, Space.World);
- What does this line mean?
- transform
- Refers directly to this game object's Transform attribute.
- .Translate
- Allows us to move the object from its current position.
- movement * speed * time.DeltaTime.
- We multiply our speed value by our movement vector (so that we're not at a speed of 1 unit per frame).
- This vector is then continuously added to the game object's position vector to move it.
- time.deltaTime
- What is that?
- This allows our player movement to be frame-independent.
- Imagine that your computer runs the game at 60 fps (frames per second).
- We can calculate the total # of units moved by the player by doing the following calculation:
- 60 * 5 (our speed, let's say) * movement ([0, 0, 1], let's say)
- Thus, we moved 300 units in total
- Let's assume your friend's PC runs the game at 120 fps.
- Then, by the same calculation (with the same movement), we'd move 600 units in total when the game runs on their PC.
- That's not good! This means that the higher the FPS is, the faster we move.
- Then, by the same calculation (with the same movement), we'd move 600 units in total when the game runs on their PC.
- This is why we multiply this entire expression by time.deltaTime (whose value is roughly equal to 1/your fps amount).
- 60 * 1/60 = 1
- 120 * 1/120 = 1.
- Therefore, our movement stays consistent across different machines (since we're just multiplying by 1).
- Space.World
- This allows our player object to move relative to the game world's global axes.
- This means that, regardless of where the game object is or what direction it's facing or what orientation the camera is in, when we press "W", we will always move in the direction of the game world's positive z-axis.
- transform
- We placed the movement = new Vector3(move.x, 0f, move.y) line
Now, let's go back to the Unity Editor.
-
Click on the jearl_backwards (either in the Scene Panel on the left or in the Scene itself) asset to view its components.
-
In the Player Input component, find the Behavior attribute.
-
Change its value from Send Messages to Invoke Unity Events.
-
Right underneath, click and open the Events dropdown.

-
Click and expand the Player dropdown
-
If the previous steps were followed correctly, you should see a box labeled Movement (CallbackContext)
-
Click the Plus icon at the bottom right of the box.
-
In the blank attribute, drag and drop the jearl_backwards asset into it.
-
Open the No Function dropdown
-
Again, if the previous steps were followed and you saved your script, you should see an option called Player_Movement (which is the name of one of the functions we created in our movement script)
- Click and expand it
-
In the following menu, at the top, you should see OnMove (which is our Input function for movement)
- Click it.
-
What all this did is assign the OnMove CallbackContext function to our player object. Now, whenever we press WASD (buttons associated with movement), those key inputs will be read and sent to this function.
Fatal error (this is me from a couple minutes in the future). I just realized that I placed down the assets in the wrong way. If you've been following this tutorial, when you ran the game, your player is likely moving in the complete opposite directions.
Fix: Swap the positions of your motor_oil and jearl_backwards assets and also turn the camera so it is properly oriented and centered on our player (the blue axis should be facing away from the camera). Like this:
Anyways...
Run the game and you should be able to move!
But, you'll notice that the player is "stiff". He's always looking in the same direction. Let's change that so that the player looks in the direction that we're moving in!
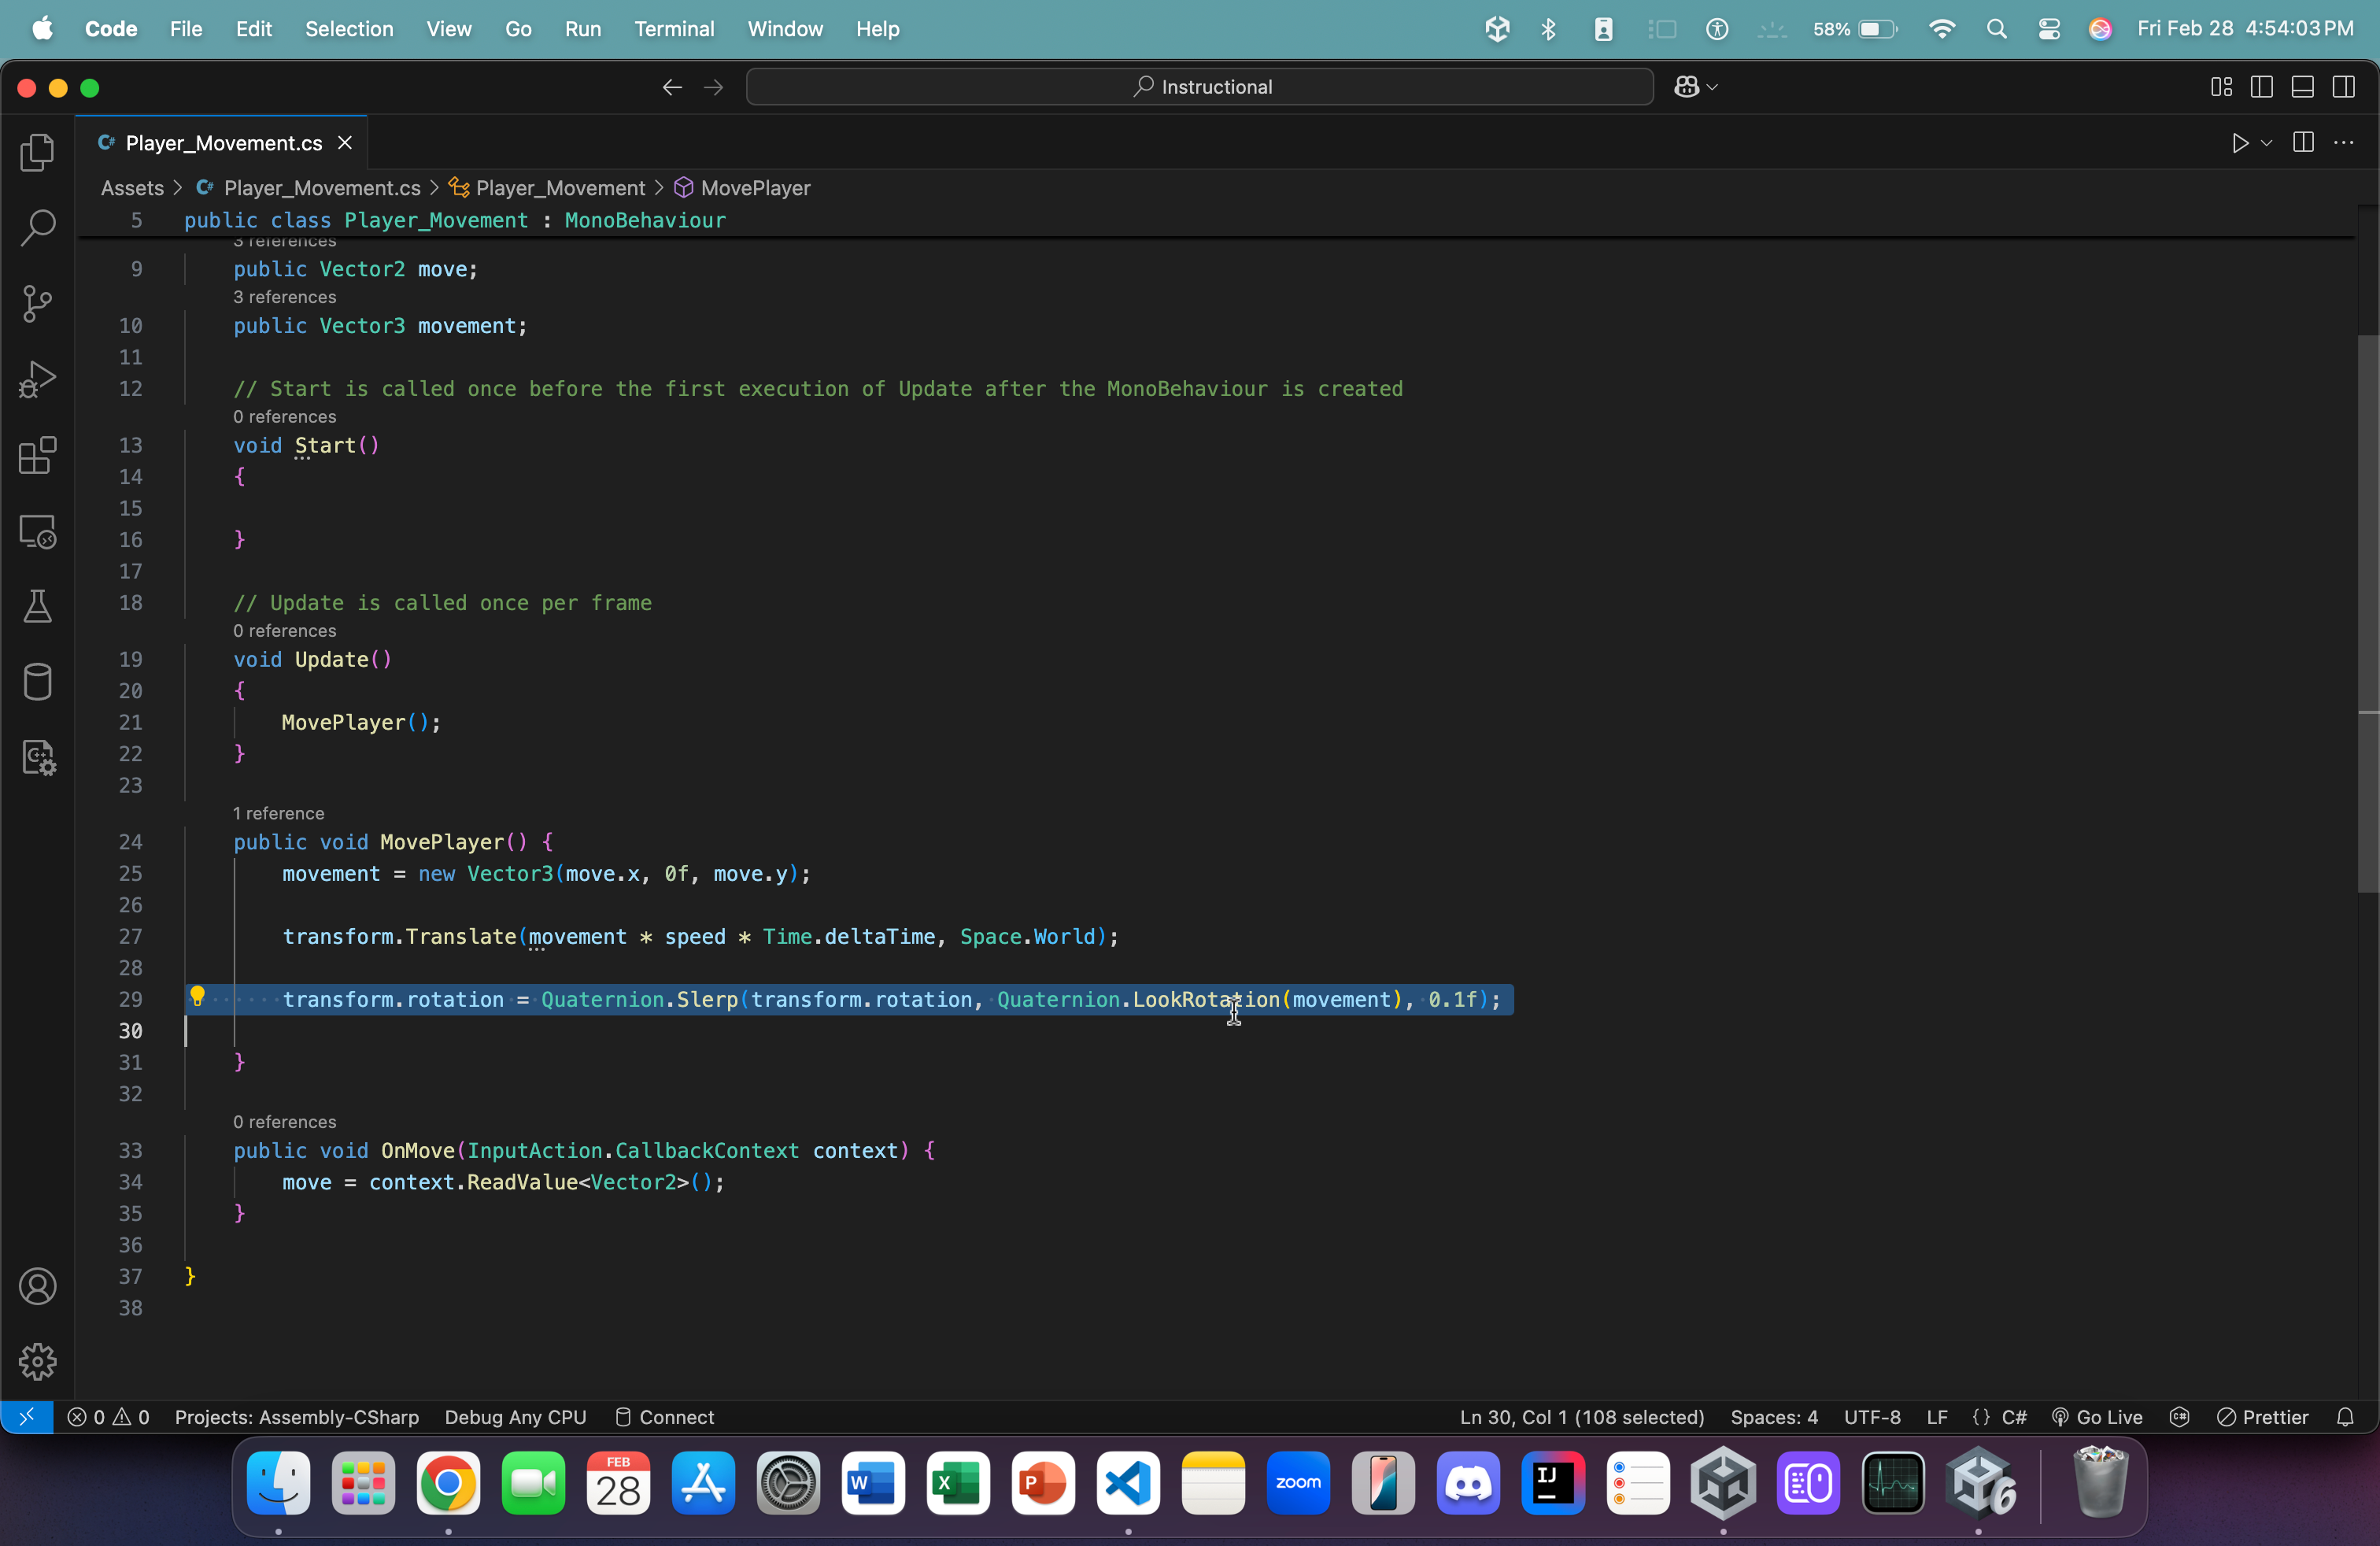
- Back in our script, add the following line inside the MovePlayer:
- transform.rotation = Quaternion.Slerp(transform.rotation, Quaternion.LookRotation(movement), 0.1f);
- What does this mean?:
- transform.rotation
- Now, we're accessing this game object's rotation characteristic (before, it was translation)
- Quaternion.Slerp(...)
- In mathematics, Quaternions are objects that are used to represent rotations in a 3D space
- The function .Slerp() takes two such quaternions and interpolates (or transitions) between them with a given strength (indicated by a floating-point number).
- (transform.rotation, Quaternion.LookRotation(movement), 0.15f)
- Here, our two quaternions are:
- transform.rotation
- This object's current rotation
- Quaternion.LookRotation(movement)
- The rotation that's required to face in the direction of the given 3D vector (we used the Quaternion class's built-in function, LookRotation, to achieve this)
- 0.1f
- We transition between these two rotations with a strength of 0.1 (which is slow enough to see the transition)
- Our game object will smoothly transition between rotations (instead of snapping) when we press WASD.
- We transition between these two rotations with a strength of 0.1 (which is slow enough to see the transition)
- transform.rotation
- Here, our two quaternions are:
- transform.rotation
Now, when you go back to the Editor, let the new script update, and hit Play, you should see movement and the player object rotate (i.e. look) in the direction of the movement. Isn't that cool?
Now, let's add some jumping functionality
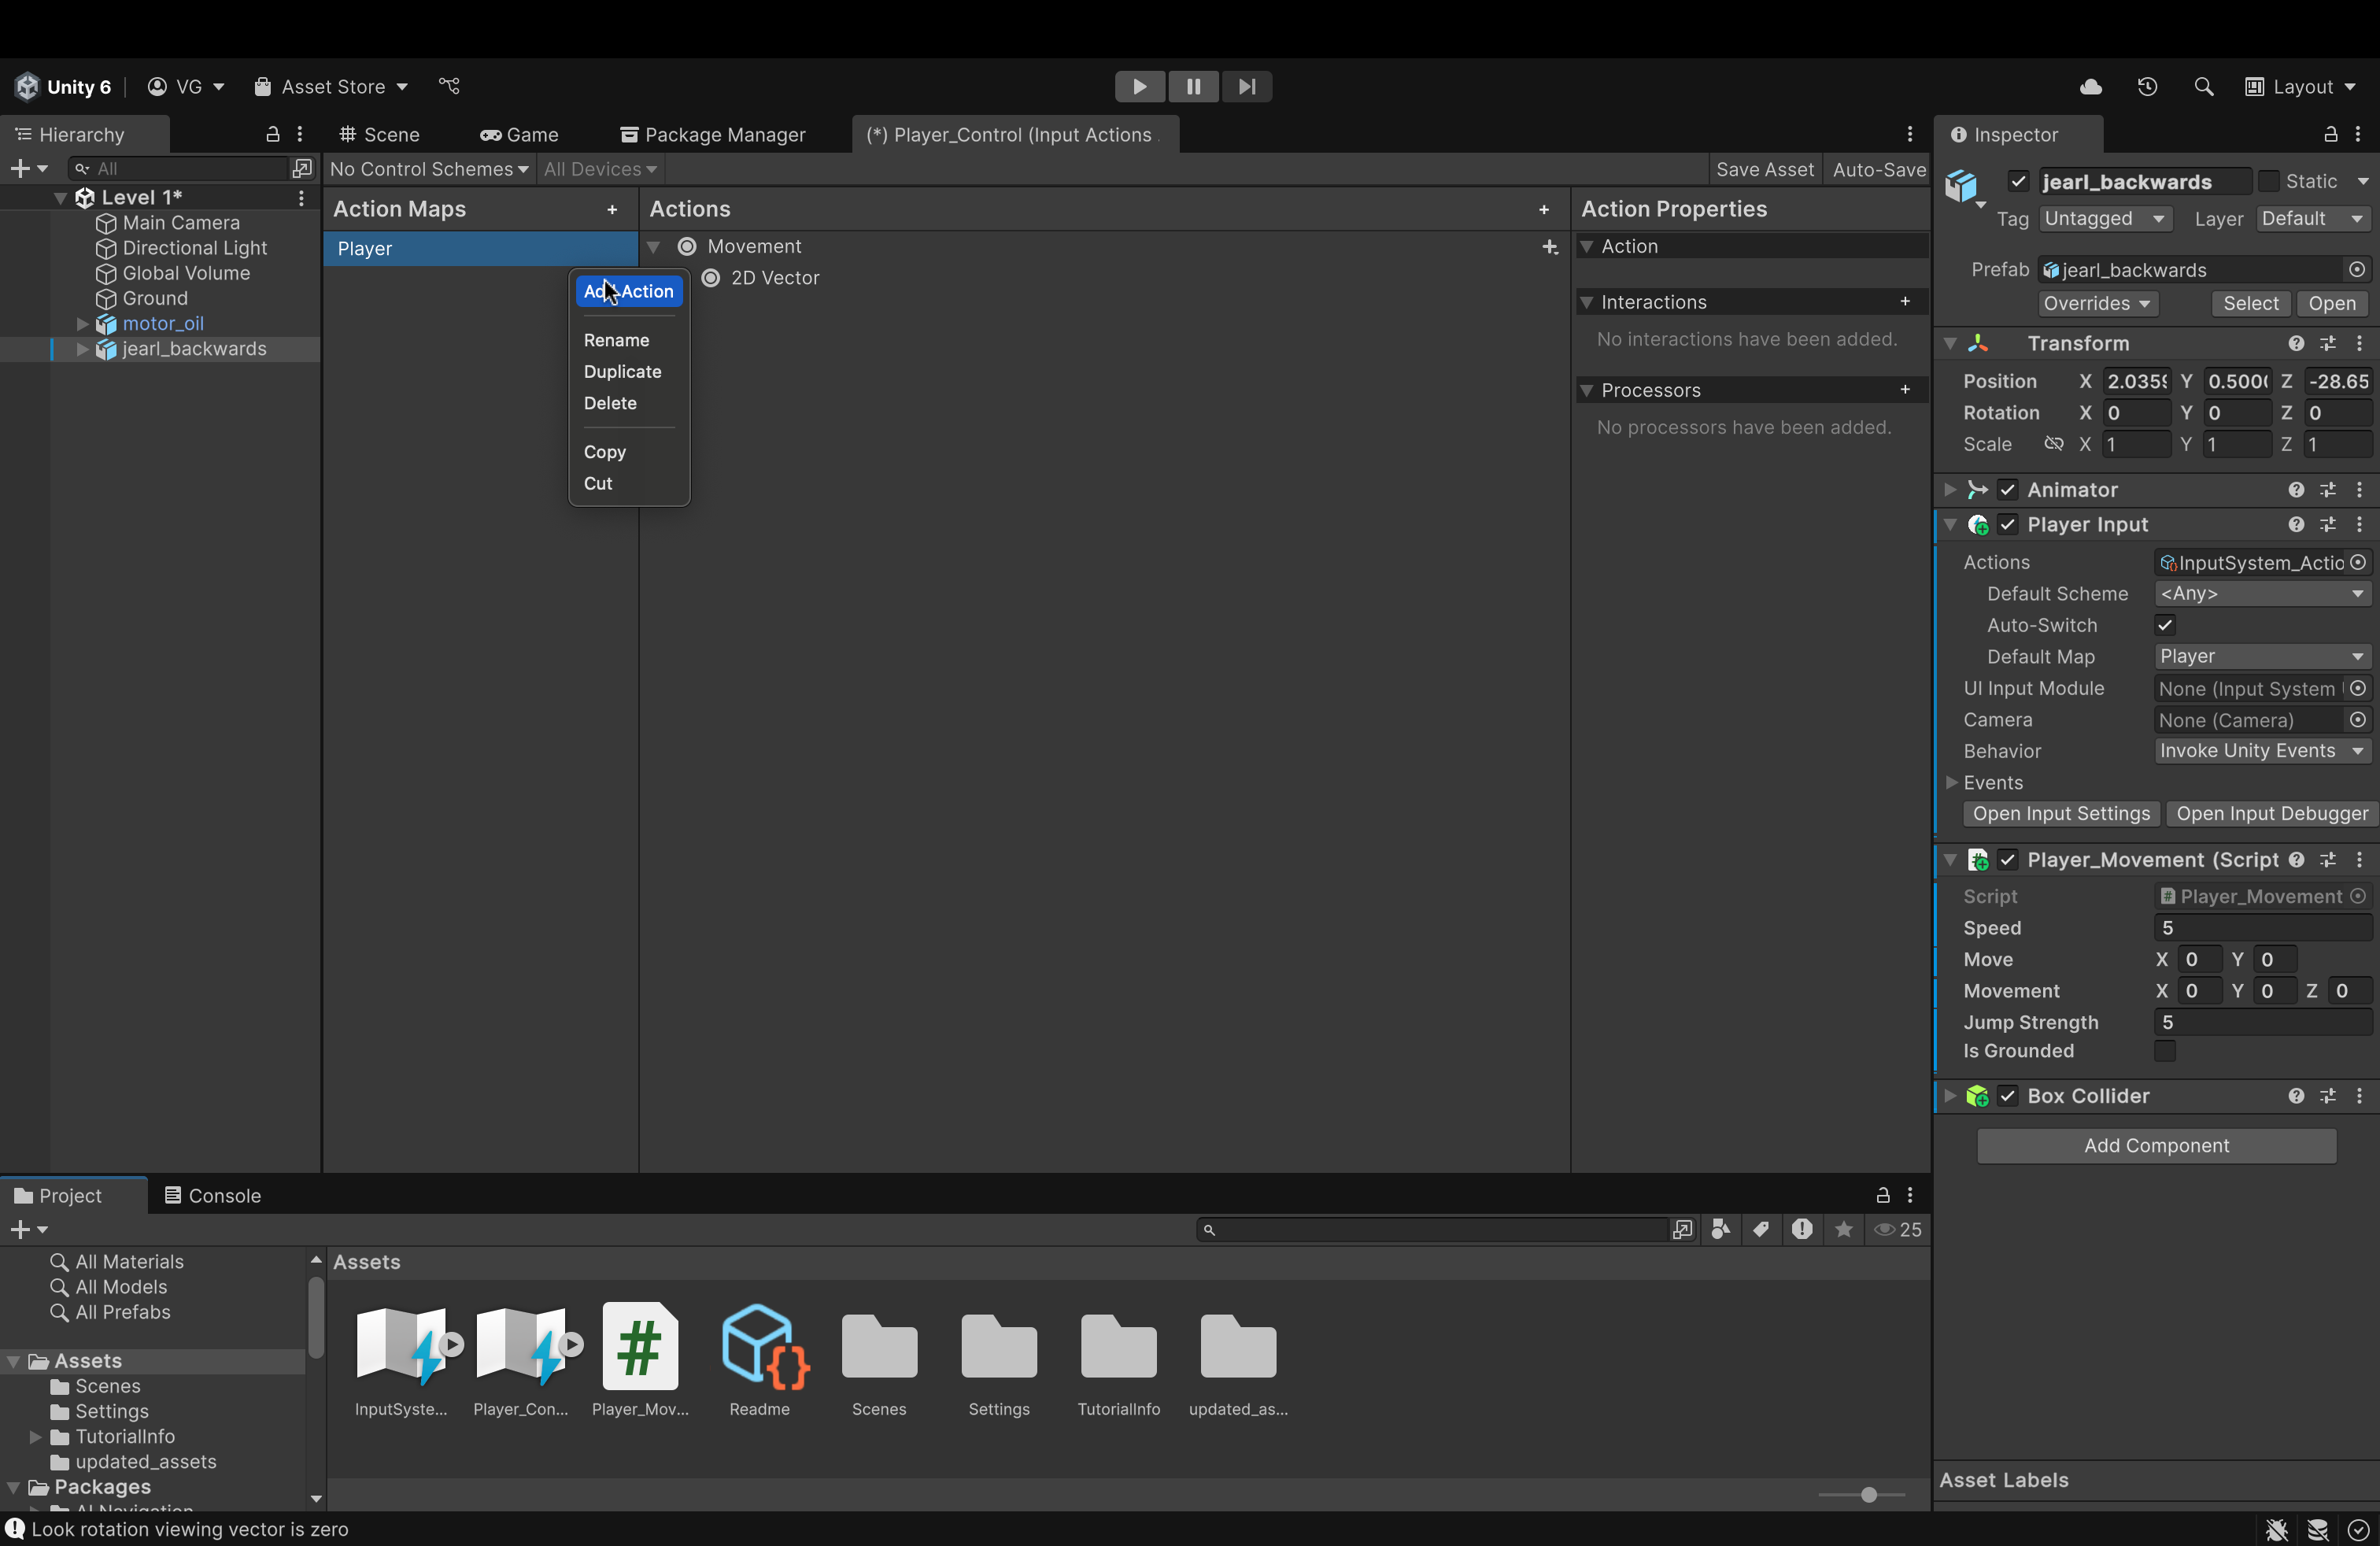
- Open the Player_Control action map. Then, right click on the "Player" action map and hit Add Action.
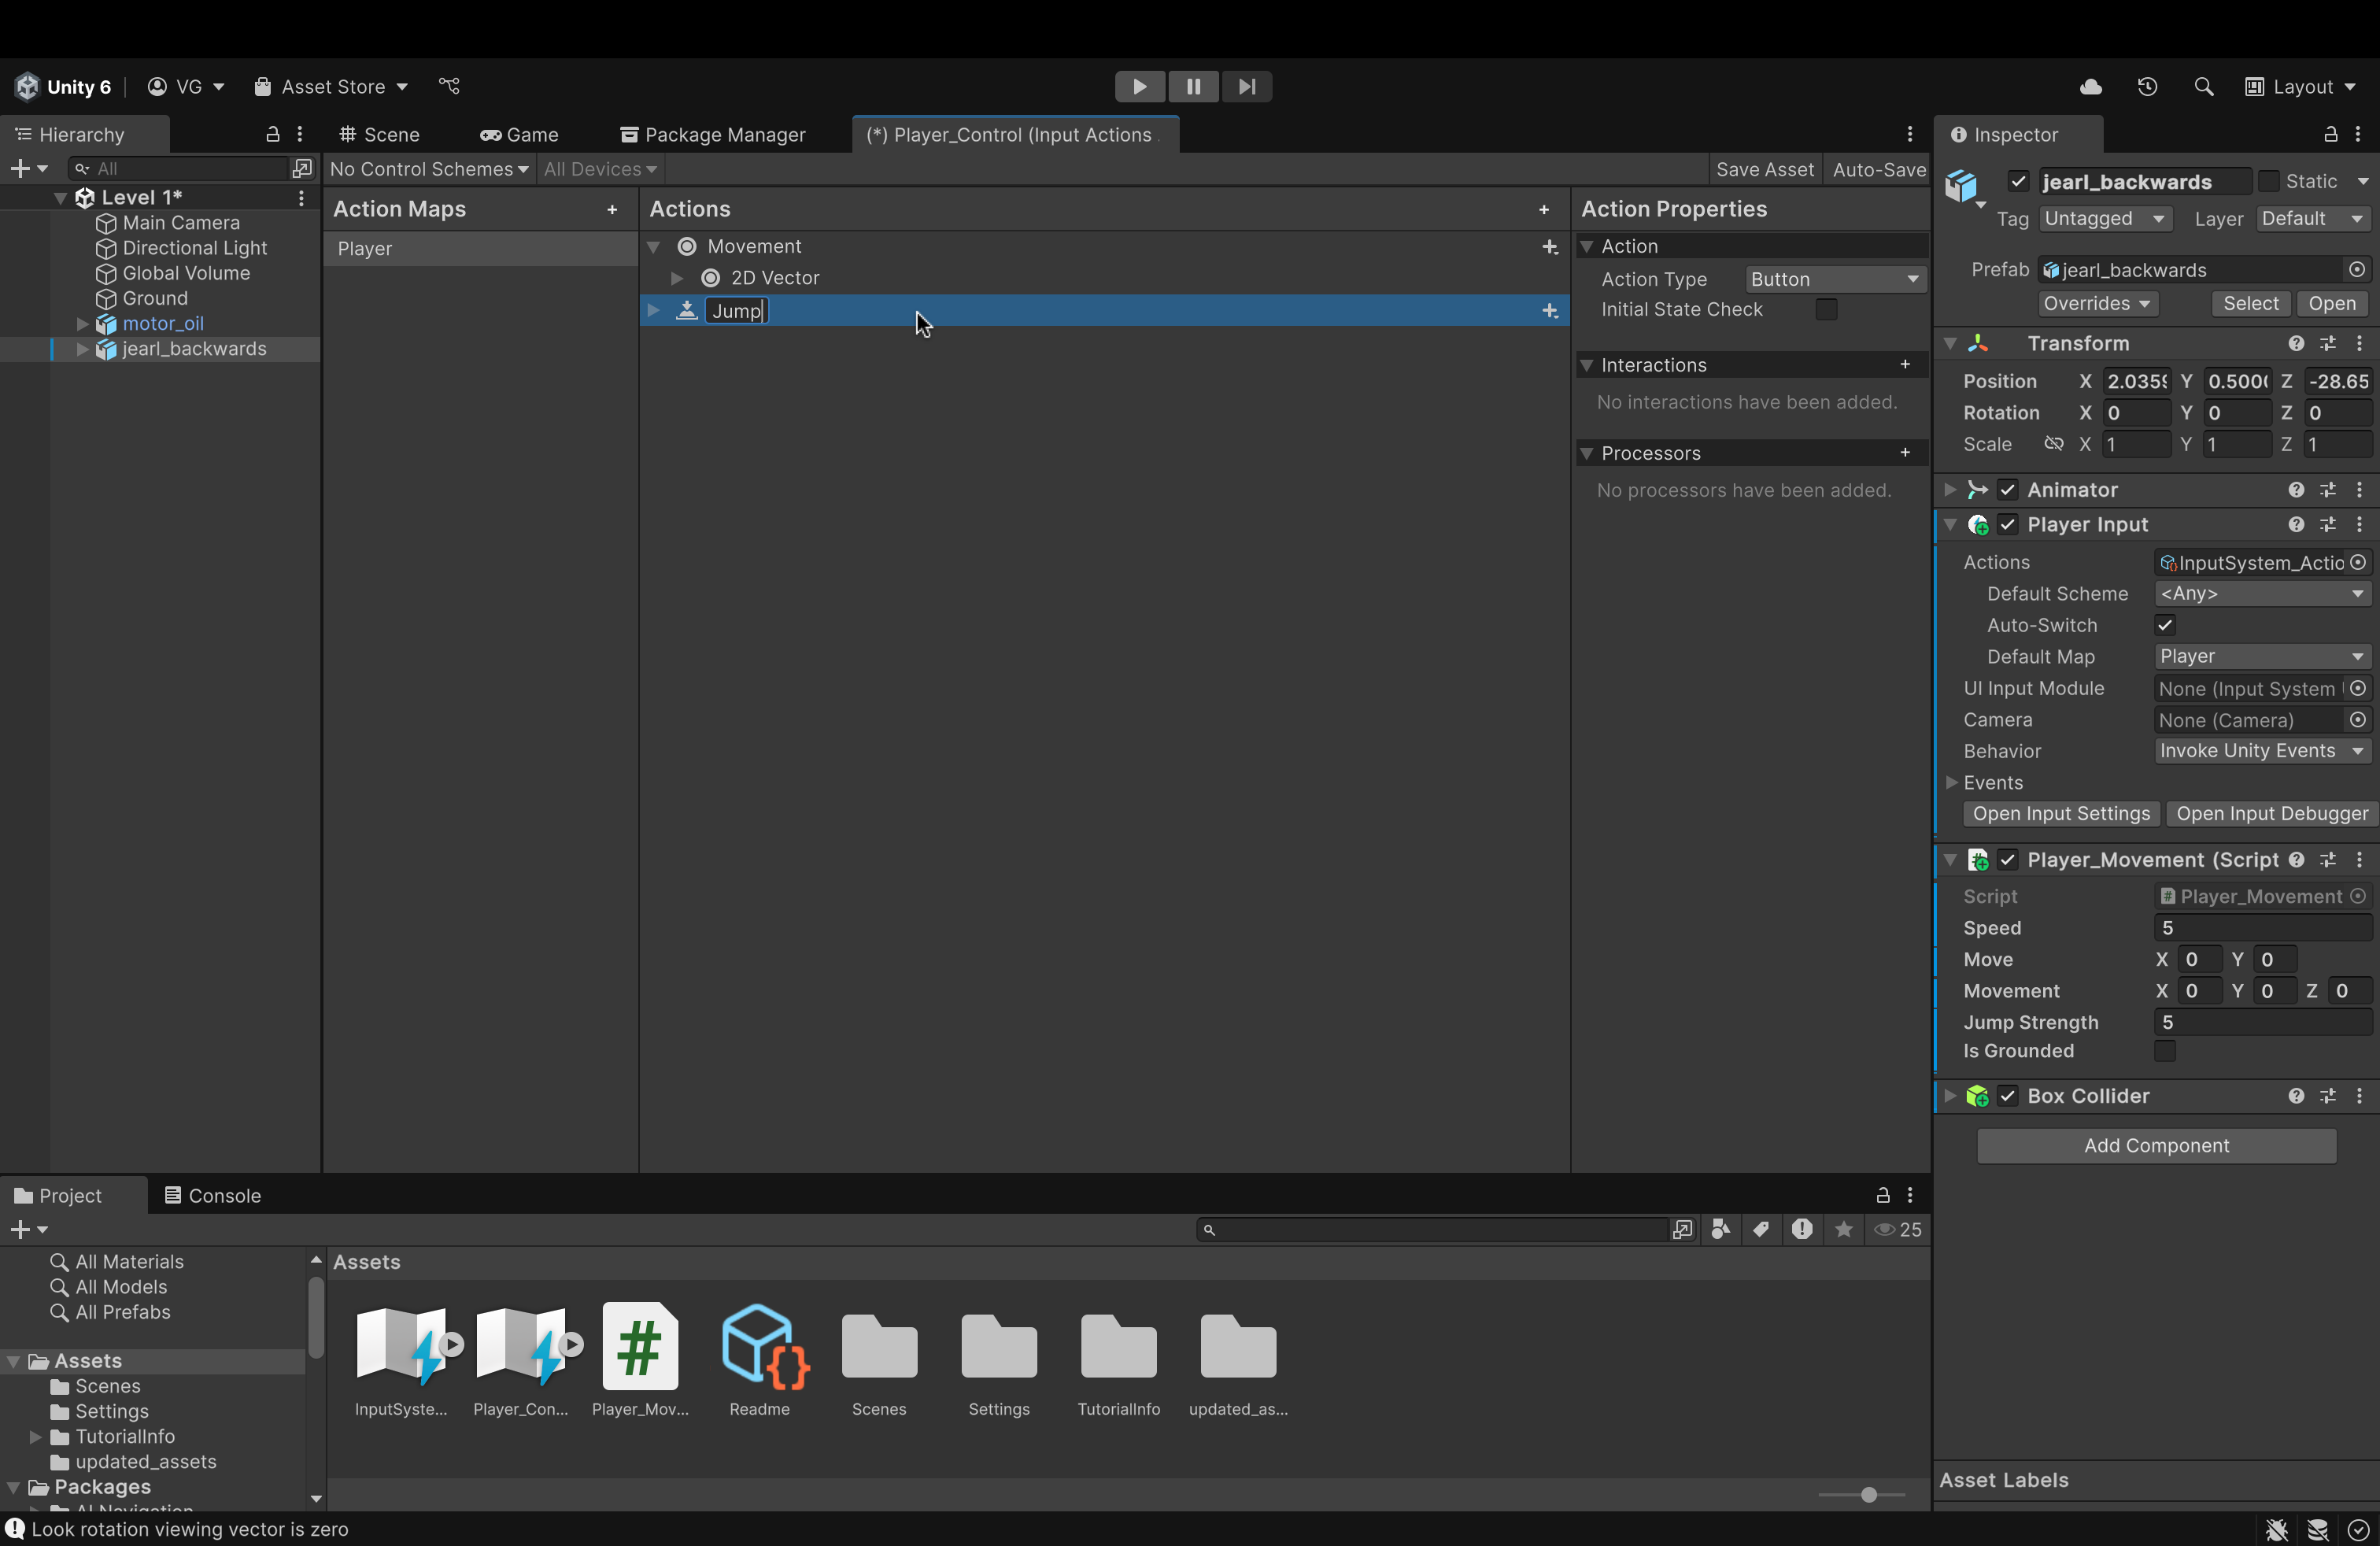
- Click once on the newly created action, press
Enter, and rename it to Jump.- Also, in the right-hand panel, ensure that the Action Type attribute for this action is button (we will press the jump button once to jump. not hold it)
- Also, in the right-hand panel, ensure that the Action Type attribute for this action is button (we will press the jump button once to jump. not hold it)

- In the middle panel, next to Jump, click the triangle to view its contents.
- Click on < No Binding >.
- Over to the right, open the Path dropdown and either search for the Spacebar key or use the Listen feature (like earlier).
- Select Spacebar from the search results to assign it to the empty key binding.
- Make sure to click Save Asset in the top right.
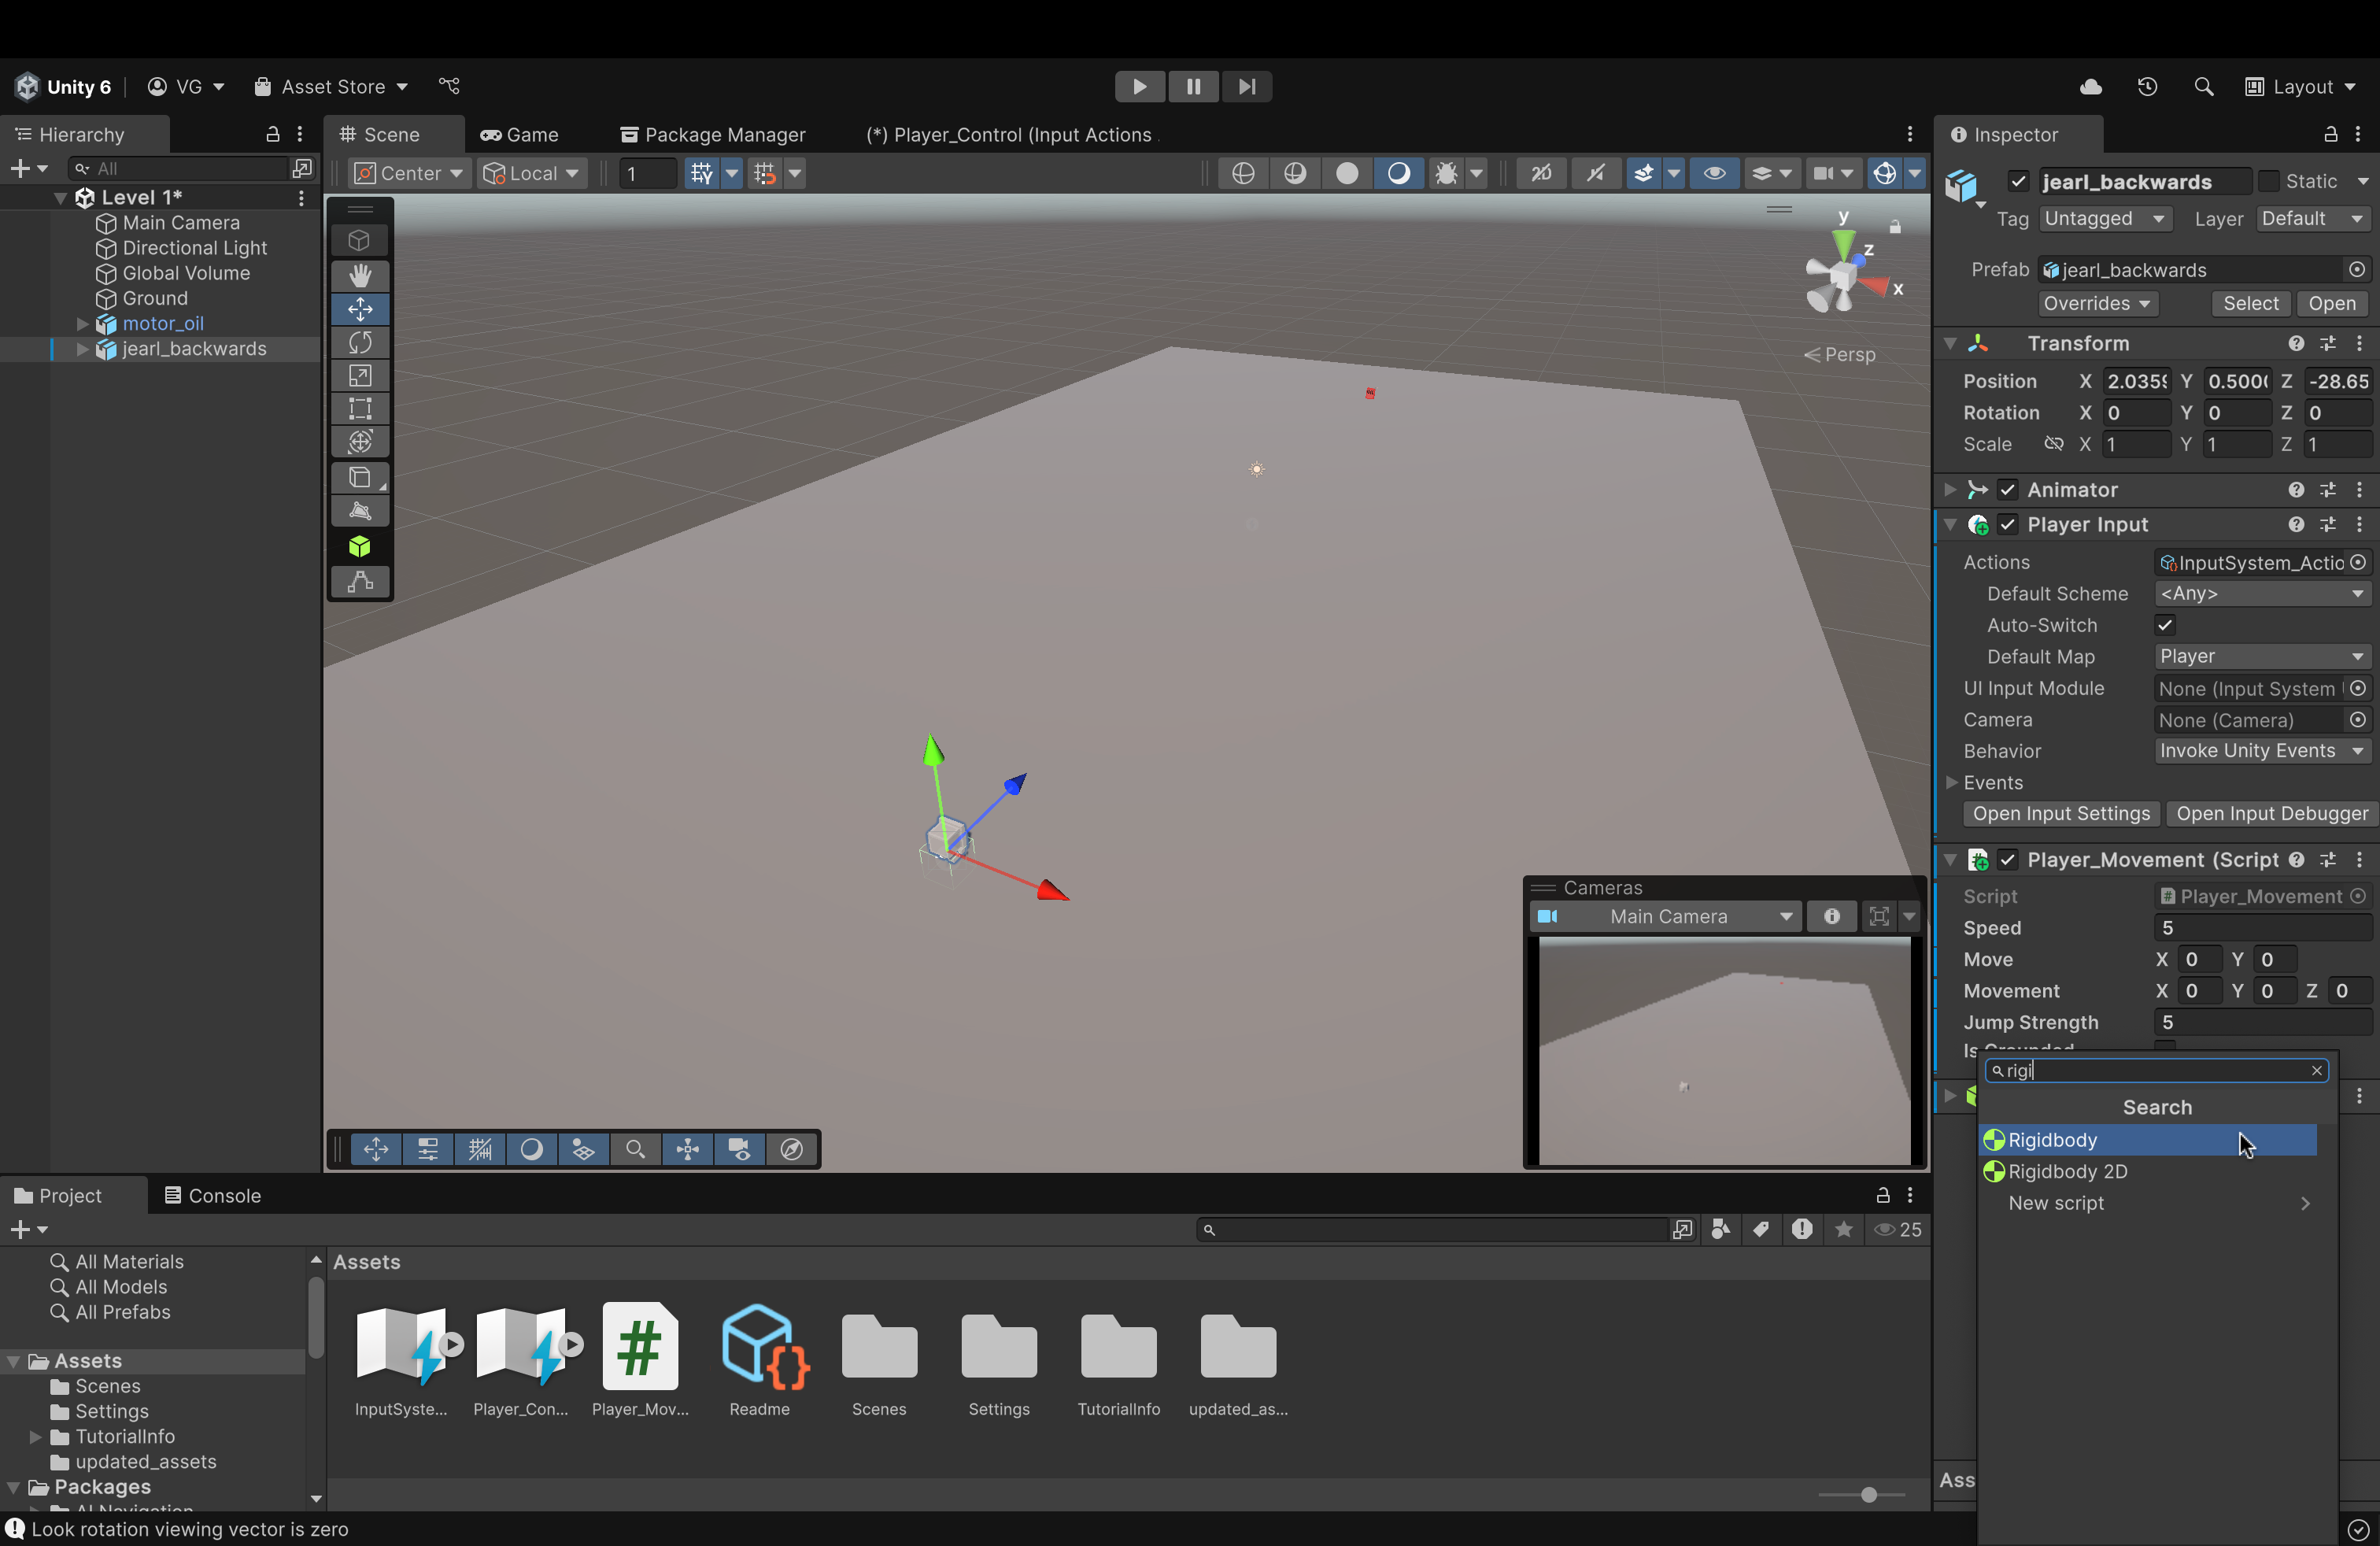
- Back in our Scene View, click on jearl_backwards to access its components
- Click on Add Component and, in the search bar, start typing Rigidbody. You should see it in the search results.
- Click on Rigidbody to add it to our player object
- What's the point?
- This component enables our player object to now be affected by physics (i.e. gravity)
- Without this, our jump functionality would not work and be very wonky
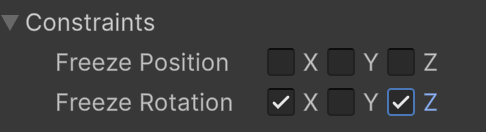
- Inside of the Rigidbody component, under the Constraints dropdown, check the boxes for the X and Z axes for Freeze Rotation
- Why?
- This will prevent unwanted rotations or leaning when our player interacts with or collides with any uneven surfaces.
- Locking these two axes ensures that our jump force is only applied to the y-axis (directly up) and nowhere else.
- Why?
Let's make a few changes to our script, Player_Movement.cs (or whatever you named it)
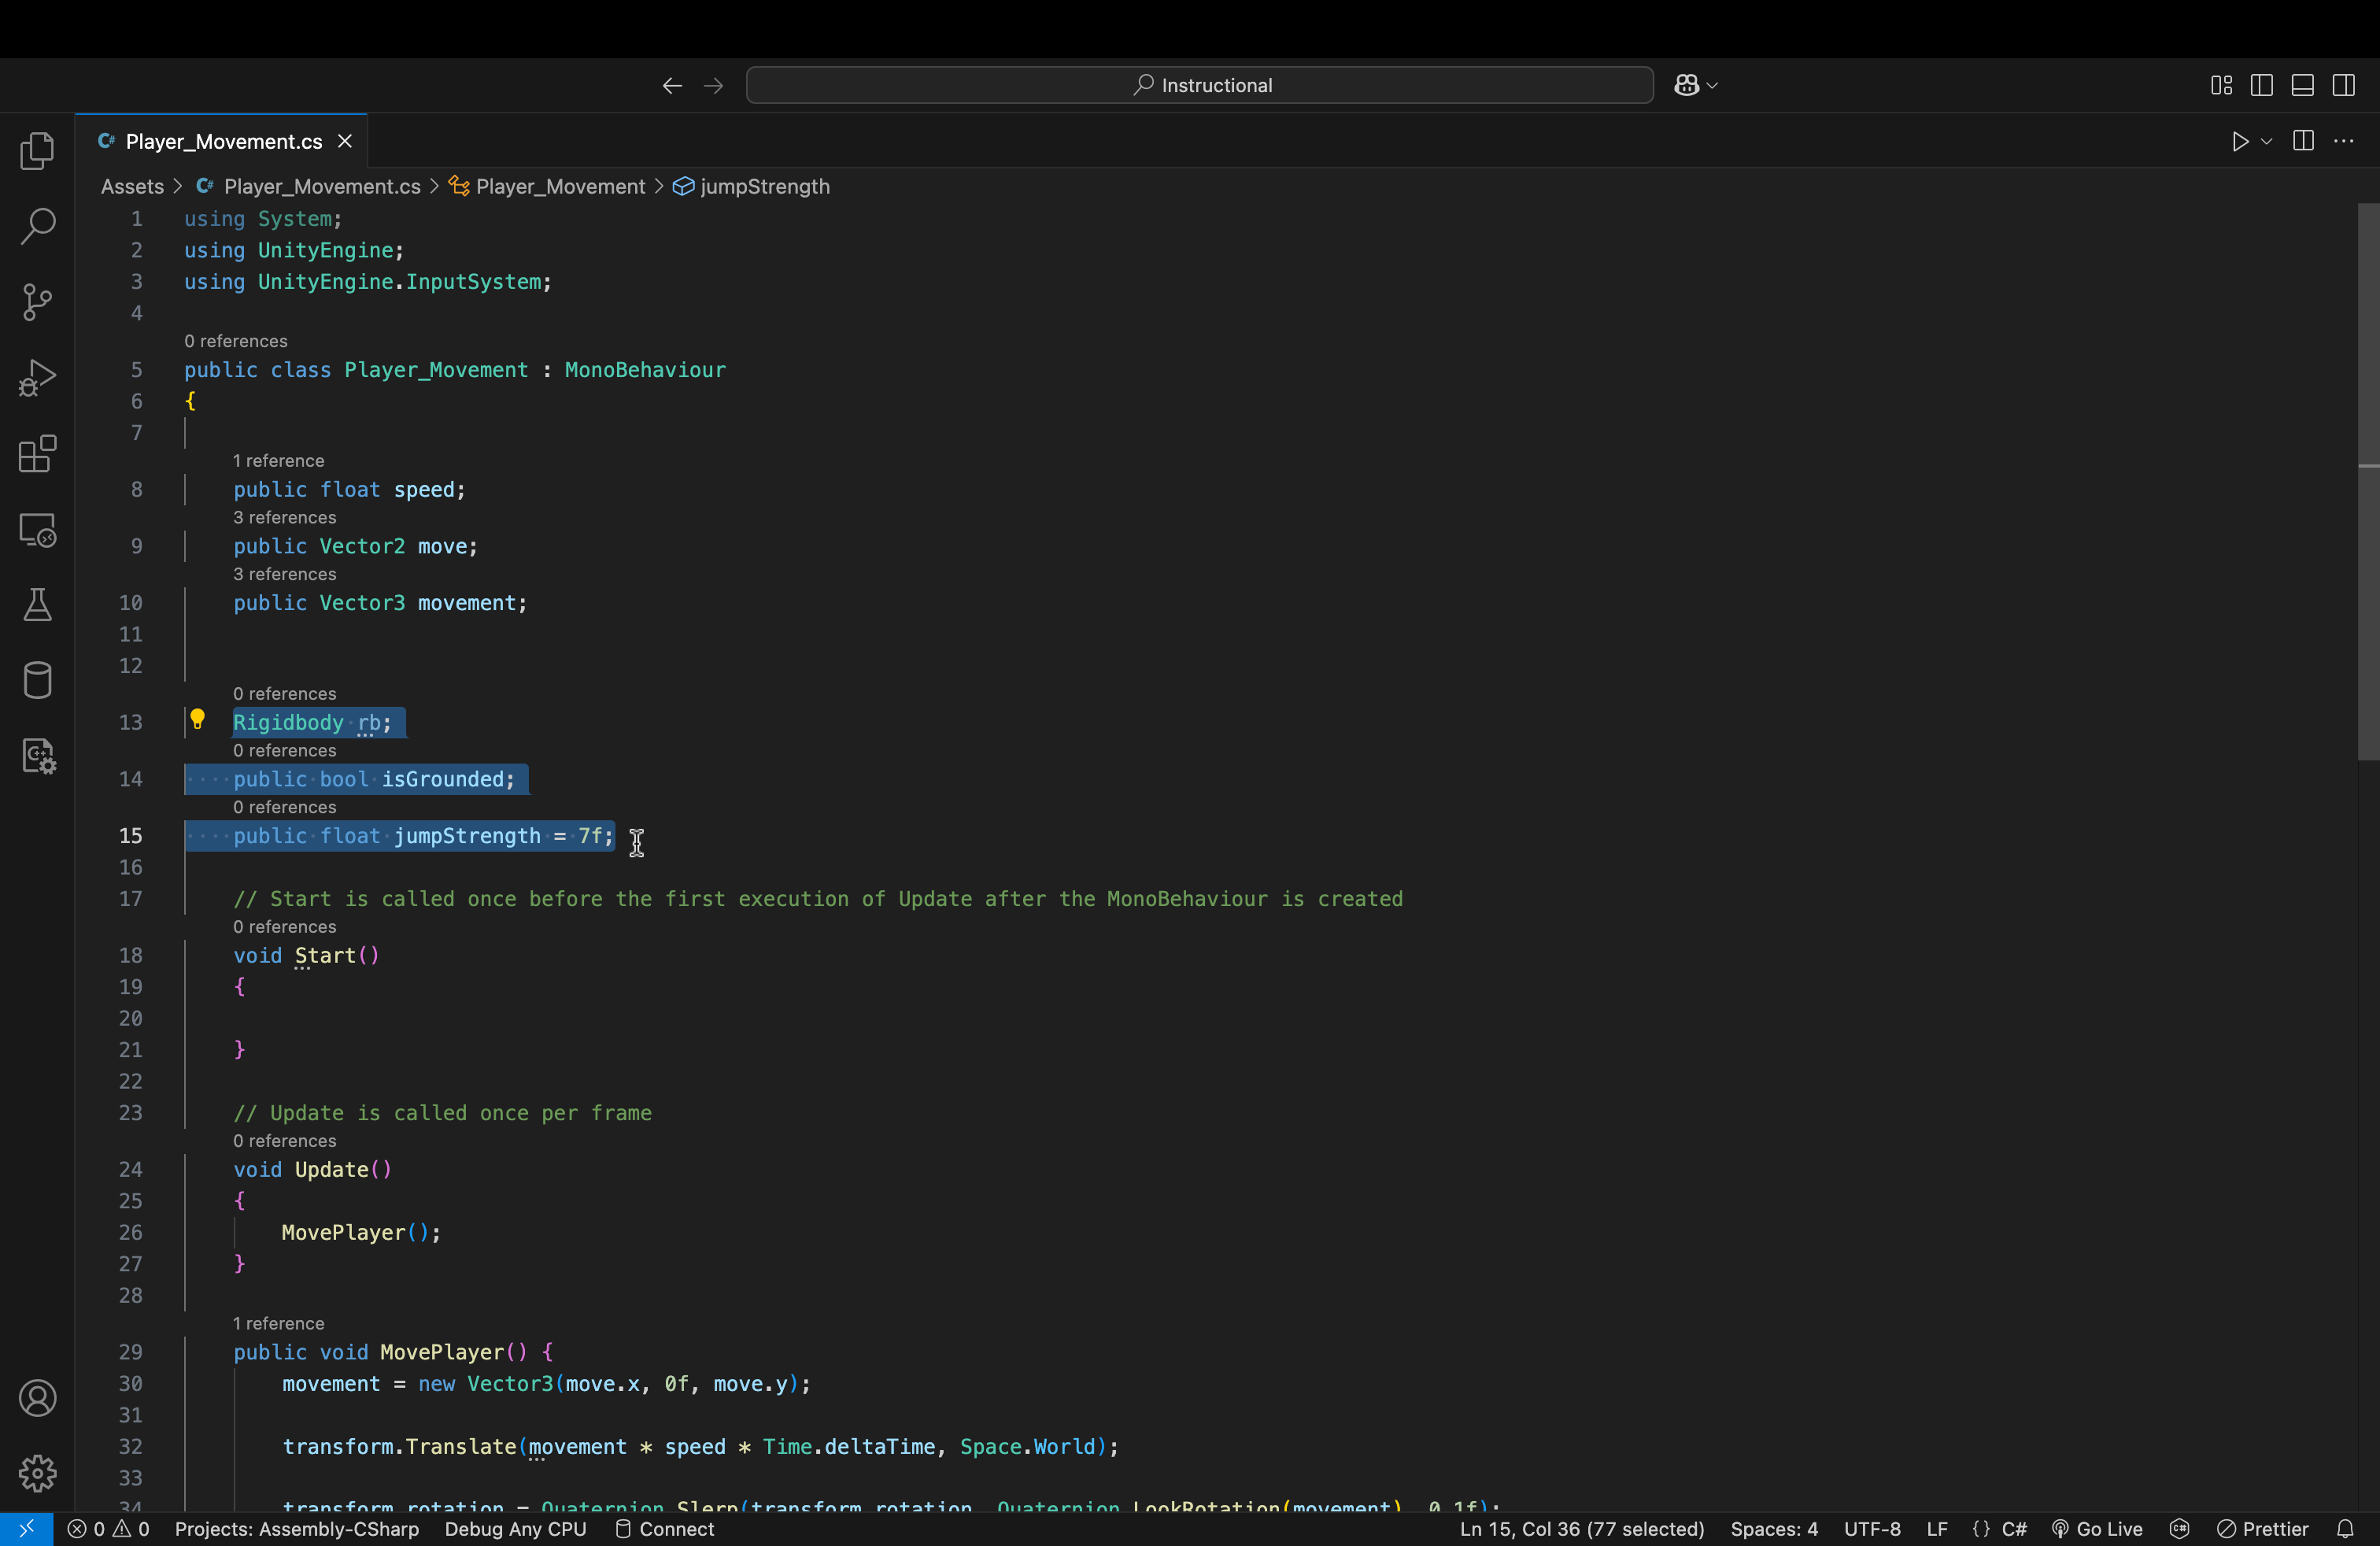
- Add the following three variables up top:
- Rigidbody rb;
- public bool isGrounded;
- public float jumpStrength = 7f;
- Let's take a look at these:
- Rigidbody rb;
- This variable will hold the Rigidbody component of the object that this script is attached to. This will allow us to add forces to it later.
- public bool isGrounded;
- This ensures that we can only jump again once we have landed (and not at any other time)
- Simply relying on collisions can cause some errors.
- Without this check, we could either fall through the ground or keep jumping up forever and never land.
- public float jumpStrength = 7f;
- Self-explanatory. Allows us to modify the strength of our jump. We can change this value in the Editor as well.
- Rigidbody rb;
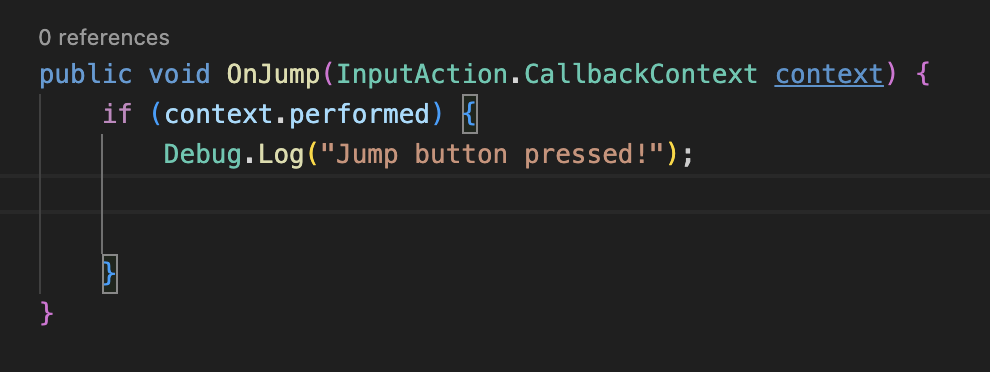
- Underneath our OnMove function, add this function.
- The syntax is mostly the same except for one key difference...
- context.performed
- Remember, we are not pressing and holding the jump button. This is a one-and-done type of action.
- Therefore, we do not need to constantly read a value from the action map (like OnMove)
- We just need to check, once, whether or not we received a context (message) from our key binding (the jump button)
- If we did, we print a message to the console.
- If we did, we print a message to the console.
- We just need to check, once, whether or not we received a context (message) from our key binding (the jump button)
- context.performed
- The syntax is mostly the same except for one key difference...
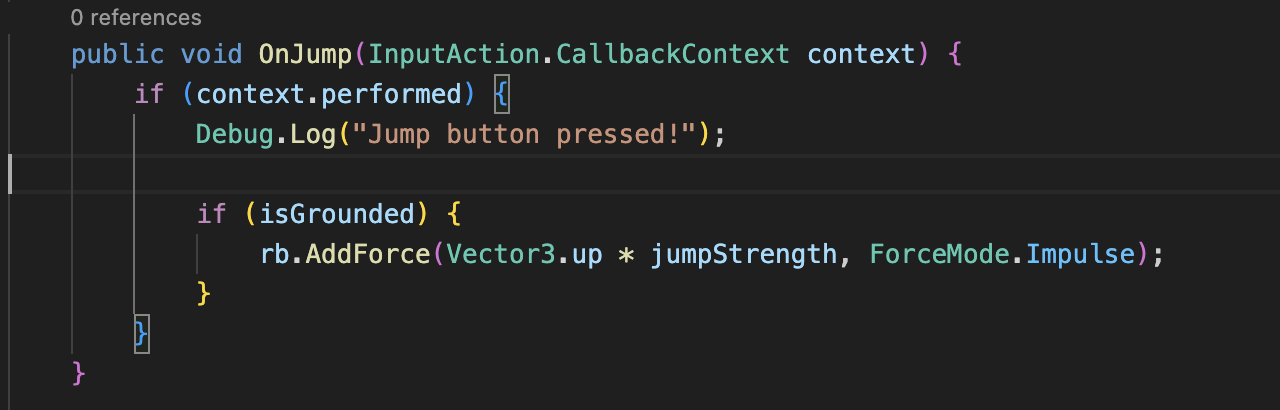
- Add the if statement that you see up above inside our earlier if statement.
- What does this even mean?:
-
We nested this addition inside of our context.performed if statement.
- This ensures that if we press the jump button while the player object is airborne, we won't add more force to the player (i.e. double jump)
- Not necessarily a bad thing. Feel free to implement this later if you want to.
- This ensures that if we press the jump button while the player object is airborne, we won't add more force to the player (i.e. double jump)
-
if (isGrounded) {...}
- If isGrounded is true (i.e. we are on the ground)
-
rb.AddForce(Vector3.up * jumpStrength, ForceMode.Impulse)
- We will add an impulse force (instantaneous force) to our Rigidbody component, which will, in turn, affect the player object.
- This force will be equal to the 3D up vector (whose value is (0, 1, 0)) multiplied by our jump strength.
-
- What does this even mean?:
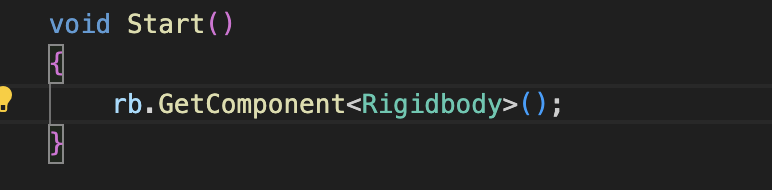
- In our Start function, add the line in the image above.
- This allows us to actually access and store this object's Rigidbody component inside of our variable for use in our script.
- We placed this inside Start() so that this action is only performed once. We access the Rigidbody component once, store it, and that's it.
- EDIT (This is me from the future) --> Change this line from rb.GetComponent... to rb = GetComponent...
But, how can we actually check if the object has even landed to then enable it to jump again?
The answer? With collisions
-
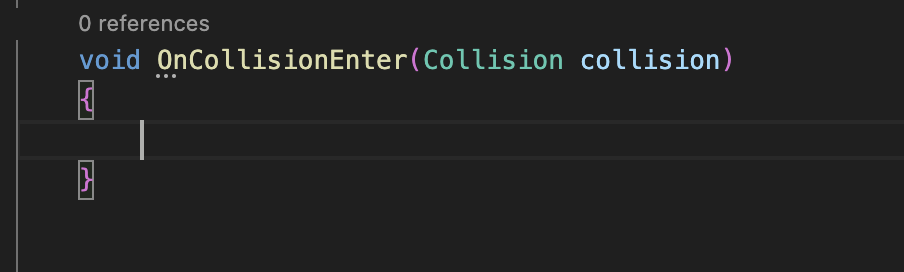
Add the following function below our OnJump function.
- Do note that this is a built-in function that we are simply overwriting.
- Intellisense and autocomplete should kick in as soon as you start typing the function name.
- Upon any collision, Unity, by default, calls this method. The physics engine is fast enough to even call this multiple times per frame.
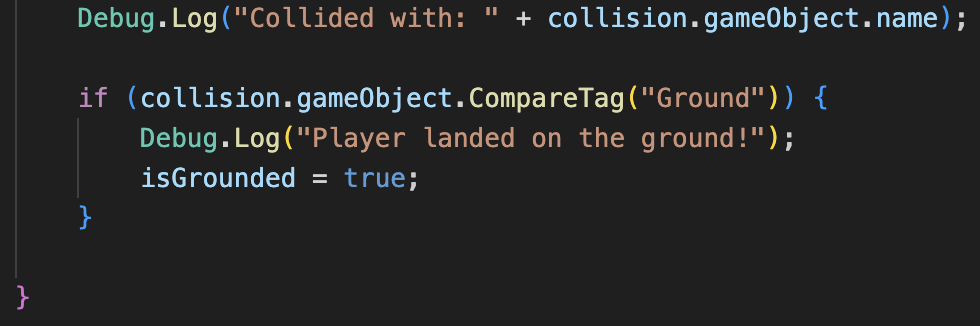
- Add the following code to the function body of OnCollisionEnter.
- What does this mean?
- Debug.Log(...)
- This is here to ensure that a). a collision occurred and b). it occurred with the correct object.
- if (collision.gameObject.CompareTag("Ground")) {
- When a collision occurs, the collision variable in our method signature will be given information about the collision.
- The "collision." refers to the collision that just occurred.
- The ".gameObject" refers to the other object that this object collided with
- The .CompareTag checks if that other object held a tag of "Ground" (we'll go over what this is in just a little bit).
- So, if the other object in the collision that just happened with our object is tagged with the tag "Ground", then...
- We set isGrounded to true (i.e. we have landed).
- When a collision occurs, the collision variable in our method signature will be given information about the collision.
- Debug.Log(...)
- What does this mean?
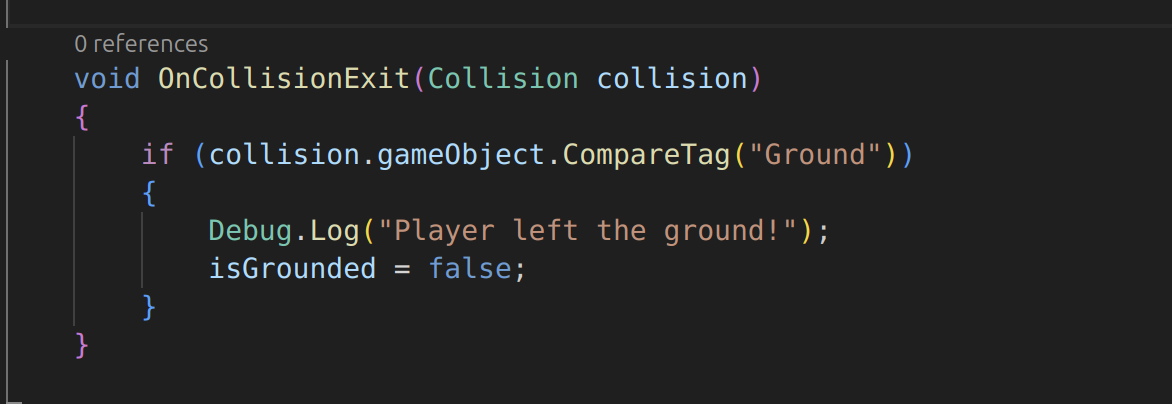
- Add the following method after OnCollisionEnter()
- Why?
- If you comb through the rest of the code, you realize that there's nothing that sets the isGrounded flag to False
- Once we jump and it's set to True, it remains True.
- The result? Unlimited jumps
- Fun, but it should be implemented in a better manner (I'll leave that up to you if you want to do that)
- This method is called in Unity when two GameObjects' colliders are not in contact with each other.
- Once they separate, this method is called.
- The game engine can determine if they've separated. This method just allows US to determine that as well and update our script's logic as necessary.
- Why?
-
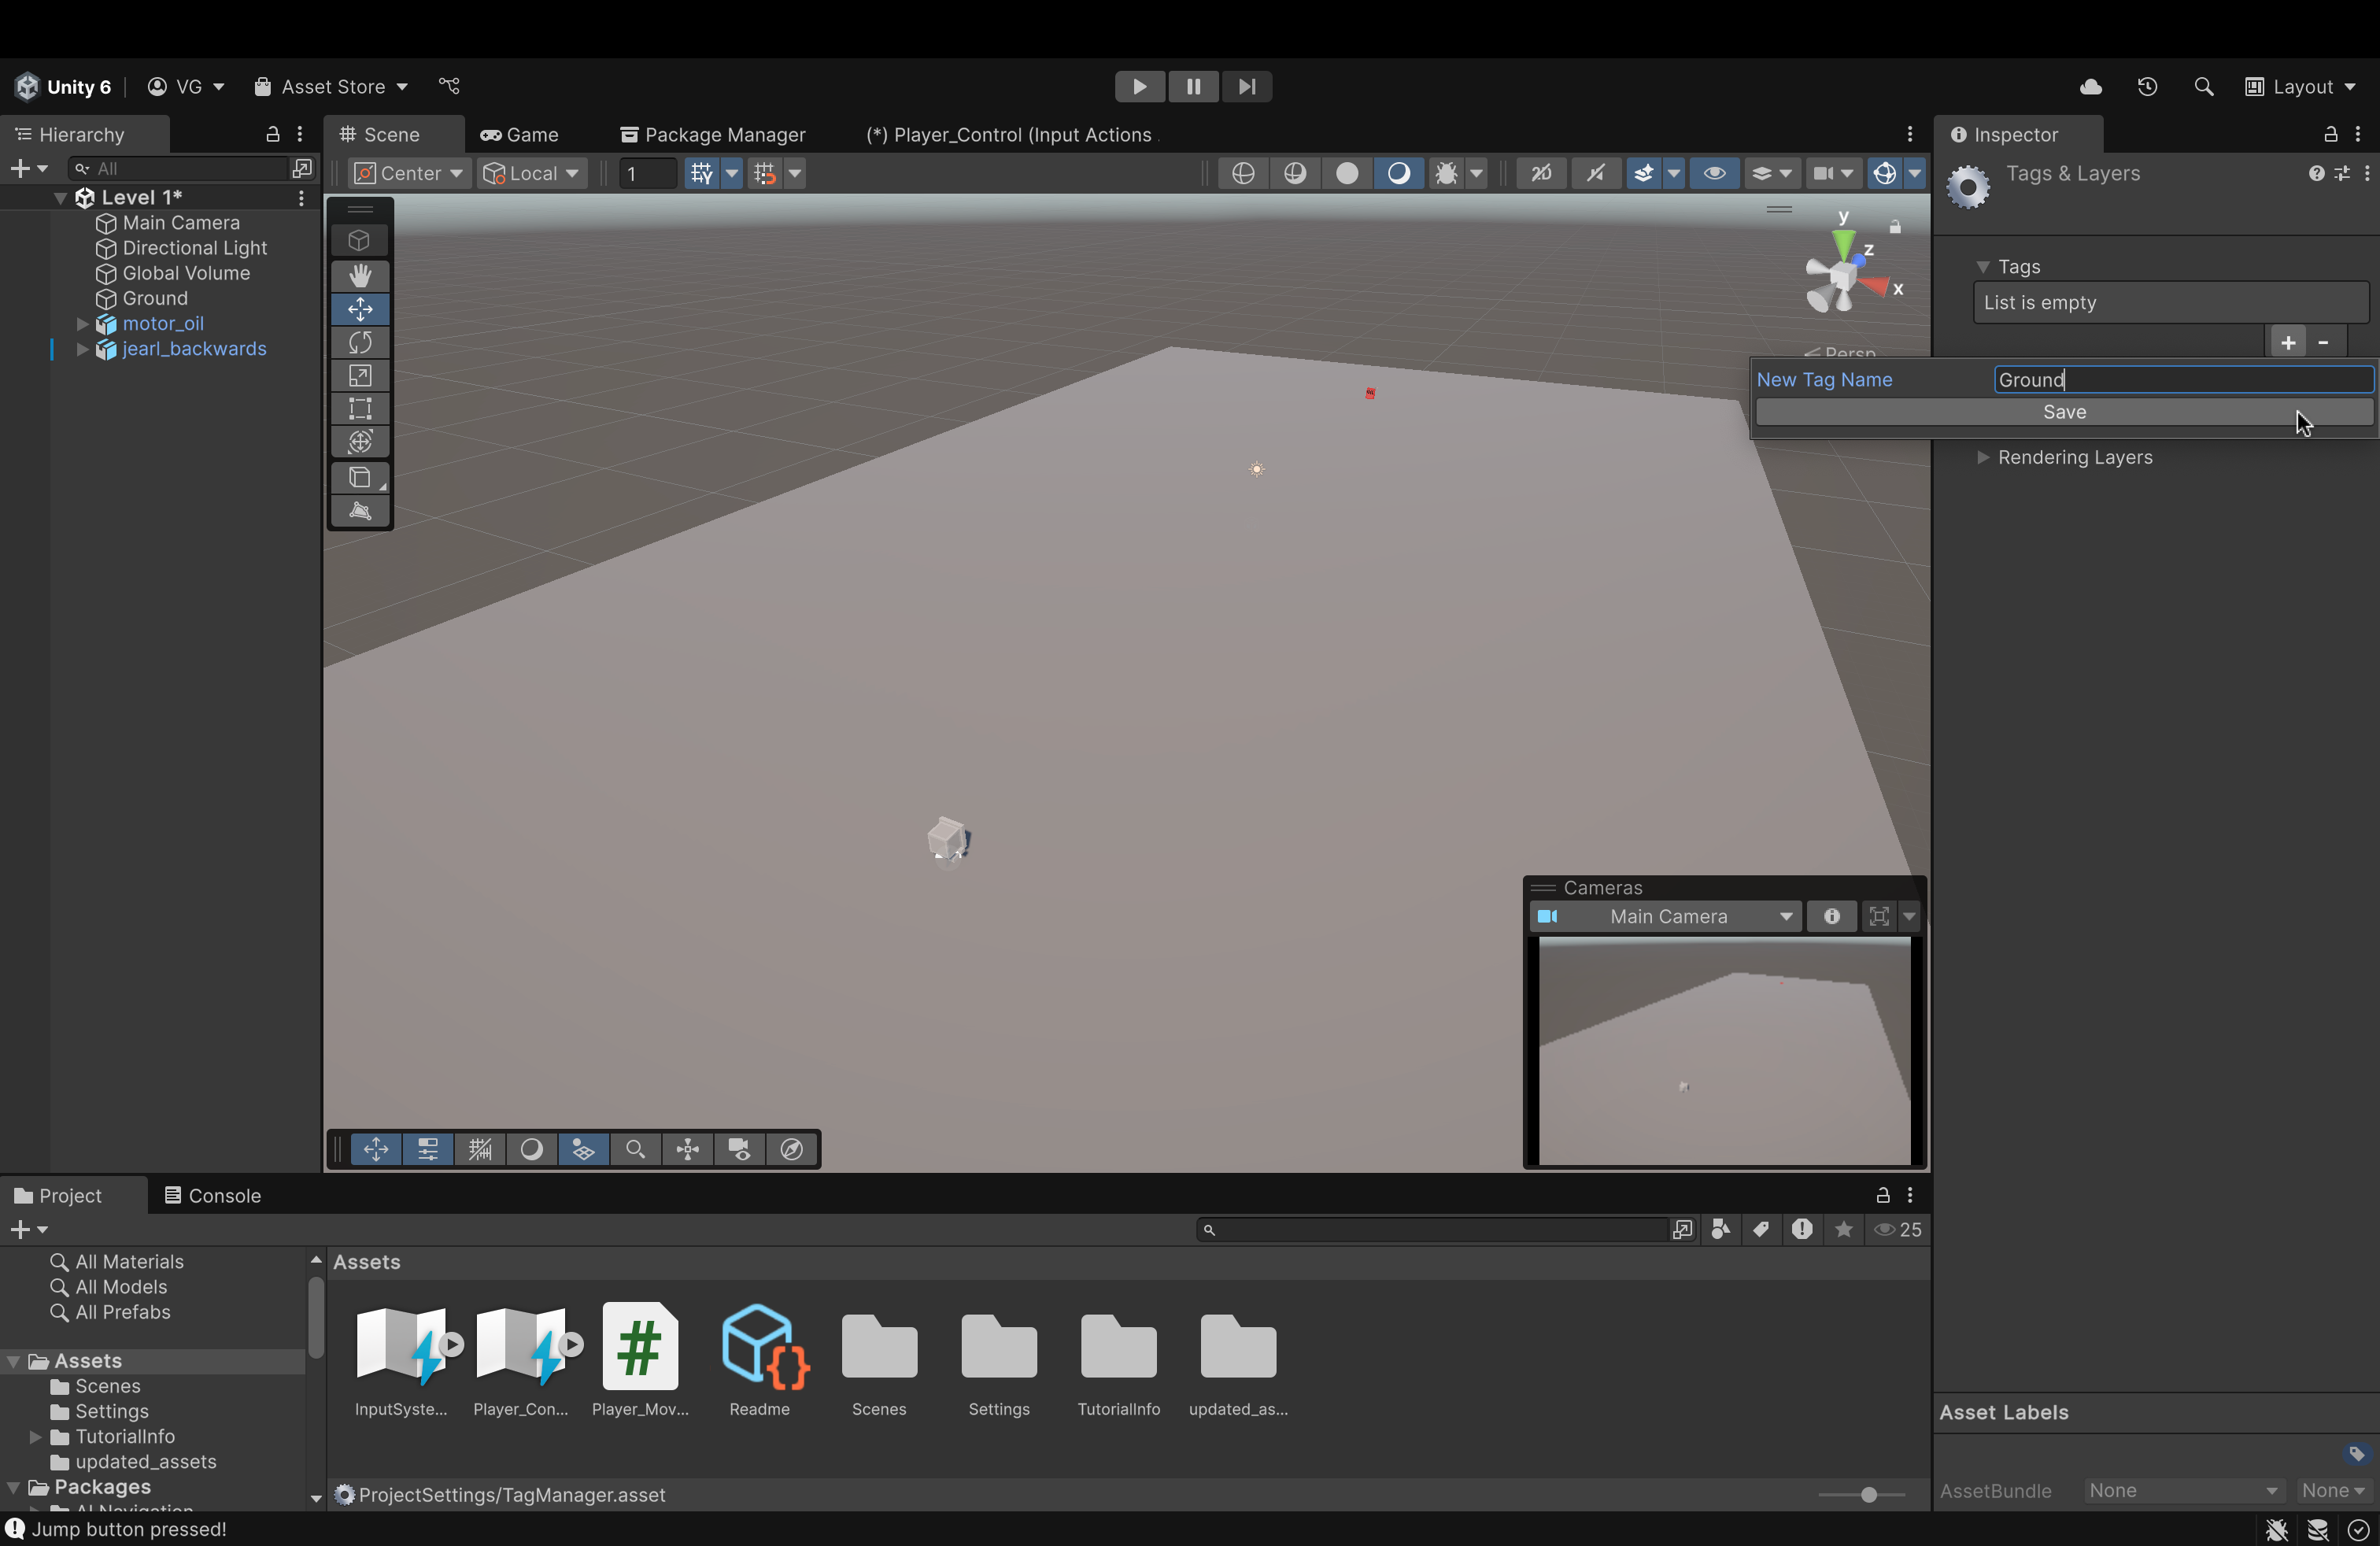
Back in the Editor, let's add a tag to our Plane game object.
- Click the Plane object to view its components.
- In the Component Panel (on the right), up top (underneath the object's name), find the Tag attribute.
- Click the dropdown menu next to it to expand it.
- Click Add Tag...
- In the new window, click the plus icon.
- Name your tag Ground (name it EXACTLY the name we used in our if statement in the collision function in our script).
- Click Save.
- Click on the Plane ground object to see its components. Again.
- Find the Tag attribute and open the dropdown.
- You should see your newly created tag in the list.
- Click it to assign it to this object.
- Unity does NOT do this automatically. So, don't forget this step!
- Unity does NOT do this automatically. So, don't forget this step!
-
You remember earlier when we configured the OnMove function in our Player Input script? This time, we need to do the exact same thing, but for the OnJump function!
- Click on jearl_backwards to view its components.
- In the Player Input script, open the Events dropdown (same as before).
- Open the Player dropdown.
- If you see a new box labeled Jump (CallbackContext), repeat the same steps as before:
- Click the plus icon
- Drag our player object into the empty box below Runtime
- In the bigger dropdown, find our movement function.
- Open it.
- You should see an option for OnJump
- Click that and you're good.
-
Make sure to add a Box Collider component to your game object. The process is that same as any other component. Simply add it and that's it.
So now, assuming everything was set up correctly, upon running our game, you should be able to move AND jump!
Now, for a final touch (before moving on to animations), let's fix the position of our camera

- Let's make a new script for our Main Camera object
- Click on the Main Camera to open its Component view on the right side.
- At the bottom, click Add Component and type in the box New Script
- Let's name the script Player_Follow
- Once created, double-click to open it.

- Let's add the following variables first:
- What do they mean?:
- public Transform player;
- We will need this later to hold information about our player object (we'll just click and drag our player object into this variable in our Editor later).
- Vector3 desired_distance = new Vector3(...)
- This is the three dimensional position that the camera will be locked at.
- This is how much distance you want to maintain between the camera and the player at all times.
- Note: These are coordinates that I decided to use after a bit of trial and error (I just like how the camera sits at this position).
- Feel free to experiment yourself to find the location that you find better.
- Move the camera to that position. Then, just copy its Position values (from Transform) into this Vector3 variable.
- Vector3 offset
- This is where we'll store the offset value (calculated as the difference between the player's position and the camera's position)
- public Transform player;
- What do they mean?:
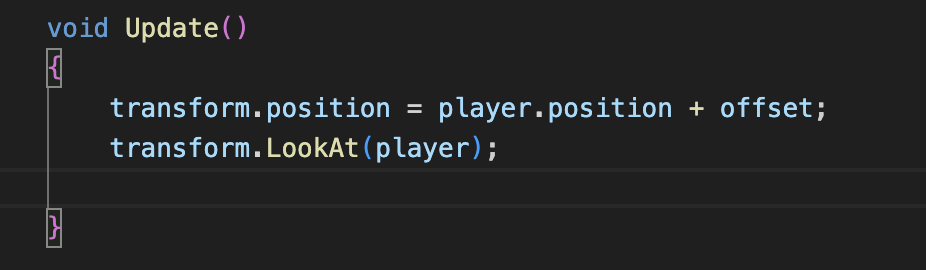
- Now, we'll add the lines up above into the Update() method
- What does this mean?
- transform.position = player.position + offset;
- We're gonna take the position of this game object (the camera) and set it to the position of the player + the offset vector that we manually set up above.
- transform.LookAt(player);
- This line will apply a rotation to this game object (the camera) that will ensure that its forward vector (the z-axis vector) is pointing directly at the specified game object (which we'll set to our player object in the Unity Editor).
- transform.position = player.position + offset;
- What does this mean?

- Now, we'll add this line into the Start() method
- What does this mean?
- This is how we calculate how much offset (distance) we need to maintain at each frame of gameplay.
- What does this mean?