Making a Player
Making the Nodes
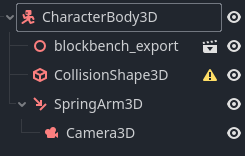
- Make a handful of new nodes to represent the player. The main one will be a
CharacterBody3D. Then drag thejearl.gltffile to add a model to it. After that, create aCollisionShape3Dunder it, then aSpringArm3D, and move the existingCamera3Dunder that. After all of that, the player and its child nodes should look like this.
- Let's rename a few of these nodes, you can do that by double clicking, hitting "F2", or right clicking and selecting "Rename". See the image below:

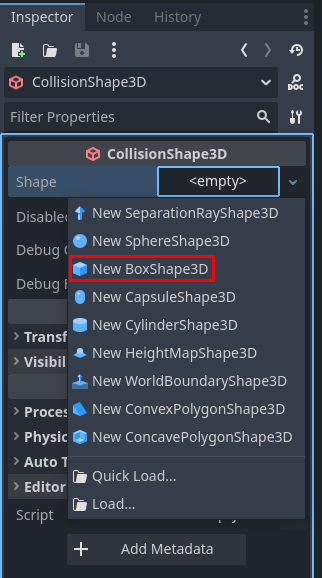
- Notice there's a caution sign next to the collision shape, that's because you don't have any collision data assigned to it yet. Click on the node, and in the properties editor, click on the
<empty>inShape <empty>, then selectNew BoxShape3D.
-
You should see a transparent blue box appear in the scene, this represents the shape of the collider. Use the orange handles and arrows to properly fit it around the model (you may want to turn off snapping for this).
-
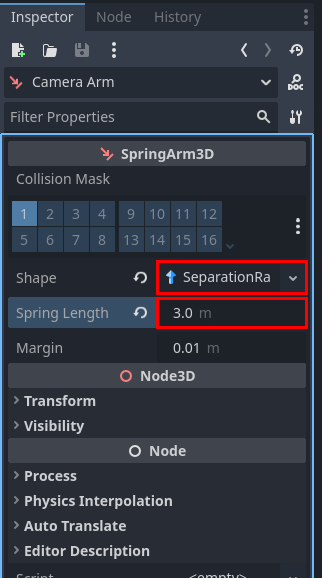
Now you have some properties to set on the camera arm. Set the
ShapetoNew SeparationRayShape3Dand theSpring Lengthto3.0.
Scripting the Camera Arm
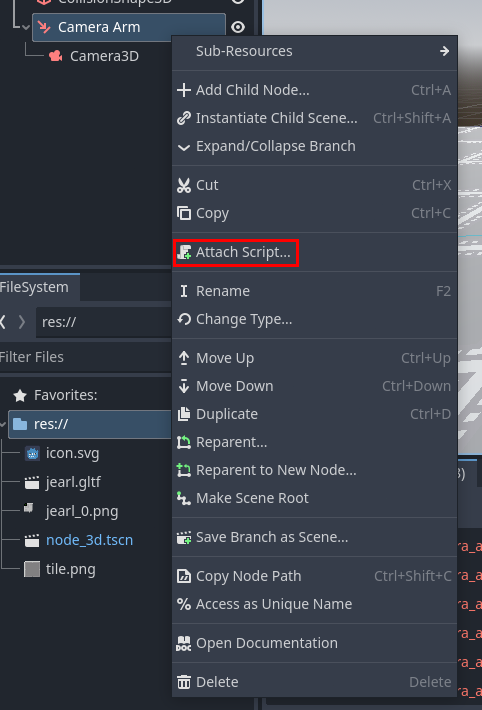
- In the scene tree, right click the camera arm and select
Attach Script...
-
The default settings are fine, just hit
Create -
This is the script you're going to use for the camera arm:
extends SpringArm3D

const MOUSE_SENSITIVITY = 0.5
const ZOOM_SPEED = 0.25

const ZOOM_MAX = 5
const ZOOM_MIN = 2

# Called when the node enters the scene tree for the first time.
func _ready() -> void:
	Input.set_mouse_mode(Input.MOUSE_MODE_CAPTURED)

func _input(event: InputEvent) -> void:
	if event is InputEventMouseMotion:
		rotation.y -= (deg_to_rad(event.relative.x) * MOUSE_SENSITIVITY)
		rotation.y = wrapf(rotation.y, 0, TAU)
		rotation.x -= (deg_to_rad(event.relative.y) * MOUSE_SENSITIVITY)
		rotation.x = clamp(rotation.x, -PI/2, PI/20)
	if event.is_action("zoom_in"):
		spring_length -= ZOOM_SPEED
	if event.is_action("zoom_out"):
		spring_length += ZOOM_SPEED
	spring_length = clamp(spring_length, ZOOM_MIN, ZOOM_MAX)
Breaking Down the Camera Script
- The very first line says that this script is made for
SpringArm3Dnodes, think of this like inheritance from Java, it allows you to access all the properties and functions of that class. - The next few lines declare constants that will be used later.
- The
_readyfunction is a special type of function called a "callback". That means Godot will call this function on its own schedule, and you get to create custom behavior for when that happens. This specific function will get called once when the node loads in, which makes it useful for setup and initialization. In this case, it's changing the mouse mode so the cursor dissapears and movement is locked to the window. This is suitable for first person and third person games. - The
_inputfunction is another callback that is called whenever the engine sees a player input. It also gives information about the input with theeventargument. If the event is a mouse motion, then apply that motion to the spring arm's rotation. If it matches one of the zooming events then increase or decrease the spring length. Notice the use of theclampfunctions, which prevent looking to high or low, and zooming too far in or out.
Testing the Camera
- Now if you run the game, you can pivot the camera by moving your mouse, and you can zoom in and out. Also when you go low enough, the camera slides across the floor instead of clipping through it. That's the benefit of the
SpringArm3D. This stops working at very sharp angles, which is why theclampfunction is in the script.
Player Movement
- Next, add a script to the player node, it will look like this:
extends CharacterBody3D

enum PlayerState {
	IDLE,
	RUNNING,
	JUMPING,
	FALLING
}

const SPEED = 5.0
const JUMP_VELOCITY = 4.5
const JUMP_BOOST_VELOCITY = 1.5
const ANGULAR_VELOCITY = 5.0

var did_jump_anim = false
var did_fall_anim = true
var current_state = PlayerState.IDLE
var direction = Vector3.ZERO
var gravity = 5
@onready var camera = $"Camera Arm/Camera3D"
@onready var model = $Jearl
@onready var animations = $Jearl/AnimationPlayer

func _process(delta: float) -> void:
	var input_dir = Input.get_vector("walk_left", "walk_right", "walk_forward", "walk_backward")
	direction = (transform.basis * Vector3(input_dir.x, 0, input_dir.y)).normalized()
	direction = direction.rotated(Vector3.UP, camera.global_rotation.y) # Remove me and see what happens!

	if input_dir:
		model.rotation.y = lerp_angle(model.rotation.y, atan2(-direction.x, -direction.z), ANGULAR_VELOCITY * delta) # Change me to `model.rotation.y = atan2(-direction.x, -direction.z)` and see what happens!

	if not direction and is_on_floor():
		current_state = PlayerState.IDLE
	elif direction and is_on_floor():
		current_state = PlayerState.RUNNING
	else:
		if velocity.y > 0:
			current_state = PlayerState.JUMPING
		else:
			current_state = PlayerState.FALLING
	update_animation()

func _physics_process(delta: float) -> void:
	if not is_on_floor():
		velocity.y -= gravity * delta

	if Input.is_action_just_pressed("jump") and is_on_floor():
		velocity.y = JUMP_VELOCITY

	if Input.is_action_just_released("jump") and velocity.y > 0:
		velocity.y *= 0.25

	if direction:
		velocity.x = direction.x * SPEED
		velocity.z = direction.z * SPEED

	else:
		velocity.x = 0
		velocity.z = 0
	move_and_slide()

func update_animation() -> void:
	if is_on_floor():
		did_jump_anim = false
		did_fall_anim = false
	if current_state == PlayerState.RUNNING:
		animations.play("walk")
	if current_state == PlayerState.IDLE:
		animations.play("idle")
	if current_state == PlayerState.JUMPING and not did_jump_anim:
		animations.play("jumping")
		did_jump_anim = true
	if current_state == PlayerState.FALLING and not did_fall_anim:
		animations.play("falling")
		did_fall_anim = true
Breaking Down the Player Script
-
The first handful of lines sets up globals needed throughout the script. The only notable thing here is the
PlayerStateenum. An enum is a datatype that can be one of a set of predefined states. In this case, there are defined states for being idle, running, jumping and falling. Thecurrent_statevariable can therefore be in one of those states at a given time. -
The
_processfunction is a callback that is called many times per second, and is used for general game logic. The frequency that this function is tied to the framerate, but since that can fluxuate depending on PC specs and how intensive the game is, it also provides an arguement. Thedeltaargument is a float that describes how long ago in seconds the_processfunction was previously called. This is used to normalize game bevahiors across PCs and when the framerate changes. -
In it, the player input is read (specifically a vector from the WASD keys), is applied to the player's basis, rotated in relation to the camera, then stored for later. Then the player model is rotated along the y-axis in accordance with the direction of input. Note that the direction is smoothed out with
lerp_angleto prevent snapping. Finally some conditions related to the player being on the floor, and whether the player is rising or falling to correctly set the animation state. -
The
_physics_processfunction is a callback that unlike_processis guaranteed to run at regular intervals, which makes it suitable for physics operations. In it, the following logic is done:- Player is in the air? → Apply gravity to the player
- Player is on the ground and has hit the jump button? → Give the player an upward force
- Player is rising in the air and has let go of the jump button? → Slow down the player's velocity
- Is the direction calculated in
_processnonzero? → Apply it to the X and Z axes of velocity - Finally, the
move_and_slidefunction is called, which applies the set velocity to the Player's physics object in the game world, accounting for collisions and other forces.
-
The
update_animationfunction is not a callback, but is called at the end of the_processfunction after the player state is set. Depending on the player's current state, it plays the relevant animation. Theplayfunction does not restart the same animation if it is already playing, so this setup effectively loops animations. Note the extra logic needed for jumping and falling in order to play those animations once per cycle.Try changing the lines with comments in the code. You might get a better idea of what exactly they do.
Let's move on to making props.